background image

Ge

Sp

Fr

I t

Sw

      WARNUNG!
Verwenden Sie Handschuhe beim 
Kettenschärfen.

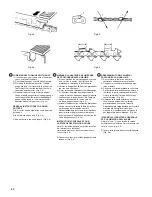
  1. Kopfplatte
  2. Anschneidecke 
  3. Seitenplatte 
  4. Kehle
  5. Ferse
  6. Grundplatte 
  7. Nietbohrung 
  8. Zehe
  9. Tiefenlehre
10. Korrekter Winkel an der Kopfplatte (je nach
      Kettentyp unterschiedlich)
11. Leicht hervors tehender "Haken" bzw.
      Spitze (bei anderen Typen u. U. abgerundet)
12. Korrekter Höhenunterschied zwischen
      Kopfplatte und oberstem Punkt der Tiefenlehre
13. Abgerundetes Stirnende der Tiefenlehre

SCHÄRFEN DER KETTE Schneidzahnteile 
(Fia. 4-1, 2)

      VARNING!
Använd skyddshandskar när kedjan skärpes. 

   1. Skovelplan 
   2. Skärhörn 
   3. Sidoplan 
   4. Gap
   5. Bakre bäryta 
   6. Skärlänk
   7. Nithål
   8. Främre bäryta
   9. Underställningsklack
 10. Korrekt vinkel för skovelplanet (gradantalet
       beror på typen av kedja) 
 11. Utstickande hörn eller punkt (kurva på
       kedjetyp utan mejselskär)
 12. Toppen av ryttaren på korrekt höjd under
       skovelplanet
 13. Framändan av underställningsklacken
       avrundad

SKÄRPNING AV KEDJAN 
Skärtandsdelar (Fig. 4-1, 2)

      ATTENTION!
Vous devez toujours porter des gants de 
protection lorsque vous affûter la chaîne.

  1. Platine supérieure 
  2. Gouge
  3. Platine latérale 
  4. Goulet
  5. Semelle arrière 
  6. Châssis
  7. Trou de rivet 
  8. Semelle avant
  9. Limiteur de profondeur
10. Angle correct de la platine supérieure (le 
     degré de l'angle dépend du type de chaîne)
11. "Coin" légèrement saillant (courbe sur les
      chaînes sans maillon-gouge)
12. Partie supérieure du limiteur de profondeur
      (sa hauteur correcte doit être inférieure à
      celle de la semelle supérieure)
13. Partie frontale arrondie du limiteur de
      profondeur

Affûtage de la chaîne
Les différentes parties d'un maillon-gouge 
(Fig. 4-1, 2)

44

En

Fig.4-1

Fig.4-2

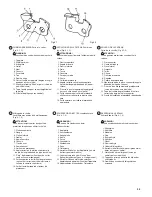
      WARNING!
Gloves should be used when sharpening chain.

  1. Top plate
  2. Working corner 
  3. Side plate
  4. Gullet 
  5. Heel
  6. Chassis 
  7. Rivet hole 
  8. Toe
  9. Depth gauge
10. Correct angle on top plate (degree of angle
      depends on chain type)
11. Slightly protruding "hook" or point (curve on
      non-chisel chain)
12. Top of depth gauge at correct height below
      top plate
13, Front of depth gauge rounded off

CHAIN SHARPENING Parts of a cutter. 
(Fig. 4-1, 2)

      ATTENZIONE!
Indossate del guanti durante l'affilamento della 
catena.

  1. Piastra superiore
  2. Angolo di lavoro
  3. Piastra laterale
  4. Gola
  5. Tacco
  6. Ossatura
  7. Foro per chiodo
  8. Punta
  9. Calibro di profondità
10. Angolo corretto sulla piastra superiore 
      (i gradi dell'angolo dipendono dal tipo di
      catena)
11. "Gancio" o punta leggermente sporgente
      (curva su catene non a scalpello)
12. Parte superiore del calibro di profondità
      all'altezza corretta sotto la piastra supe- 
      riore
13. Parte anteriore del calibro di profondità
      arrotondata

AFFILATURA DELLA CATENA Parti di una 
lama (Fig. 4-1, 2)

      ATENCIÓN!
Utilice guantes protectores cuando afile la 
cadena.

  1. Placa superior
  2. Canto de trabajo 
  3. Placa lateral
  4. Garganta
  5. Talón
  6. Chasis
  7. Orificio de remache 
  8. Reborde
  9. Calibre de profundidad
10. Ngulo correcto de la placa superior (el ángulo
      depende del tipo de cadena) 
11."Gancho" o punto ligeramente protuberante
      (curva de la cadena no biselada)
12. Tope del calibre de profundidad a la altura
      correcta debajo de la placa superior
13. Frente del calibre de profundidad redondeado

AFILADO DE LA CADENA 
Parte de la cuchilla (Fig. 4-1, 2)

Содержание ECS-3300

Страница 1: ...er s manual Manuel d utilisation Manuale uso e manutenzione Bedienungsanleitung Manual del propietario Instruktionsbok En Fr It Ge Sp Sw ECS 3300 3350 ECS 3301 3351 TCS 3300S 3301S 970 42946 201 2005...

Страница 2: ...e Die in der Bedienungsanleitung und an der Maschine angegebenen Warnungstexte and Anweisungen sind zu lesen und zu befolgen Lea comprenda y siga todas las advertencias y dem s instrucciones de este m...

Страница 3: ...erra con ambas manos con el dedo pulgar firmemente trabado alrededor de la manija frontal Anv nd aldrig maskinen med ena handen H ll maskinen stadigt med de b da h nderna med tummen runt det fr mre ha...

Страница 4: ...Ger t starten und die Vergasereinstellung pr fen Siehe Wartung Vor dem Gebrauch Ihres neuen Ger ts Fr Description Pr cautions et consignes de s curit Montage Utilisation Entretien Caract ristiques 2...

Страница 5: ...ndle 7 Fuel tank cap 8 Choke control knob 9 Priming pump optional 10 Guide bar 11 Saw chain 12 Front hand guard 13 Throttle lock 14 Chain brake optional 15 Spiked bumper 16 Chain catcher 17 Guide bar...

Страница 6: ...efore felling a tree the operator must be accustomed to the sawing techniques of the chain saw Be sure of pre plan a safe exit from a falling tree While cutting hold saw firmly with both hands with th...

Страница 7: ...spingerla verso il pignone 3 il pi possibile Assicurarsi che il perno del bullone di regolazione della tensione catena 4 entri nel foro sulla barra 5 Fig 1 2 NOTA Spostare leggermente la lama indietro...

Страница 8: ...so tra 0 5 e 1 mm circa IMPORTANTE UNA TENSIONE ADEGUATA ESTRE MAMENTE IMPORTANTE Fig 1 4 5 8 Sollevare l estremit della lama e serrare a fondo il dado di fissaggio della lama della catena con la chia...

Страница 9: ...ais faire le plein lorsque le moteur est en fonctionnement Desserrer lentement le bouchon du r servoir de carburant 1 pour effectuer le remplissage afin de laisser chapper une surpression ventuelle Se...

Страница 10: ...ecrease the quantity and turn it clockwise to increase the quantity Fig 2 1C Do not try to turn the screw beyond level marks Fig 2 1B Fig 2 1C Ketten l Fig 2 1B Mit Ketten l auff llen 2 Stets l bester...

Страница 11: ...a posizione di avviamento 3 Tirare la manopola della valvola dell aria nella posizione di chiusura 4 Fig 2 3 4 Tirare l avviatore autoavvolgente rapida mente facendo attenzione a tenere salda mente l...

Страница 12: ...rst gasreglaget och d refter gasreglagesp rren l ngsamt D l ses gasreglaget i startl get 3 Drag chokereglaget till choke l ge 4 Fig 2 3 4 Drag snabbt i starthandtaget Var noga med att h lla fast hand...

Страница 13: ...Do not carry the machine with the engine running Stopping Fig 2 6 Decrease engine speed and push ignition switch to stop position Fig 2 5 Fig 2 6 Gebrauch der Kettenbremse Extrazubeh r Fig 2 5 Die Ket...

Страница 14: ...result in serious personal injury Even though your saw has safety built into its design you should not rely on these safety features exclusively Know where your bar tip is at all times Kickback does o...

Страница 15: ...risque de forcer l arbre s abattre dans une direction impr vue pouvant entra ner des d g ts mat riels ou des blessures corporelles IMPORTANT Ne jamais utiliser votre tron onneuse comme levier ou pied...

Страница 16: ...parte superiore della catena la forza reattiva spinger la motosega verso l operatore allontanandola dal legno che si sta tagliando Fig 2 7C ATTENZIONE C il rischio di contraccolpi se la motosega vien...

Страница 17: ...le condizioni del vento ostacoli entro il raggio dell albero ad esempio altri alberi fili dell elettricit strade edifici etc ATTENZIONE Osservare sempre le condizioni generali dell albero Controllare...

Страница 18: ...a di restare bloccata nel taglio di abbattimento nel caso in cui l operatore dovesse aver sbagliato a valutare la direzione della caduta Accertarsi che nessuna persona si trovi nel raggio dell albero...

Страница 19: ...ontrollo provocando lesioni Fig 2 7G Stare in piedi sul lato sinistro del fusto Mantenere un punto d appoggio sicuro per i piedi e appoggiare la motosega sul fusto Tenere la motosega vicino a s in mod...

Страница 20: ...osega verso di s facendo seguire il procedimento precedente Fig 2 7J Se il tronco giace al suolo fare un taglio di alesatura per evitare di tagliare nel terreno Completare con un taglio dal fondo Fig...

Страница 21: ...e con un taglio dall alto Fig 2 7M ATTENZIONE PERICOLO DI CONTRACCOLPI Non tentare di fare un taglio di alesatura se non si ha una preparazione appropriata Un foro di alesatura comporta l uso della pu...

Страница 22: ...au moteur de tourner sans variation de r gime dans toutes les positions ce qui assure une marge de s curit avant la mise en rotation de la cha ne Si le ralenti ne peut tre r gl de mani re obtenir l a...

Страница 23: ...must regularly be replaced with a new one A Fig 3 2 Filtre air Fig 3 2 Le filtre air 1 ainsi que l ponge du filtre air 3 doivent tre nettoy s r guli rement afin d liminer toute trace de poussi re ou d...

Страница 24: ...d starting difficulties If the engine is low on power difficult to start or runs poorly at idling speed always check the spark plug first If the spark plug is dirty clean it and check the electrode ga...

Страница 25: ...bile Barra catena Fig 3 5 Prima di usare l attrezzo pulire la scanalatura e il bocchettone dell oliatore 1 della lama con lo speciale utensile disponibile come accessorio opzionale Carter laterale Fig...

Страница 26: ...eitengeh use Fig 3 6 Das Seitengeh use und den Bereich um die Antriebsmechanik regelm ig von S gemehl und Schmutzteilchen befreien Diesen Bereich von Zeit zu Zeit mit l oder Fett schmieren um Rostbild...

Страница 27: ...ti le alette del cilindro e il carter della ventola Ogni 100 ore di impiego oppure una volta all anno pi frequentemente se le condizioni lo richiedono pulire le alette e le superfici esterne del motor...

Страница 28: ...rtie frontale arrondie du limiteur de profondeur Aff tage de la cha ne Les diff rentes parties d un maillon gouge Fig 4 1 2 44 En Fig 4 1 Fig 4 2 WARNING Gloves should be used when sharpening chain 1...

Страница 29: ...Place depth gauge tool on cutter If depth gauge projects file it level with the top of the tool Always file from the inside of the chain toward an outside cutter Fig 4 3 4 Round off front corner to ma...

Страница 30: ...G ANGLES FOR SHARPENING SAW CHAIN Fig 4 7B Fig 4 7 6 Limer suffisamment pour liminer tous les d g ts survenus au tranchant des lames platine sup rieure 1 et platine lat rale 2 du maillon gouge Fig 4 7...

Страница 31: ...fixant le filtre air Entretien hebdomadaire Contr ler le lanceur sa corde et son ressort de rappel Nettoyer ext rieurement la bougie D monter la bougie d allumage et contr ler l cartement des lectrod...

Страница 32: ...Guide bar length cm Chain pitch mm Chain gauge mm Sound pressure level dB A by IS07182 Sound power level dB A by IS09207 Vibration level m s2 by IS07505 Front handle Rear handle En MODEL ECS 3300 3301...

Страница 33: ...dei tempi 1 3 minimo 1 3 piena potenza 1 3 velocit di corsa Nota Le specifiche possono subire modifiche senza preavviso per miglioramenti tecnici Der quivalente Ger uschpegel Schwingungspegel errechn...

Страница 34: ...ent Vicepresidente Stellvertretender Vorsitzender Vicepresidente Manufactured at Chiba Japan Fait Luogo Erstellt in Fabricado en Signature Signature Firma Unterschrift Fimado Position Function Incaric...

Страница 35: ...de cabezal de fuerza motriz de barra y de cadena seg n las normas de la ANSI B175 1 1991 Los n meros indicados bajo el encabezamiento llamado TANAKA son conjuntos corrientes para sierras de cadena nue...

Отзывы: