


4.6.1
Problems with the print
quality
Print is too pale
1. The print head to platen gap is not correctly set, refer to the reference manual on
CD-ROM, section Setting the print head gap.
For printers with the AGA = ON:
Enter a correction value in a range from 0 to -10. See the reference manual on
CD-ROM, section Setting the print head gap.
2. The ribbon is used up or the ribbon cassette is not correctly fitted. Refer to the
reference manual on CD-ROM, section Changing the ribbon cassette.
Smudged print
1. The ribbon is damaged (e.g. frayed). Change the ribbon as described in the
reference manual on CD-ROM, section Changing the ribbon cassette
.
2. The print head gap is too small, increase the gap. See the reference manual on
CD-ROM, section Setting the print head gap.
For printers with the AGA = ON:
Enter a correction value in a range from 0 to -10. See the reference manual on
CD-ROM, section Setting the print head gap.
Prints undefined
characters
1. Check that the interface plug is correctly connected to the computer and to the
printer.
2. Check that the proper emulation and the correct character set (country, CG table
or character set) is selected in the Setup menu.
3. Check the length of the interface cable (see the reference manual on CD-ROM,
chapter Technical specifications).
The first line is not
completely printed out at
the top
Check the function FormAdj. Refer to the reference manual on CD-ROM, chapter
The menu, section Menu description table and chapter Operation, section Setting
the first printing line.
Dots within characters are
missing
1. Check whether the ribbon is damaged, if necessary replace it (see the reference
manual on CD-ROM, section Changing the ribbon cassette).
2. Set the correct print head gap.
3. Check whether the platen is damaged.
4. Check whether the print head is damaged.
In case of points 3 or 4, please contact your dealer.
Please use original ribbon cassettes only.
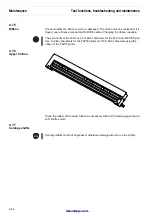
Test functions, troubleshooting and maintenance
Troubleshooting
4-17
Содержание T2150 SprintPro
Страница 2: ...This page intentionally left blank manuals4you com manuals4you com ...
Страница 8: ...This page intentionally left blank manuals4you com manuals4you com ...
Страница 24: ...This page intentionally left blank manuals4you com manuals4you com ...
Страница 50: ...This page intentionally left blank manuals4you com manuals4you com ...
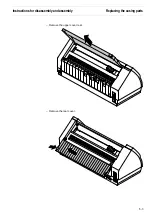
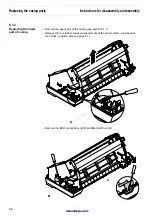
Страница 59: ... Pull out the printhead carefully Instructions for disassembly and assembly Replacing the print head 5 9 ...
Страница 90: ...This page intentionally left blank manuals4you com manuals4you com ...
Страница 92: ...6 1 1 Housing Panel a Printer Spare parts and schematics 6 2 manuals4you com manuals4you com ...
Страница 94: ...6 1 2 General Arrangement sheet 1 Printer Spare parts and schematics 6 4 manuals4you com manuals4you com ...
Страница 98: ...6 1 4 Power supply 120 230 V 448 473 Printer Spare parts and schematics 6 8 manuals4you com manuals4you com ...
Страница 115: ...This page intentionally left blank Spare parts and schematics Optional automatic sheet feeder rear ASF R 6 25 ...
Страница 121: ...STOP Spare parts and schematics Interface adapter cpl 6 31 ...
Страница 122: ...This page intentionally left blank manuals4you com manuals4you com ...