PAGE
11
Section 2
•
Connecting the System
WINDOW EMITTER 1
WINDOW EMITTER 2
WINDOW EMITTER 3
WINDOW EMITTER 4
WINDOW EMITTER 5
WINDOW EMITTER 6
SOURCE 1
LOOP OUT
SOURCE 2
LOOP OUT
SOURCE 3
LOOP OUT
SOURCE 4
LOOP OUT
SOURCE 6
LOOP OUT
SOURCE 5
LOOP OUT
LINK
ETHERNET
Multi-room Controller
6
1
2
7
8
3
4
10
11
12
14
13
5
9
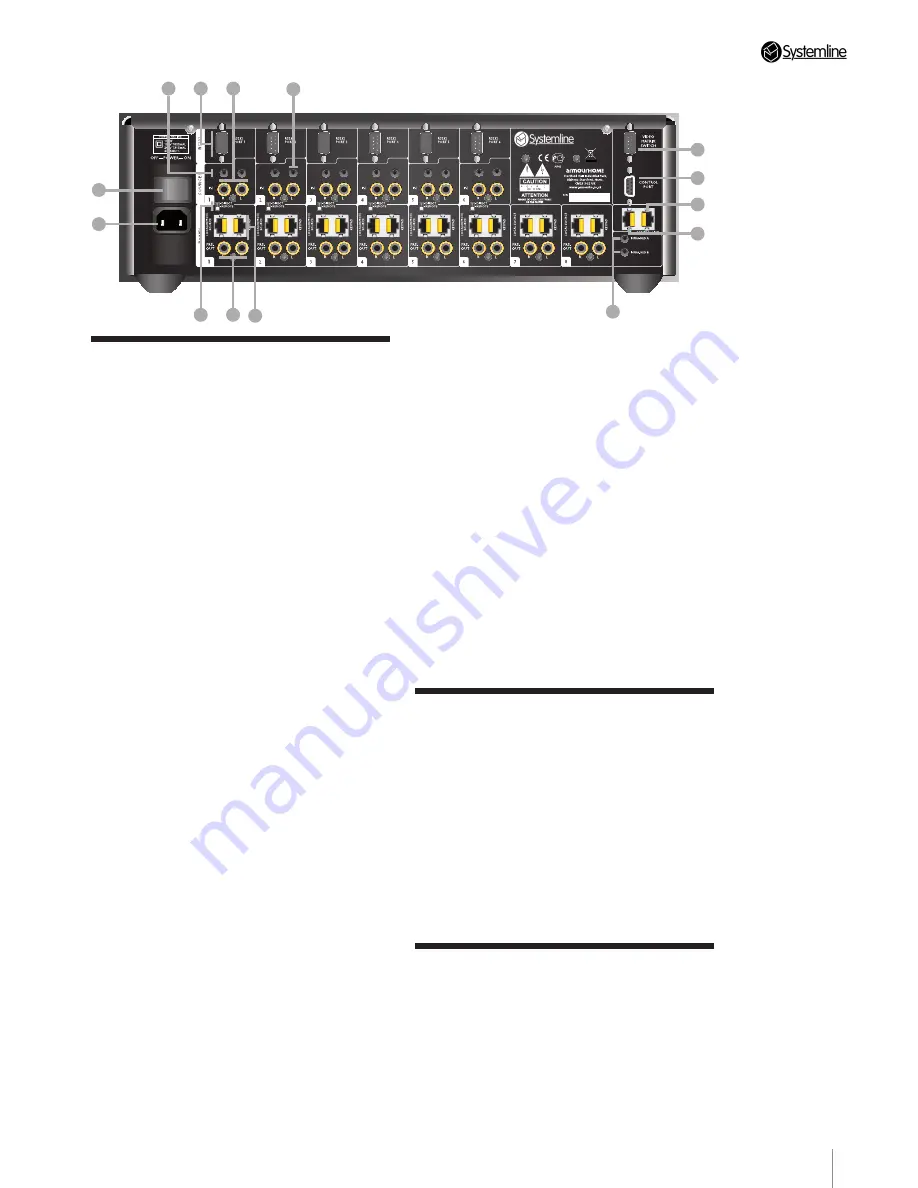
2.8 Rear Panel Connections
1.
Mains Power
– ON\OFF switch.
2.
IEC Mains Inlet
3.
Direct/Remote Switch
– when set to
‘Direct’, the source available to the system is
that connected to the Phonos.
When set to ‘Remote’, the source located in
the zone (via CAT5 cable) is available.
Note:
IR is unaffected by this switch.
4.
Analog audio outputs
– phono
connectors from the 8 Zones to Power
Amplifiers.
5.
Keypad
– RJ45 for connection to the
keypad in the Zone.
6.
IR Window Emitter
– 3.5mm jacks for
connecting window emmitters to the 6
sources. An emitter may not be necessary if
a source is to be controlled via RS232.
7.
RS232 ports
– can be used to control
audio sources or can be used to control
other devices such as lighting controllers.
8.
Analog audio inputs
– phono connectors
from the 6 Sources.
9.
Loop analogue audio output
– The audio
loop out allows audio inputs to be connected
to a second S6.2 controller using a jack
to phone cable. Only available if using the
phono audio input sockets.
10.
IR Output
– 3.5mm jacks for driving
Window Emitters. Signal is ‘Global’ IR – all
zones added together.
11.
Video Matrix RS232 port
– for control
of an Armour 4X8 HDMI matrix or Kramer
matrix.
12.
Control RS232 port
– external control
systems such as KNX and Lutron can
control each of the 8 zones using the S6.2
RS232 control protocol available from www.
systemline.co.uk.
Note:
Only control of the audio zone is
possible through this port, no external RS232
device control such as iPort or Music server
can be accessed
13.
Ethernet RJ45 socket
– This must
be plugged into a suitable network switch
or router in order to configure and upload
software into the S6.2 Controller.
14.
Link RJ45 socket
– This is used if two
S6.2 Controllers are used in one system, a
standard patch cable is needed for this link.
2.9 Switching on the S6.2
Controller
Note:
All wiring should be completed before
switching on the S6.2 Controller.
When ready, switch on the S6.2 Controller at
the rear panel.
After a short power-up delay, the S6.2
Controller will show all zones on standby and
the standby LED showing red.
2.10 Installation of Sources,
Lighting Controls and
Other Units
Refer to the installation and operating
instructions of the respective equipment for
other parts of the system.
Содержание S6.2
Страница 1: ...S6 2 Controller S6 2 Controller Installation Guide...
Страница 21: ......
Страница 22: ......
Страница 23: ......


