background image

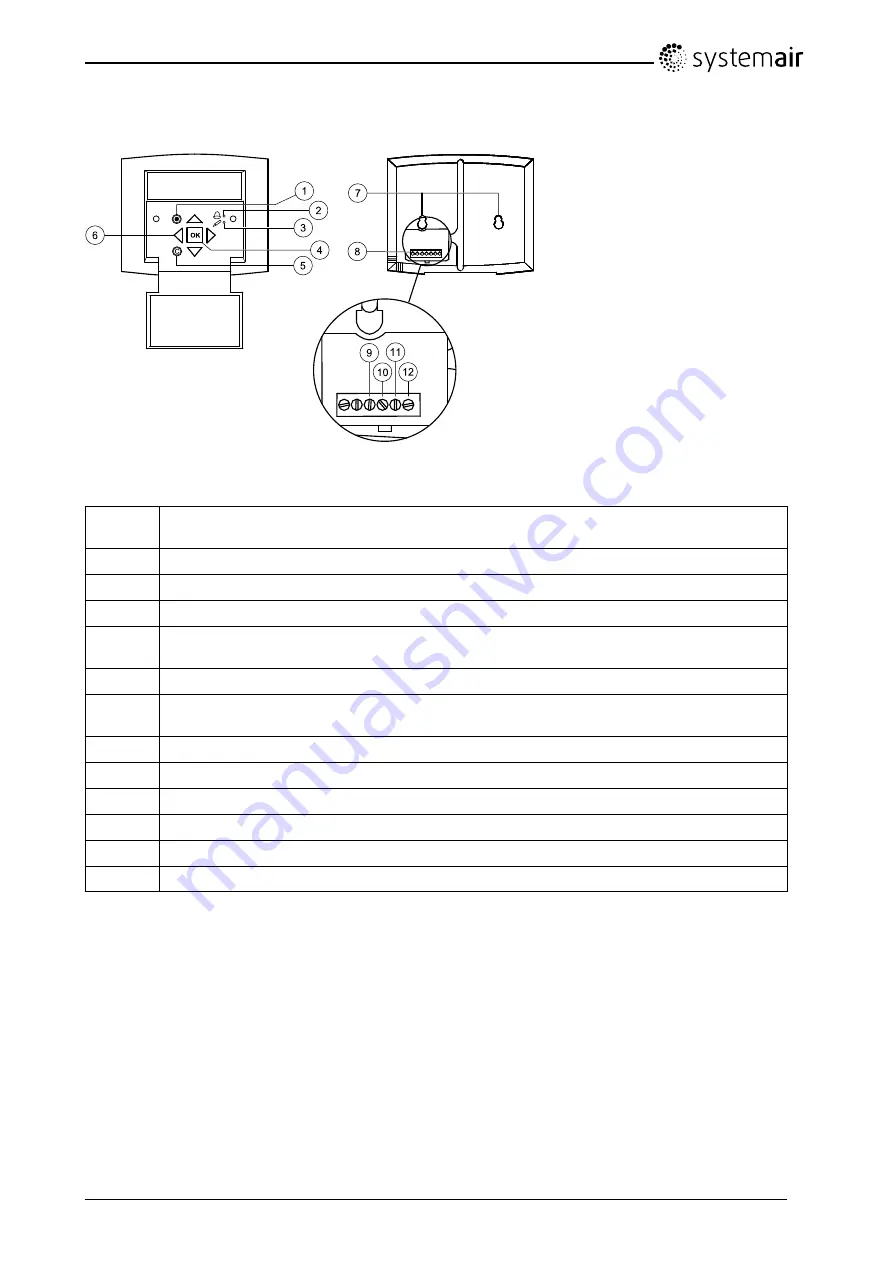
5.1.1 Operating the control panel

Fig. 5 The control panel

Posi-

tion

Explanation

1

Alarm button: Gives access to the alarm list.

2

Alarm LED: Indicates alarm by flashing red light.

3

Write LED: Indicates by flashing yellow light that parameters can be set or changed.

4

OK button: Press this button to be able to change or set parameters whenever possible. Also
used to move between changeable parameters in one dialogue window frame.

5

Cancel button: Used to abort a change and return to the initial setting.

6

Right/Left & Up/Down buttons: Used to move up, down, left & right in the menu tree. Up/Down
buttons are also used to increase or decrease values when setting or changing parameters.

7

Mounting holes.

8

Connection block.

9

Connection to brown cable.

10

Connection to yellow cable.

11

Connection to white cable.

12

Connection to black cable.

5.1.1.1 Navigating the menus

The start display (the display normally shown) is at the root of the menu tree. Pressing DOWN will move
you through the menu options. UP will move you back through the options. To enter a higher menu level,
use UP or DOWN to place the cursor at the menu you wish to access and press RIGHT. If you have
sufficient log on privileges the display will change to the menu you have chosen.

At each level there may be several new menus which you move through using UP/DOWN. Sometimes
there are further sub menus linked to a menu or menu item. This is indicated by an arrow symbol at the
right-hand side of the display. To enter a menu, press RIGHT again. To step back to previous menu
level, use LEFT.

TA 450-4500

Operation and Maintenance Instructions

132616

9

Systemair Sverige AB

Содержание TA 1400 HW

Страница 1: ...TA 450 4500 Air Handling Unit Operation and Maintenance Instructions Document in original language 132616 EN_GB 08 12 2015 A001...

Страница 2: ...on 7 4 1 Temperature control possibilities 7 4 2 Heat start 7 4 3 Free cooling 8 5 Interface Description 8 5 1 Control Panel 8 5 1 1 Operating the control panel 9 6 Commissioning 10 6 1 Before startin...

Страница 3: ...ifting device is used Use protective clothing The units electrical connection to the mains supply must be preceded by an all pole circuit breaker with a minimum 3 mm gap Caution If the unit is install...

Страница 4: ...and inspection The motor bearings are lifetime lubricated and maintenance free 3 2 Supply air filter The filter is of bag filter type with filter quality M5 The filter need to be replaced when pollute...

Страница 5: ...ial is stainless steel The electric heating coil has both automatic and manual overheating protection The manual overheat protection is reset by pressing the red button marked RESET inside the connect...

Страница 6: ...450 EL A Speed transformer B Control unit Corrigo C 24V Transformer D Terminal block E Terminal block for power input F Reset button for overheat protection G Circuit breaker TA 450 4500 Operation and...

Страница 7: ...650 2000 EL A Speed transformer B Control unit Corrigo C 24V Transformer D Terminal block E Terminal block for power input F Reset button for overheat protection G Circuit breaker TA 450 4500 Operatio...

Страница 8: ...box TA 1400 4500 HW Fig 4 Connection box TA 1400 4500 HW A Speed transformer B Control unit Corrigo C 24V Transformer D Terminal block TA 450 4500 Operation and Maintenance Instructions 132616 6 Syst...

Страница 9: ...nit The supply air temp sensor is placed in the supply air duct approximately 3m after the unit Compensates for low outdoor temperatures by increasing the supply air temperature with an optional value...

Страница 10: ...e unit goes back to OFF position If the outdoor sensor is not located in the outdoor air inlet duct and a room sensor has been selected the unit will not start free cooling as long as all the temperat...

Страница 11: ...k 9 Connection to brown cable 10 Connection to yellow cable 11 Connection to white cable 12 Connection to black cable 5 1 1 1 Navigating the menus The start display the display normally shown is at th...

Страница 12: ...normal speed Use the OK button to move between changeable parameters and the UP DOWN arrows to see the displayed alternatives Confirm by pressing OK once more Move on down in the menu structure by use...

Страница 13: ...ced speed during Saturdays and holidays It s possible to set 2 periods per day Reduced speed Saturday Holiday Per 1 00 00 24 00 Per 2 00 00 00 00 8 Select Yes or No End Wizard No After finishing the s...

Страница 14: ...ff Running time SAF 0 0 h EAF 0 0 h The time in hours that the motors have been operating SAF Supply air fan EAF Exhaust air fan Selected functions Control function Extract air control Fan control Flo...

Страница 15: ...emp Actual temperature in the chosen control mode Temperature for the chosen control mode If cascade control Max min supply setp Max 30 C Min 12 0 C Set the maximum and minimum allowed supply air temp...

Страница 16: ...inputs can be used to force the unit to start or increase to Normal running although the timer says the running mode should be Off or Reduced If the running time is set to 0 the unit only runs as long...

Страница 17: ...to a manual mode Supply Temperature contr Auto Manual set 0 0 Set the supply air temperature to Auto On or Off Set the output signal between 0 100 The outputs Y1 Y2 and Y3 if in Auto mode will follow...

Страница 18: ...on which choices have been made in the configuration menu some of the possible alternatives may not be displayed Control temp Supply air control P band 33 0 C I time 100 0 sec Set P band and I time fo...

Страница 19: ...ings No Restore user settings No In this menu it is possible to restore all parameters to their factory settings or to the user settings they were saved as earlier Select Yes or No Save user settings...

Страница 20: ...e cooling function Set the lower outdoor night temperature limit for the activation of the free cooling function Set the lower room temperature limit The temperature needs to be above this value for t...

Страница 21: ...ontrol CO2 VOC Control CO2 VOC active Never Type Fan Min time 60 min In applications with varying occupancy the fan speeds can be controlled by the air quality as measured by a CO2 VOC sensor See encl...

Страница 22: ...Not active Min setpoint 12 0 C Max setpoint 30 0 C Set if a external setpoint is used for example a room controller Not active Active Set min allowed setpoint of the external setpoint Set max allowed...

Страница 23: ...from factory to enter service level is 2222 Back to operator level 1111 Log off Log off No Actual level None Log off from system level by changing No to Yes with the OK and UP DOWN buttons Automatic l...

Страница 24: ...nged as necessary New filters can be ordered from Systemair Operation time between filter changes must be re set after filter change see Alarm settings Alarm limits Service alarm in the Control panel...

Страница 25: ...oaked in hot soapy water through the duct via diffuser louver openings or special inspection hatches in the duct system if fitted Note In addition the roof cowl must be checked once a year and cleaned...

Страница 26: ...on Check diffuser louver openings 3 Cold supply air Check set supply air temperature on the control panel Check if overheating thermostat is still alert If necessary reset by pressing the red button m...

Страница 27: ...the specification and production number from the data plate on the unit 1 Item number 2 Production order number 3 Consecutive number 4 Production date 5 Product code product specification TA 450 4500...

Страница 28: ...erves the right to make changes and improvements to the contents of this manual without prior notice Systemair Sverige AB Industriv gen 3 SE 739 30 Skinnskatteberg Sweden Phone 46 222 440 00 Fax 46 22...

Отзывы: