66
MV-1930/1931-06-2021 . © Alle rettigheder forbeholdes Swim & Fun A/S
UK
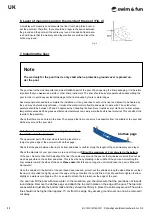
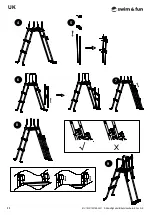
6. Layer of masonry sand on the inside of the pool (Fig. 4)
A small layer of masonry sand prevents the liner from being forced out un-
der the pool wall. Therefore, there should be a layer in the space between
the ground and the pool wall the entire way round. Use debris-free mason-
ry sand. Ensure that the masonry sand layer surface is solid and level the
entire way round.
Fig. 4
7. Installing the liner
Note
The warranty for the pool liner is only valid when a protective ground cover is placed un-
der the pool.
The pool liner is the most important and most
delicate
part of the pool. When opening the liner packaging, it is therefore
important that you
never
use a knife or other sharp instrument. The liner should be kept separate when assembling the
pool in order to avoid any accidental damage to the liner caused by tools or metal edges.
Several people are needed to complete the installation. It is a good idea to set out the liner and allow it to be heated by
the sun’s rays before being unfolded – it makes the material more flexible and easier to work with. The outdoor tem
-
perature should be between 20 and 25 degrees when handling the liner. Never install a very cold liner or a liner whose
temperature exceeds 25 degrees as different temperatures can easily warp the flexible liner material. This can affect the
results of the assembly.
Check that there are no holes in the liner. Then spread the liner out as much as possible from the middle of the pool and
all the way around the pool wall.
Note: Do not wear shoes when spreading the liner from
the middle out to the pool wall!
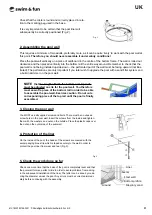
The uppermost part of the liner sides is held in place tempo-
rarily along the edge of the pool wall with clothes pegs.
Check that the seam between the liner’s bottom and sides is uniform along the length of the solid masonry sand layer.
Check the diameter of your pool once more and at this point
fill it with a maximum of 2 cm of water in the bottom
of the pool. No more than that! Adjust/pull the liner the entire way around the pool so that wrinkles are smoothed out as
much as possible on the bottom and sides. This is best done by standing in the middle of the pool and smoothing the
liner outward toward the sides of the pool.
Please note
that this can no longer be corrected once the pool is filled with
more water!
Once the wrinkles in the bottom of the pool have been reduced, smooth out the wrinkles along the sides. Make sure that
the liner is not pulled too tightly up over the edge of the pool before the pool is filled. It is still possible to tighten the liner
slightly at a water level of approx. 30 cm, so wait to attach the top rails over the edge of the pool.
You can now fill the pool with more water. In the meantime, you should ensure that the pool does not lose its
round shape. Remove the clothes pegs and attach the top rail in place on the edge of the pool. The top rails
are assembled just like the bottom rails and they should rest firmly in place the entire way around. The water
-
line should not be higher than approx. 15 cm from the edge. Any excess ground cover can now be removed/
cut away.
Liner
Clothes pegs
Содержание KRETA XL POOL 1930
Страница 8: ...8 MV 1930 1931 06 2021 Alle rettigheder forbeholdes Swim Fun A S DK 4 6 8 5 7 9...
Страница 23: ...MV 1930 1931 06 2021 Alle rettigheder forbeholdes Swim Fun A S 23 SE 4 6 8 5 7 9...
Страница 38: ...38 MV 1930 1931 06 2021 Alle rettigheder forbeholdes Swim Fun A S FI 4 6 8 5 7 9...
Страница 53: ...MV 1930 1931 06 2021 Alle rettigheder forbeholdes Swim Fun A S 53 NO 4 6 8 5 7 9...
Страница 68: ...68 MV 1930 1931 06 2021 Alle rettigheder forbeholdes Swim Fun A S UK 4 6 8 5 7 9...
Страница 83: ...MV 1930 1931 06 2021 Alle rettigheder forbeholdes Swim Fun A S 83 DE 4 6 8 5 7 9...
Страница 98: ...98 MV 1930 1931 06 2021 Alle rettigheder forbeholdes Swim Fun A S NL 4 6 8 5 7 9...
Страница 113: ...MV 1930 1931 06 2021 Alle rettigheder forbeholdes Swim Fun A S 113 PL 4 6 8 5 7 9...
Страница 122: ......
Страница 123: ......

