background image

8

Installation-Assembly Procedures

Attaching Gas Springs

1.

The gas springs are shipped with lock-

ing clips installed. These clips must be
removed before gas springs can be
installed on the bed.

2. 

With a helper holding the canopy

open, align open ends of gas spring ball
joints with pivot studs and push into
place. Be sure spring cylinder is in up
position as shown. Reinstall locking clips.
Repeat on other side. DO NOT lower
canopy until both gas springs are
installed! Failure to install locking clips
may result in the gas springs working
loose, allowing the canopy to fall, which
may cause serious injury!

3.

Lift and lower canopy a few times to

lubricate gas springs for optimum perfor-
mance.

Your gas springs contain one of these two

types of ends. Remove locking clips as shown

before assembly.

Содержание PRO 24RS

Страница 1: ...M O D E L S P R O 2 4 R S 2 4 R S F 2 4 R S T 2 6 R S 2 6 R S T 22031A A S S E M B L Y A N D U S E R G U I D E ...

Страница 2: ...ay not apply to you No one has authority to change or modify this Limited Lifetime Warranty in any respect To obtain service under the Limited Lifetime Warranty contact ETS Inc at 1 800 228 6292 and ask for the Technical Service Department ETS Inc SHALL NOT BE LIABLE FOR LOSS OF USE LOSS OF TIME INCONVENIENCE RENTAL OR SUBSTITUTE PRODUCTS LOSS OF BUSINESS LOSS OF INCOME OR ANY OTHER INCIDENTAL OR ...

Страница 3: ...ll safety precautions ontents C Safety Information iii Installation 1 Unpacking and Inspection 1 Tools Required 2 Pre Installation Planning 3 Assembly Procedures 4 Making Electrical Connections 9 Operation 10 Before You Tan 10 Exposure Times 10 Using Your Sunbed 11 Care and Maintenance 12 Cleaning After Use 12 Thorough Periodic Cleaning 12 Mechanical Inspection 12 Replacing Lamps 13 Timer Maintena...

Страница 4: ... that period WARNING Read the instructions booklet before using this sunlamp product To use lie down under canopy and pull down as far as adjustment will allow All persons in the room should wear protective eyewear when lamps are on Recommended eyewear provided eyeshields Lucas Products Super Sunnies or Intrexco No 5635 1 or equivalent eyewear as defined under 21 CFR 1040 20 Other types of eyewear...

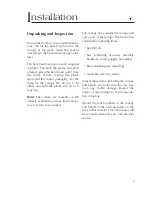
Страница 5: ...lip Note The cartons are reusable in the unlikely event that you may find it neces sary to return your sunbed The canopy box contains the canopy unit and a pair of gas springs The bench box contains the following items Bench Unit Box containing necessary assembly hardware safety goggles and pillow Box containing two stand legs Assembly and User Guide Inspect these items including the canopy and be...

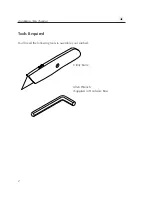
Страница 6: ...2 Installation Tools Required Tools Required You ll need the following tools to assemble your sunbed Utility Knife Allen Wrench Supplied in Hardware Box ...

Страница 7: ...assembly of your sunbed requires three people Plan to have a couple of helpers assist you 3 Pre Installation Planning Before you begin to assemble your sunbed you should observe the following pre installation considerations Installation Pre Installation Planning Your sunbed operates from a 220V AC source You should have an elec trical outlet like the type shown below installed in the room in which...

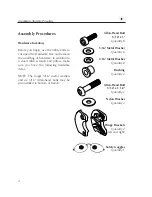
Страница 8: ...ench and pillow make sure you have the following hardware items NOTE The larger 5 16 metal washers and six 5 16 Allen head bolts may be pre installed in bottom of bench Allen Head Bolt 5 16 x 1 Quantity 8 5 16 Metal Washer Quantity 6 5 16 Metal Washer Quantity 2 Bushing Quantity 2 Allen Head Bolt 5 16 x 1 1 2 Quantity 2 Nylon Washer Quantity 2 Hinge Brackets Quantity 2 left and right Safety Goggle...

Страница 9: ...six larger sized 5 16 washers attach the stand legs with the skirt mounting holes toward the back of the bed as shown Install center bolt first You may have to gently push sides of legs in to align holes Tighten with the Allen wrench 2 Turn bench right side up on floor Place so that power cord connector is facing toward wall outlet SKIRT MOUNTING HOLES ELECTRICAL CONNECTOR INDICATES BACK OF BENCH ...

Страница 10: ...Install the hinge brackets to the ends of the bench such that the short boss engages the stud above the bolt hole and the long boss engages the hole below the bolt hole Then secure using the 5 16 x 1 Allen head bolt and 5 16 metal wash er Tighten bolt snug then an additional half turn 2 Place the bushings into the hinge brackets as shown below ...

Страница 11: ...s You may want to use some of the cardboard packing laid across the bench to support the canopy 2 Insert the 5 16 x 1 1 2 bolts with the nylon washers into both hinge brackets Tighten bolts into the endcap threaded inserts until snug then an additional half turn Do not overtighten to avoid damag ing threaded inserts ...

Страница 12: ...d push into place Be sure spring cylinder is in up position as shown Reinstall locking clips Repeat on other side DO NOT lower canopy until both gas springs are installed Failure to install locking clips may result in the gas springs working loose allowing the canopy to fall which may cause serious injury 3 Lift and lower canopy a few times to lubricate gas springs for optimum perfor mance Your ga...

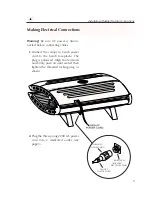
Страница 13: ...h power cord to the bench receptacle The plug is polarized Align the terminals and firmly push on until seated then tighten the threaded locking ring as shown 2 Plug the three prong 220V AC power cord into a dedicated outlet see page 3 THREADED LOCKING RING CANOPY POWER CORD RECEPTACLE ON BENCH ELECTRICAL PANEL Making Electrical Connections ...

Страница 14: ...ooklet on medications that increase sensitivity to light As with all electrical appliances do not operate this device near water or while you are wet Exposure Times We recommend that you tan every other day following the tanning times in the exposure schedule Tanning normally appears after the first few sessions and maximizes after approximately four weeks Tan once or twice per week there after to...

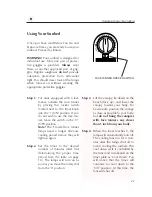
Страница 15: ...s need a longer after use cooling period before they will light up again Step 2 Set the timer to the desired number of minutes after first determining the proper time period from the table on page 10 The lamps will turn on as soon as you move the rotary dial from the 0 position OFF 20 15 10 5 0 C O O L D O W N Step 3 Lift the canopy lie down on the bench face up and lower the canopy toward your bo...

Страница 16: ...the acrylic shields and lamps as described in Replacing Lamps Step 2 With a soft cloth wipe the entire length of each lamp to remove any film buildup Step 3 Clean both sides of the acrylic shields with a non ammonia dis infectant cleaner Step 4 Wipe the reflectors with a clean damp cloth Step 5 Re install the lamps and acrylic shields Mechanical Inspection Your tanning bed has been built for years...

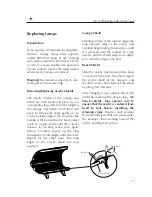
Страница 17: ... strip throughout its full length until removed Repeat for the other strips The long edges of the acrylic shield are now exposed Canopy Shield Standing in front of the sunbed grasp the long exposed edge of the acrylic and carefully begin sliding it toward you until it is removed from the sunbed You may need to pull the shield edge down slight ly to clear the edge of the bed Bench Shield Slide the ...

Страница 18: ...he following lamp types have been certified for use in SunQuest Solariums Application Canopy and Bench Turbo Face Tanner Lamp Model Number Diamond Sun S Wolff Model 71T12100W VelocityTM Wolff Model 71T12100W 24RST only Turbo SunTM S Wolff Model F8 T5 10W Only the following lamp types have been certified for use in SunQuest Solariums Application Canopy and Bench Lamp Model Number Diamond Sun S Wolf...

Страница 19: ...aper towel Ensure that the lamp is firmly seated in the lamp holders RETAINING SCREWS Note Never take hold of the lamp such that your fingers are in contact with the lamp glass Finger oils will greatly reduce the lamp s operational life Step 3 Gently close the face tanner glass casing and lock it closed with the screws Ensure that the screws firmly secure the glass casing Warning Never turn the eq...

Страница 20: ...OT perform these tests with a person in the sunbed Care Maintenance Timer Maintenance Step 1 Obtain an accurate watch capa ble of measuring in seconds Set the timer to its maximum inter val Using the watch time how long the lamps remain on The lamps should shut off within plus or minus 10 of the maximum timer interval Step 2 Set the timer to the maximum time interval Wait ten minutes then turn the...

Страница 21: ...ve Gas springs should hold the canopy fully open as well as allow it to rest fully closed If the canopy is left open for an extended period of time it may creep down This is considered normal Keep the canopy closed when not in use Replace gas springs when they no longer have sufficient power to hold the canopy open when raised 1 Check source of AC power Reset circuit breaker or replace fuse if nec...

Страница 22: ...18 Notes ...

Страница 23: ...QUESTIONS 1 800 228 6292 6270 Corporate Drive Indianapolis IN 46278 2900 Have the following information ready when calling ETS to order parts or service for your bed Date Purchased Canopy Serial Number Bench Serial Number ...

Отзывы: