background image

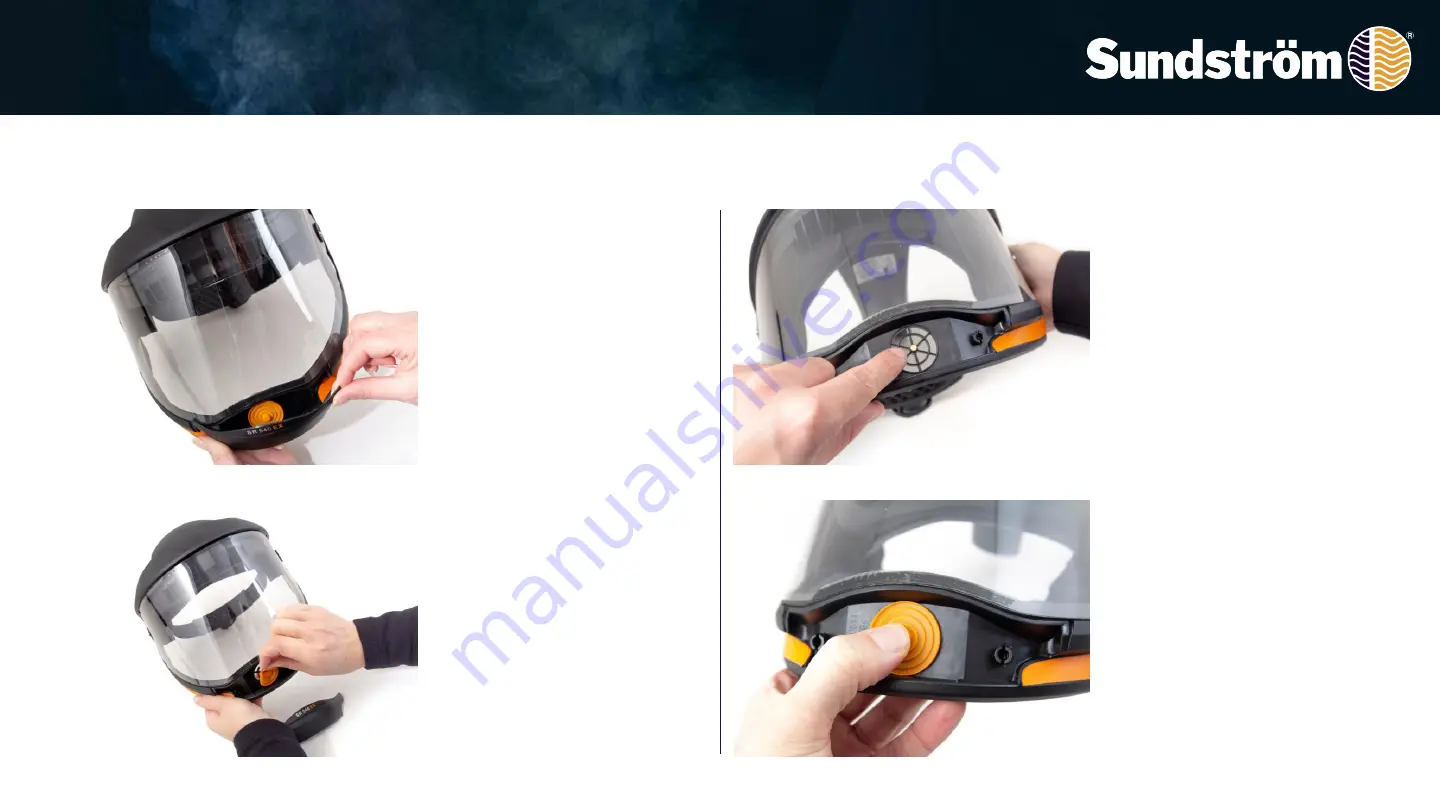
7. Exhalation membrane

2019-10-23

OI06H-6018 SR 540 EX

12

7.1

Snap off the valve cover 

from the valve seat.

7.2

Slip off the membrane.

7.3

Check that the valve seat 

is ok.

7.4

Press the new membrane 

onto the pin. Carefully check 
that the membrane is in 
contact with the valve seat all 
way round. 

Press the valve cover into 
place. A clicking sound 
indicates that it is in place.

Содержание H06-6012

Страница 1: ...2019 10 23 OI06H 6018 SR 540 EX 1 Operating instruction SR 540 EX Revision 02...

Страница 2: ...th the SR 500 EX fan unit in potentially explosive environments SR 540 EX face shield in combination with fan unit SR 500 EX are approved in accordance with EN 12941 1998 class TH3 SR 540 EX in combin...

Страница 3: ...Unpacking SR 540 EX Packing list Face shield Breathing hose User instruction Cleaning tissue 2019 10 23 OI06H 6018 SR 540 EX 3...

Страница 4: ...ing of the hose is in place Check that the flat gasket is ok and in place at the other end 1 2 Connect the end with the flat gasket to the face shield Turn it clockwise about 1 8 of a turn 1 3 Connect...

Страница 5: ...2 Turn the flow meter bag inside out and the flow meter appears 2 3 Place the face shield in the flow meter bag and start the fan Grip the lower part of the bag in order to seal around the hose Grip...

Страница 6: ...eld on If necessary adjust the circumference of the head harness by means of the knob at the rear of the head harness 3 2 If necessary adjust the head harness in height by lengthening or shortening th...

Страница 7: ...has been lowered fully 3 5 Insert a finger between your chin and the face seal and run the finger along the contact surface of the face seal all the way round to check that it fits well against the fa...

Страница 8: ...hem forward with your thumb 4 2 Release the visor by moving the lever of the over centre lock upwards through about 180 degrees And remove the visor 4 3 Remove the protective film from the new visor S...

Страница 9: ...by moving the lever downwards as far as it will go 4 5 Check that the visor is firmly in contact with the visor opening seal all round 4 6 Fit the closing panels by pushing them into place with your f...

Страница 10: ...rom the visor unit holes Remove the face seal 5 3 Thread the new face seal over the visor unit flange with the centre markings in line with one other 5 4 Press the face seal frame down so that the pin...

Страница 11: ...the face seal hooks from the head harness 6 2 Pull the sweatband off 6 3 Fit the Velcro strip with the ruffled side towards the forehead strap and with the relief upwards 6 4 Secure the hooks to the...

Страница 12: ...from the valve seat 7 2 Slip off the membrane 7 3 Check that the valve seat is ok 7 4 Press the new membrane onto the pin Carefully check that the membrane is in contact with the valve seat all way r...

Страница 13: ...opropanol solution for disinfection 8 2 If the equipment is more heavily fouled use a soft brush or sponge moistened with a solution of water and dishwashing detergent or the like Rinse the equipment...

Страница 14: ...for the visor 8 6 Clean around the opening seal 8 7 Clean the seal After cleaning store the equipment in a dry and clean place at room temperature Avoid exposing it to direct sunlight The flow meter c...

Страница 15: ...onal condition Always use genuine Sundstr m parts Do not modify the equipment The use of non genuine parts or modification of the equipment may reduce the protective function and put at risk the appro...

Отзывы: