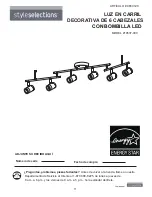
background image

4

E

PREPARATION

Before beginning assembly of product, make sure all parts are present. Compare parts with 

package contents list and hardware contents list. If any part is missing or damaged, do not attempt 

to assemble the product. 

Estimated Assembly Time: 30~60 minutes

Tools Required for Assembly (not included): Ladder, Phillips Head Screwdriver, Flathead

Screwdriver, Wire Cutters, Pliers, Safety Glasses, Drill and 7/32 in. Drill Bit 

Helpful Tools (not included): Wire Stripper, Tape

ASSEMBLY INSTRUCTIONS

AA

x 2

Hardware Used

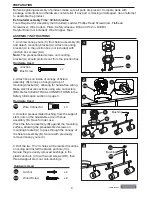
1. Unscrew canopy nuts (C) from fixture assembly (B) 

and detach mounting bracket (A). Attach mounting 

bracket (A) to the junction box (not included) with 

junction box screws (AA).

Note:

 The preassembled screws on mounting 

bracket (A) should protrude out from the junction box.

Junction

Box Screw

AA

A

BB

1

2

3

B

A

A

B

C

4

4. Drill the two 7/32 in. holes at the marked locations 

on ceiling and install the plastic anchors (CC).

Secure the previously removed bushings to the 

plastic anchors (CC) with wood screws (DD), then 

thread support stem nut onto bushings.

Anchor

CC

x 2

Hardware Used

Wood Screw

DD

x 2

CC

DD

Bushing

Bushing

Wire Connector

BB

x 3

Hardware Used

2. Attach hook on inside of canopy of fixture 

assembly (B) to loop on hanging strap of 

mounting bracket (A), allowing for hands-free wiring. 

Make electrical connections using wire connectors 

(BB). Refer to ELECTRICAL CONNECTIONS in the

Safety Information section on page 3. 


3. Unscrew preassembled bushing from the support 

stem nuts on the adjustable arms of fixture 

assembly (B). Save for later use.

Place the fixture assembly (B) against the mounting 

surface, allowing the preassembled screws on 

mounting bracket (A) to pass through the canopy of 

the fixture assembly (B). Secure with previously 

removed canopy nuts (C).


Lowes.com

Содержание 19537-000

Страница 1: ...ITEM 0650120 6 HEAD LED DECORATIVE TRACK LIGHT Fran ais p 6 Espa ol p 11 1 Questions problems missing parts Before returning to your retailer call our customer service department at 1 877 888 8225 8 a...

Страница 2: ...Fixture Assembly B QUANTITY PART DESCRIPTION Fixture Assembly 1 1 2 Canopy Nut preassembled to Fixture Assembly B Junction Box Screw AA BB Wire Connector Qty 3 Qty 2 HARDWARE CONTENTS not shown actual...

Страница 3: ...he supply circuit Connect the green or bare copper colored wire to the grounding conductor of the supply circuit Use U L CSA Listed wire connectors suitable for the size type and number of conductors...

Страница 4: ...n Box Screw AA A BB 1 2 3 B A A B C 4 4 Drill the two 7 32 in holes at the marked locations on ceiling and install the plastic anchors CC Secure the previously removed bushings to the plastic anchors...

Страница 5: ...ted for at a pro rated value Some states do not allow limitations on how long an implied warranty lasts and or the exclusion or limitation of incidental or consequential damages so the above limitatio...

Страница 6: ...0120 RAIL D CLAIRAGE D CORATIF 6 LUMI RES 6 Des questions des probl mes des pi ces manquantes Avant de retourner l article au d taillant appelez notre service la client le au 1 877 888 8225 entre 8 h...

Страница 7: ...ire B Quantit Pi ce Description Luminaire 1 1 2 crou de couvercle pr assembl au luminaire B AA BB QUINCAILLERIE INCLUSE non illustr e la grandeur r elle CC DD Vis bois Qt 2 Lowes com Vis pour bo te de...

Страница 8: ...du luminaire au fil noir du circuit d alimentation Raccordez le fil vert ou en cuivre d nud au conducteur de mise la terre du circuit d alimentation Servez vous de capuchons de connexion homologu s U...

Страница 9: ...ctuer le c blage Effectuez les branchements lectriques en vous servant des capuchons de connexion BB Consultez la mise en garde intitul e BRANCHEMENTS LECTRIQUES des consignes de s curit la page 8 3 R...

Страница 10: ...pla ables est garanti pour une p riode de cinq 5 ans compter de la date d achat initiale Cette garantie ne s applique pas aux pi ces endommag es en raison d un usage inappropri de dommages accidentels...

Страница 11: ...BOMBILLA LED Preguntas problemas piezas faltantes Departamento de Servicio al Cliente al 1 877 888 8225 de lunes a jueves de 8 a m a 6 p m y los viernes de 8 a m a 5 p m hora est ndar del Este Antes d...

Страница 12: ...Y P A R Pieza Descripci n Ensamble de la l mpara 1 1 2 Tornillo de la caja de uni n AA BB Conector de cables Cant 3 CC DD Ancla de expansi n Cant 2 Tornillo para madera Lowes com Tuerca de la cubierta...

Страница 13: ...al conductor blanco del circuito de suministro Conecte el o los conductores negros de la l mpara al conductor negro del circuito de suministro Conecte el conductor verde o de cobre desnudo al conducto...

Страница 14: ...s 4 en el techo e instale las anclas de expansi n de pl stico CC Asegure los conectores que retir previamente en las anclas de expansi n de pl stico CC con tornillos para madera DD y luego enrosque el...

Страница 15: ...ectricida 3 Consulte a un electricista profesional certificado CAUSA POSIBLE PROBLEMA ACCI N CORRECTIVA GARANT A Este producto de estado s lido con calificaci n ENERGY STAR con componentes que no pued...

Отзывы: