


27
M2-H
Description, Care and Maintenance
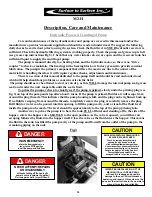
Wash Wand
The M2 is equipped with a pressurized wash wand (Fig.9a) for clearing obstructions and accumulation in the
jetting tee. It is recommended that the jetting tee be cleaned with the wash wand after the introduction of
material into the hopper after each batch.
The wash wand uses the high-pressure fluid from the mixing system piping which can reach pressures of up
to 50psi. CAUTION should always be used when handling the wash wand. A valve is located on the wash
wand to regulate the flow of fluid.
The wash wand is not to be used as a poker or pry bar, but instead use the fluid from it to “wash” away
accumulations. Be careful when putting the wash wand inside the mixing chamber that it does not block the
fluid stream coming out of the nozzle, as it will spray back up the hopper and towards the operator.
The wash wand can also be used to get a fluid sample for testing purposes. An example of this (Fig.9b)
is to check the viscosity of the fluid using a marsh funnel. Simply slow the engine speed down to reduce flow
and pressure, and put the wash wand inside the hopper (with the hopper valve open) and open the small
valve located on the wash wand. Rotate the valve handle to the on position, and let it flow for approx. 15
seconds, close the valve and place the wash wand in the screening area of the marsh funnel. Fill the marsh
funnel to the proper volume, close the valve on the wand, and store back the small hose holder rack. Follow
the instructions of the marsh funnel for the rest of the test.
The sample of fluid taken from the wash wand is the same as the fluid going out of the top discharge of the
filter / shear housing to the drill rig or reservoir tank.
Fig.9a
Fig.9b
CAUTION
DO NOT POSITION
ANY PART OF YOUR BODY
over the hopper, valve,
or mixing tee while cleaning.
WARNING
NEVER USE BODY PARTS,
OR FOREIGN OBJECTS
in an attempt to unplug or clean the
hopper valve or mixing tee.
Serious personal injury or
damage will result.
CAUTION
WHEN THE UNIT
IS IN OPERATION,
the fluid in the piping may reach
pressures up to 50 p.s.i.
Содержание M2-H
Страница 2: ...2 This page left blank intentionally ...
Страница 13: ...13 ...
Страница 18: ...18 M2 H Identifying Your Machine Components Location of Tags and PIN Plates ...
Страница 19: ...19 SECTION II Description Care and Maintenance ...
Страница 31: ...31 SECTION III Set up and Installation of Unit in Detail ...
Страница 33: ...33 SECTION IV Operating the M2 Unit ...
Страница 41: ...41 SECTION V Troubleshooting the M2 Unit ...
Страница 44: ...44 SECTION VI Periodic Maintenance Repair Information ...
Страница 49: ...49 SECTION VII OEM Repair Information ...
Страница 62: ...62 ...
Страница 63: ...63 ...
Страница 64: ...64 ...
Страница 68: ...68 SECTION VIII Parts Manual ...