background image

Accutom-50 
Instruction Manual 


2.


Basic Operations 


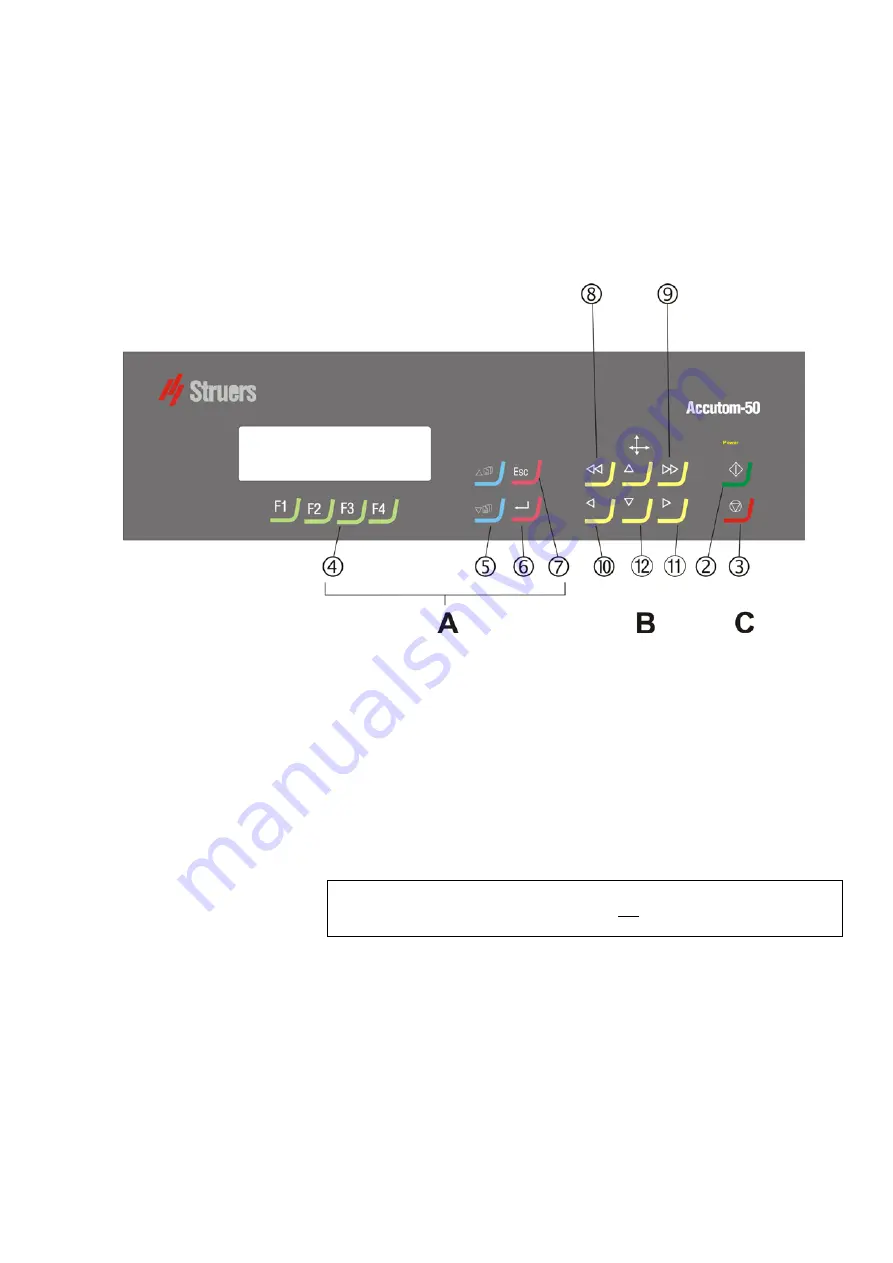
Programming and monitoring functions 

B

  Positioning of the specimen holder 

C

  Start/stop of Accutom-50 


Short Beep:

 when a key is pressed, a short beep indicates that 

the command has been accepted. 


Long Beep:

 a long beep indicates that the key is inactive at that 

moment. 

 
The main switch is located on the back of the machine. 


Using the Controls 
Front Panel Controls 
of Accutom-50 

Groups of Keys 

Acoustic Signals 

Location of Main Switch 

Please Note... 

The contents of the program memory are not lost when the main switch is 

turned off. 

Содержание Accutom-50

Страница 1: ...Manual No 15017001 Date of Release 15 11 2012 Accutom 50 Instruction Manual...

Страница 2: ...with Struers equipment covered by the Instruction Manual Service Manuals Struers Service Manual may only be used by a trained technician authorised by Struers The Service Manual may only be used in co...

Страница 3: ...aw blades or cup wheels 5 Observe the current safety regulations for handling mixing filling emptying and disposal of the additive for cooling fluid 6 The sample must be securely fixed in the specimen...

Страница 4: ...nt marked with a WEEE symbol contain electrical and electronic components and must not be disposed of as general waste Please contact your local authorities for information on the correct method of di...

Страница 5: ...utom 50 9 Groups of Keys 9 Acoustic Signals 9 Location of Main Switch 9 Front Panel Controls 10 Display 11 Reading the Display 12 Changing Editing Values 13 Numeric Values 13 Alphanumeric Values 14 Po...

Страница 6: ...the Sample 27 Positioning the Sample 27 Setting the Grinding Parameters 28 Cup Wheel 28 Speed 28 Y Feed 28 Sweeps 28 X Inc 28 Water 28 Rotation 29 Removal Mode 29 Starting the Grinding 31 During Grin...

Страница 7: ...y 2 5 mm 1 Allen key 3 mm 1 Allen key 4 mm 1 Allen key 5 mm 2 Screws M4x20 2 Screws M4x35 1 Set of Instruction Manuals Accutom 50 should be placed on a stable and plane tolerance 1 mm table The table...

Страница 8: ...red Setting 230 or 240V 240V 200 to 220V 200V Note The two additional settings 110V and 120V are not to be used Reinsert the voltage switch Put the fuse holder back into the cable terminal Supplying P...

Страница 9: ...e on 3 phase power connections If the plug supplied on this cable is not approved in your country then the plug must be replaced with an approved plug The leads must be connected as follows Green eart...

Страница 10: ...at the end of the inlet tube has dropped into position Recirculation Unit IMPORTANT Always ensure that there is sufficient water in the tank as the recirculation pump will be damaged if it is running...

Страница 11: ...display to appear should be the MAIN MENU If the heading in the display is different press Esc until the MAIN MENU appears A long beep can be heard The MAIN MENU is the highest level in the menu stru...

Страница 12: ...nu OPTIONS Language ENGLISH X retract OFF Contrast 40 No of final grinding sweeps 15 F1 DEFAULT VALUE Press ENTER to activate the LANGUAGE Menu LANGUAGE ENGLISH DEUTSCH FRAN AIS ESPA OL Press MENU UP...

Страница 13: ...short beep indicates that the command has been accepted Long Beep a long beep indicates that the key is inactive at that moment The main switch is located on the back of the machine Using the Control...

Страница 14: ...the X direction in steps of 100 m Keep the key pressed to increase the speed FUNCTION KEYS F1 F2 F3 F4 Controls for various purposes See the bottom of the individual screens POSITION LEFT Changes to P...

Страница 15: ...PTY METHOD 11 EMPTY METHOD 12 EMPTY METHOD F1 COPY F2 INSERT F3 RESET F4 RENAME A Heading B Inverted text Cursor C Function key options D Arrow indicates that there are more lines in the picture Displ...

Страница 16: ...ll change the screen to the following X POSITIONS Absolute Position 15 255 mm Relative Position 5 000 mm F1 RESET F2 ADD F3 MOVE TO REL ZERO F2 ADD is only available in cutting methods Pressing one of...

Страница 17: ...d Cutting Method 1 EMPTY METHOD Wheel B0D15 Speed 2700 rpm Feed 0 100 mm s Force MEDIUM Rotation OFF Water ON F1 MULTI CUT Press ENTER to edit the value Two square brackets appear around the value Cut...

Страница 18: ...the value A submenu appears CUT OFF WHEELS M0D08 M1D08 M0D10 M1D10 M0D13 M1D13 B0D13 B0C13 50A13 30A13 SAW13 M0D15 M1D15 E0D15 B0D15 B0C15 50A15 40A15 10S15 30A15 USER 1 USER 2 USER 3 USER 4 USER 5 U...

Страница 19: ...setting it to zero calculation of the sample movement close to the cut off wheel or cup wheel is made easier The screen value always relates to the distance the specimen holder has travelled since be...

Страница 20: ...o go back to the Main Menu To go back to the Main Menu Esc Press Esc until the MAIN MENU display appears A long beep can be heard MAIN MENU CUTTING METHODS GRINDING METHODS MANUAL FUNCTIONS CONFIGURAT...

Страница 21: ...EMPTY METHOD 11 EMPTY METHOD 12 EMPTY METHOD F1 COPY F2 INSERT F3 RESET F4 RENAME If you selected GRINDING METHODS the screen will look as follows SELECT GRINDING METHOD 1 EMPTY METHOD 2 EMPTY METHOD...

Страница 22: ...e parts off Mount the new cut off wheel and remount the outer flange with the machined face towards the inner flange Insert the locking pin in the hole in the inner flange Gently fasten the flange scr...

Страница 23: ...eset the relative position in both X and Y direction by pressing F1 when in the respective screens Set the stop position to define the length of the cut There are two ways of setting the stop position...

Страница 24: ...5000 rpm in steps of 100 rpm The default values for all Struers cut off wheels are already saved together with the wheel definitions Whenever a different cut off wheel is selected the recommended spe...

Страница 25: ...efined number of slices includes the reference slice If the programmed number and thickness of slices exceeds the possible number of slices Accutom 50 will automatically tell you how many slices can b...

Страница 26: ...setting should be on Before you start cutting make sure that the cutting chamber is clean to ensure a free flow of cooling water The debris collecting tray must be free of removed material and other...

Страница 27: ...o retract the sample from the cut off wheel This can be done by pressing the POSITION DOWN key The forward movement of the sample is stopped and the sample moved backwards until the key is released ag...

Страница 28: ...ny time during operation by pressing the STOP To avoid stopping the process while the cut off wheel still is in the sample press the POSITION key for the Y direction and then press F2 SET STOP The sam...

Страница 29: ...k is used for the first time it has to be connected to a vacuum pump Accutom 50 is prepared for the connection through a lead in bushing into the cutting chamber Remove the long vacuum tube from the v...

Страница 30: ...screw with an Allen key When grinding with rotation or oscillation the sample and the specimen holder should be clamped so that they rotate evenly around the centre of the sample This way the fastest...

Страница 31: ...er the face of the cup wheel and the back movement should start There are two ways of setting the stop position 1 If you do know the size of your sample Press ENTER and use MENU UP DOWN Press ENTER ag...

Страница 32: ...wheels are already saved together with the wheel definitions Whenever a different cup wheel is selected the recommended speed will automatically be inserted The movement of the sample along the Y axi...

Страница 33: ...you know the exact position of a component underneath the sample surface for example 0 125 mm this distance can be pre set Move the sample as close to the cup wheel as possible without getting in cont...

Страница 34: ...vacuum holder Reposition the glass plate close to the cup wheel Press START to grind the glass down to the pre set thickness Press F1 RESET to set the relative X position to zero Move the holder with...

Страница 35: ...tops the grinding process at the pre set stop position or after the pre defined amount of material has been removed The sample is then retracted and the cup wheel is stopped The grinding process can b...

Страница 36: ...if the flushing pump cannot reach the cooling water Remember to add Struers Additive for Cooling Fluid One part of Additive for 33 parts of water To check the concentration of additive use a refractom...

Страница 37: ...sure it is seated firmly Refill the tank with 3 88 l of water and 120 ml Struers Additive The water level should be 5 mm below the edge of the front hole in the tank cover Push the drawer with the rec...

Страница 38: ...heels are sensitive to humidity Therefore do not mix new dry cut off wheels and used humid ones Store the cut off wheels in a dry place horizontally on a plane support The precision of diamond cup whe...

Страница 39: ...43 Method Options 46 Saving a Method 46 Copying a Method 47 Inserting a Method 48 Resetting a Method 49 Editing Names 50 Name Editing Principles 51 2 Accessories 52 3 Consumables Cut off Wheels 53 Opt...

Страница 40: ...reach the Main Menu A long beep can be heard MAIN MENU CUTTING METHODS GRINDING METHODS MANUAL FUNCTIONS CONFIGURATION Press MENU UP DOWN to select CONFIGURATION Press ENTER to activate the CONFIGURAT...

Страница 41: ...Press ENTER to activate the CUT OFF WHEELS MENU CONFIGURATION OF CUT OFF WHEELS Cut off Wheel USER2 Force Limit MEDIUM Wheel Thickness 0 50 mm Speed 3000 rpm F1 PREV WHEEL F2 NEXT WHEEL F4 RENAME Pre...

Страница 42: ...HEELS Press ENTER to activate the cup wheels menu CONFIGURATION OF CUP WHEELS Cup Wheel USER 1 Cup Wheel Speed 4000 rpm F1 PREV WHEEL F2 NEXT WHEEL F4 RENAME Press ENTER to edit the value After changi...

Страница 43: ...ed back into the original position The contrast setting of the display can be adjusted When grinding the number of sweeps carried out before the sample is moved towards the cup wheel can be adjusted T...

Страница 44: ...l Functions Menu Press Esc until you reach the Main Menu MAIN MENU CUTTING METHODS GRINDING METHODS MANUAL FUNCTIONS CONFIGURATION Press MENU UP DOWN to select MANUAL FUNCTIONS Press ENTER to activate...

Страница 45: ...TINUOUS Speed Level 1 Direction F1 START ROTATION Press MENU UP DOWN to select the value to be changed Press ENTER to edit the value After changing the value Press ENTER to accept the new value and to...

Страница 46: ...PUMP MANUAL FUNCTIONS MENU SAMPLE ROTATION RECIRCULATION PUMP DRESSING OF CUT OFF WHEEL DRESSING OF CUP WHEEL Press ENTER to activate the recirculation pump option RECIRCULATION PUMP F1 START PUMP F1...

Страница 47: ...cup wheel to be dressed Clamp the dressing stick in the sample holder and position it correctly The dressing stick has to be in front of the wheel so that the wheel is cutting slices of the dressing s...

Страница 48: ...s Wheel Speed 5000 rpm Cooling Water ON Y Distance 10 0 mm F1 START DRESSING Press MENU UP DOWN to select the value to be changed Press ENTER to edit the value Press ENTER to accept the new value and...

Страница 49: ...EL MANUAL FUNCTIONS MENU SAMPLE ROTATION RECIRCULATION PUMP DRESSING OF CUT OFF WHEEL DRESSING OF CUP WHEEL Press ENTER to activate the dressing option DRESSING OF CUP WHEEL X Increment 0 010 mm Wheel...

Страница 50: ...parameters have been altered SAVE METHOD Save changes in method 1 EMPTY METHOD ENTER YES ESC NO Press ENTER to save the modified method Unless you have already named the method the name will automatic...

Страница 51: ...EMPTY METHOD 5 EMPTY METHOD 6 EMPTY METHOD 7 EMPTY METHOD 8 EMPTY METHOD 9 EMPTY METHOD 10 EMPTY METHOD 11 EMPTY METHOD 12 EMPTY METHOD F1 COPY F3 RESET F4 RENAME Press ENTER if you would like to see...

Страница 52: ...want to insert the method If it is not an EMPTY METHOD Press ENTER to see the method Esc Press Esc to return to the above display F2 Press F2 INSERT to insert the method from the buffer INSERT METHOD...

Страница 53: ...ou want to reset SELECT CUTTING METHOD A 1 UNNAMED METHOD 2 EMPTY METHOD 3 EMPTY METHOD 4 UNNAMED METHOD 5 EMPTY METHOD 6 EMPTY METHOD 7 EMPTY METHOD 8 EMPTY METHOD 9 EMPTY METHOD 10 EMPTY METHOD 11 E...

Страница 54: ...METHOD 6 EMPTY METHOD 7 EMPTY METHOD 8 EMPTY METHOD 9 EMPTY METHOD 10 EMPTY METHOD 11 EMPTY METHOD 12 EMPTY METHOD F1 COPY F2 INSERT F3 RESET F4 RENAME F4 Press F4 RENAME UNNAMED METHOD EDIT NAME Tex...

Страница 55: ...s a space in the text F3 Deletes one character to the left in the text F4 Moves the main cursor to the right ENTER places the new character in the method name and moves the auxiliary cursor in the nam...

Страница 56: ...0 mm 1 04946904 For irregular specimens with 7 screws Max width 40 mm 1 04946905 With goniometer 04276911 For adhering specimens 04276912 With ceramic vacuum chuck for thin sections 04276913 For small...

Страница 57: ...ramics HV 800 MEDIUM 0 005 0 25 3200 MEDIUM 0 005 0 25 2700 Extremely hard ferrous metals HV 500 MEDIUM 0 005 0 25 5000 Hard and very hard ferrous metals HV 350 800 MEDIUM 0 05 0 30 1000 5000 MEDIUM 0...

Страница 58: ...higher feed speeds excessive wheel wear will occur along with increased risk of wheel breakage Flatter samples Use primarily low feed speeds highest recommended wheel speed largest possible flanges an...

Страница 59: ...0 2 4 0 4 0 8 0 5 10 m 10 20 m 20 30 m 10 5 2 4000 Sintered carbides hard ceramics and hard composites HV 600 B0P10 High Medium Low 0 1 0 3 0 3 0 5 0 5 1 0 5 10 m 10 20 m 20 30 m 10 5 2 4000 Specifica...

Страница 60: ...he Y stop Position the specimen holder correctly and or change the Y stop position Feed less than 90 of pre set value The force has exceeded the force limit LOW MEDIUM HIGH and the feed speed is autom...

Страница 61: ...ase call a Struers service technician Encoder error The Y table does not move or the encoder is defective Check for mechanical blockage of the table If that is not the case call a Struers service tech...

Страница 62: ...tion 100mm with rotation Cut off Wheels Diameter 75 to 152 mm 3 to 6 Max Thickness 2 mm 0 08 Hole 12 7 mm 0 5 Cup Wheels Diameter 100 mm 4 Hole 12 7 mm 0 5 Recirculation Cooling Unit Contents 4 l Flow...

Страница 63: ...ethods F3 Reset Grinding Methods F3 Reset Functions F4 Rename F4 Rename Sample Cut off Rotation Wheels Cutting Edit Grinding Edit Recirculation Cup Parameters Parameters Parameters Parameters Pump Whe...

Страница 64: ...tting length in advance Position the sample correctly in front of the cut off wheel using the positioning keys Press F1 RESET to reset the relative X position Press one of the positioning keys to chan...

Страница 65: ...eel After the grinding press F1 RESET to set the relative X position to zero Define the thickness of the glass plate you want to grind by setting the Stop grinding at position to the wanted value Move...

Страница 66: ...Accutom 50 Gebrauchsanweisung Handbuch Nr 15017001 Auslieferungsdatum 15 11 2012...

Страница 67: ...von ausgebildeten Technikern benutzt werden die von Struers dazu berechtigt wurden Das Wartungshandbuch darf nur in Zusammenhang mit dem Struers Ger t benutzt werden f r das dieses Wartungshandbuch a...

Страница 68: ...en Sie die geltenden Sicherheitsverordnungen in bezug auf die Handhabung Mischung Verf llung Entleerung und Entsorgung des Additivs f r die K hlfl ssigkeit ein 6 Die Probe mu fest im Probenbehalter be...

Страница 69: ...EE Symbol auf Ihrem Ger t weist darauf hin dass es sich um ein WEEE relevantes Ger t handelt dass entsprechend getrennt entsorgt werden muss N here Informationen ber das Recycling dieses Produkts erha...

Страница 70: ...Tastengruppen 11 Akustische Signale 11 Hauptschalter 11 Tasten des Bedienungsfelds 12 Display 13 Lesen des Displays 14 Werte ndern 15 Numerische Werte 15 Alphanumerische Werte 16 Probe positionieren...

Страница 71: ...hleifparameter einstellen 30 Topfscheibe 30 Scheibengeschwindigkeit 30 Y Vorschubgeschwindigkeit 30 Anzahl der Y Bewegungen 30 X Zustellung 30 K hlwasser 30 Rotation 31 Abtragsmodus 31 Schleifvorgang...

Страница 72: ...gro es Gitter 1 Abriebsammelsieb 1 Schlauch f r Vakuumanschlu 1 K hlr hrchen f r Topfscheiben 1 Inbusschl ssel 2 mm 1 Inbusschl ssel 2 5 mm 1 Inbusschl ssel 3 mm 1 Inbusschl ssel 4 mm 1 Inbusschl sse...

Страница 73: ...sich mit der Position und den Bezeichnungen der Komponenten von Accutom 50 vertraut zu machen A Bedienungsfeld Taste n des Bedienungsfelds B Hauptschalter C Umlaufk hleinheit D Trennscheibe Topfscheib...

Страница 74: ...n g 230 oder 240V 240V 200 bis 220V 220V Hinweis Die beiden zus tzlichen Einstellungen 110V und 120V d rfen nicht verwendet werden Stecken Sie den Sicherungshalter wieder in das Terminal zur ck Netzan...

Страница 75: ...dreiphasigen Anschluss verwendet Falls der mit diesem Kabel mitgelieferte Stecker nicht ihren Landesvorschriften entspricht muss dieser durch einen zugelassenen Stecker ersetzt werden Die Adern m sse...

Страница 76: ...wieder an der richtigen Stelle sitzt Umlaufk hleinheit WICHTIG Sorgen Sie daf r dass immer gen gend K hlfl ssigkeit in der Wanne ist damit die Pumpe nicht trocken l uft sonst wird sie besch digt Hinw...

Страница 77: ...te das HAUPTMEN angezeigt werden Sollte eine andere berschrift im Display angezeigt werden dr cken Sie ESC bis HAUPTMEN erscheint Ein langer Piepton ert nt Das HAUPTMEN entspricht der h chsten Ebene i...

Страница 78: ...n CONFIGURATION CUT OFF WHEELS CUP WHEELS OPTIONS Dr cken Sie EINGABE um das Men OPTIONS zu aktivieren OPTIONS Language ENGLISH X retract OFF Contrast 40 No of final grinding sweeps 15 F1 DEFAULT VALU...

Страница 79: ...Sie MEN AUF AB um die gew nschte Sprache auszuw hlen Dr cken Sie EINGABE um die Sprache zu best tigen die Sie ausgew hlt haben Das Men OPTIONEN erscheint jetzt in der gew hlten Sprache OPTIONEN Sprac...

Страница 80: ...ird gibt ein kurzer Piepton an da der Befehl akzeptiert worden ist Langer Piepton Ein langer Piepton zeigt an da die Taste gerade inaktiv ist Der Hauptschalter befindet sich auf der Maschinenr ckseite...

Страница 81: ...100 m Halten Sie die Taste gedr ckt um die Geschwindigkeit zu erh hen FUNKTIONS TASTEN F1 F2 F3 F4 Tasten f r verschiedene Zwecke Lesen Sie den unteren Teil der jeweiligen Einblendungen POSITIO NIERU...

Страница 82: ...DE 12 LEERE METHODE F1 KOPIE F2 EINF G F3 NULLST F4 N NAME A berschrift B Invertierter Text Cursor C Funktionstastenoptionen D Pfeil zeigt an da noch weitere Zeilen im Bild vorhanden sind Display Bitt...

Страница 83: ...X Achse ndert sich die Anzeige folgenderma en X POSITIONEN Absolute Position 15 255 mm Relative Position 5 000 mm F1 NULL F2 DICKE F3 GEHE ZU REL NULL F2 DICKE steht nur bei den Trennmethoden zur Verf...

Страница 84: ...EERE METHODE Trennscheibe B0D15 Geschw 2700 rpm Vorsch 0 100 mm s Kraft MITTEL Rotation AUS K hlwasser AN F1 SERIENSCHNITT Dr cken Sie EINGABE um den Wert zu ndern Zwei eckige Klammern werden um den W...

Страница 85: ...rn Es wird ein Untermen eingeblendet TRENNSCHEIBEN M0D08 M1D08 M0D10 M1D10 M0D13 M1D13 B0D13 B0C13 50A13 30A13 SAW13 M0D15 M1D15 E0D15 B0D15 B0C15 50A15 40A15 10S15 30A15 ANW 1 ANW 2 ANW 3 ANW 4 ANW 5...

Страница 86: ...enbewegung in der N he der Trennscheibe oder Topfscheibe erleichtert Der Bildschirmwert bezieht sich immer auf die Strecke die der Probenhalter seit der Nullsetzung zur ckgelegt hat Die relative Nullp...

Страница 87: ...erlich in das Hauptmen zur ckzugehen Zum Hauptmen gelangen Sie folgenderma en zur ck Esc Dr cken Sie Esc bis HAUPTMEN angezeigt wird Ein langer Piepton ert nt HAUPTMEN TRENNMETHODEN SCHLEIFMETHODEN MA...

Страница 88: ...RE METHODE 12 LEERE METHODE F1 KOPIE F2 EINF G F3 NULLST F4 N NAME Wenn Sie SCHLEIFMETHODEN ausgew hlt haben sieht das Display folgenderma en aus W HLE SCHLEIFMETHODE 1 LEERE METHODE 2 LEERE METHODE 3...

Страница 89: ...e Trennscheibe und setzen Sie den Au enflansch wieder auf mit der bearbeiteten Seite gegen den Innenflasch Setzen Sie den Sperrstift in die Bohrung des Innenflansches ein Ziehen Sie die Flanschschraub...

Страница 90: ...sowohl in X als auch in Y Richtung auf null indem Sie F1 dr cken wenn Sie sich im jeweiligen Bildschirm befinden Stellen Sie Stopposition ein um die Schnittl nge zu definieren Sie haben zwei M glichk...

Страница 91: ...U min in Schritten von 100 U min eingestellt werden Die Standardwerte wurden f r alle Struers Trennscheiben bereits zusammen mit den Scheibendefinitionen gespeichert W hlen Sie eine andere Trennscheib...

Страница 92: ...lt worden ist BEMERKE Die definierte Anzahl von Scheiben schlie t die Bezugsscheibe ein Wenn die programmierte Anzahl und Dicke der Scheiben die m gliche Anzahl von Scheiben bersteigt teilt Ihnen Accu...

Страница 93: ...ormalen Trennvorg ngen sollte die Einstellung AN lauten Ehe Sie den Trennvorgang starten vergewissern Sie sich da die Trennkammer sauber ist damit das K hlwasser ungehindert flie en kann Es sollte kei...

Страница 94: ...nzug erfolgt wenn Sie ABW RTSPOSITION dr cken Die Vorw rtsbewegung der Proben wird gestoppt und die Probe r ckw rts bewegt bis die Taste wieder losgelassen wird Anschlie end bewegt sich die Probe wied...

Страница 95: ...gestoppt werden indem Sie STOPP dr cken Die Probe bleibt in ihrer gegenw rtigen Position und der Proze wird dort abgebrochen Damit der Proze nicht gestoppt wird solange sich die Trennscheibe noch in d...

Страница 96: ...mmer vorbereitet Nehmen Sie den langen Vakuumschlauch von dem Vakuum halter ab und tauschen Sie ihn gegen den kurzen Schlauch aus der zusammen mit Accutom 50 geliefert wird Drehen Sie die Schraube auf...

Страница 97: ...n sollten Probe und Probenhalter so eingespannt sein da sie gleichm ig um den Probenmittelpunkt rotieren Hierdurch l uft der Schleifvorgang am schnellsten ab da die Topfscheibe die meiste Zeit schleif...

Страница 98: ...ur ckgelegt hat und die R ckw rtsbewegung einsetzen sollte Sie haben zwei M glichkeiten um die Stopposition einzustellen 1 Sie kennen die Gr e der Probe Dr cken Sie EINGABE und verwenden Sie MEN AUF A...

Страница 99: ...definitionen gespeichert W hlen Sie eine andere Topfscheibe aus wird die empfohlene Geschwindigkeit automatisch eingef gt Bewegung der Proben entlang der Y Achse parallel zur Topfscheibe Die Y Vorschu...

Страница 100: ...Position einer Komponente unterhalb der Probenoberfl che kennen also beispielsweise 0 125 mm so k nnen Sie diese Strecke voreinstellen Bewegen Sie die Probe mit Hilfe der POSITION so dicht wie m glich...

Страница 101: ...ut in der N he der Topfscheibe Dr cken Sie START um das Glas auf die voreingestellte Dicke abzuschleifen Dr cken Sie F1 NULLST um die relative X Position auf null zu setzen Bewegen Sie den Halter mit...

Страница 102: ...er voreingestellten Stopposition oder nachdem die vordefinierte Materialmenge abgetragen worden ist Die Probe wird dann eingezogen und die Topfscheibe wird gestoppt Der Schleifproze kann jederzeit w h...

Страница 103: ...hlwasser eintaucht muss der Tank aufgef llt werden Denken Sie daran Struers Additiv f r K hlwasser zuzusetzen ein Teil Additiv auf 33 Teile Wasser Die Konzentration des Additivs wird mit Hilfe eines R...

Страница 104: ...gesehenen Ort zur ck Dr cken Sie die Deckplatte in den Tank und vergewissern Sie sich ob sie eingerastet ist Bef llen Sie den Tank mit 3 88 Litern Wasser und 120 ml Struers Additive Der Wasserspiegel...

Страница 105: ...Grund sollten Sie keine neuen trockenen und gebrauchte feuchte Trennscheiben zusammenbringen Lagern Sie die Trennscheiben an einem trockenen Ort horizontale auf einer ebenen Unterlage Die Genauigkeit...

Страница 106: ...hten 45 Methodenoptionen 48 Methode speichern 48 Methode kopieren 49 Methode einf gen 50 Methode nullstellen 51 Namen ndern 52 Prinzipien der Namens nderung 53 2 Zubeh r 54 3 Verbrauchsmaterialien Tre...

Страница 107: ...E um das Men KONFIGURATION zu aktivieren KONFIGURATION TRENNSCHEIBEN TOPFSCHEIBEN OPTIONEN Wenn Sie andere als Struers Trennscheiben verwenden wollen so m ssen sie jene konfigurieren so da sie die ric...

Страница 108: ...N CHSTE SCH F4 N NAME Dr cken Sie MEN AUF AB um den Wert auszuw hlen der ge ndert werden soll Dr cken Sie EINGABE um den Wert zu ndern Nachdem Sie den Wert ge ndert haben Dr cken Sie EINGABE um den n...

Страница 109: ...m das Men TOPFSCHEIBEN zu aktivieren KONFIGURATION DER TOPFSCHEIBEN Topfscheibe ANW 1 Topfscheibengeschwindigkeit 4000 rpm F1 VORIGE SCH F2 N CHSTE SCH F4 N NAME Dr cken Sie EINGABE um den Wert zu nde...

Страница 110: ...trasteinstellung der Anzeige kann eingestellt werden Beim Schleifen kann die Anzahl der Schleifbewegungen eingestellt werden die ausgef hrt werden ehe die Probe in Richtung auf die Topfscheibe gefahre...

Страница 111: ...ung Dr cken Sie ESC bis Sie zum Hauptmen gelangen HAUPTMEN TRENNMETHODEN SCHLEIFMETHODEN MANUELLE FUNKTIONEN KONFIGURATION Dr cken Sie MEN AUF AB um MANUELLE FUNKTIONEN auszuw hlen Dr cken Sie EINGABE...

Страница 112: ...1 ROTATION STARTEN Dr cken Sie MEN AUF AB um den Wert auszuw hlen der ge ndert werden soll Dr cken Sie EINGABE um den Wert zu ndern Nachdem Sie den Wert ge ndert haben Dr cken Sie EINGABE um den neuen...

Страница 113: ...LE FUNKTIONEN PROBENROTATION K HLWASSERPUMPE ABRICHTEN DER TRENNSCHEIBE ABRICHTEN DER TOPFSCHEIBE Dr cken Sie EINGABE um die Option K HLWASSERPUMPE zu aktivieren K HLWASSERPUMPE F1 PUMPE STARTEN F1 Dr...

Страница 114: ...e Trennscheibe ein die abgerichtet werden soll Spannen Sie den Abrichtstab in den Probenhalter ein und positionieren Sie ihn ordnungsgem Der Abrichtstab mu sich vor der Scheibe befinden so da die Sche...

Страница 115: ...und um zum vorigen Bildschirm zur ckzukehren F1 Dr cken Sie F1 um den Abrichtvorgang zu starten Setzen Sie die Topfscheibe ein die abgerichtet werden soll Spannen Sie den Abrichtstab in den Probenhal...

Страница 116: ...eschwindigkeit 4000 rpm K hlwasser AN Y Abstand 15 0 mm F1 ABRICHTEN STARTEN Dr cken Sie MEN AUF AB um den Wert auszuw hlen der ge ndert werden soll Dr cken Sie EINGABE um den Wert zu ndern Dr cken Si...

Страница 117: ...E SICHERN nderungen sichern in 1 LEERE METHODE EINGABE JA ESC NEIN Dr cken Sie EINGABE um die ge nderte Methode zu sichern Sofern Sie nicht bereits einen Namen f r die Methode ausgew hlt haben wird de...

Страница 118: ...ODE 5 LEERE METHODE 6 LEERE METHODE 7 LEERE METHODE 8 LEERE METHODE 9 LEERE METHODE 10 LEERE METHODE 11 LEERE METHODE 12 LEERE METHODE F1 KOPIE F3 NULLST F4 N NAME Dr cken Sie EINGABE wenn Sie sich di...

Страница 119: ...cht um eine LEERE METHODE handelt Dr cken Sie EINGABE um sich diese Methode anzusehen Esc Dr cken Sie ESC um zur obigen Anzeige zur ckzukehren F2 Dr cken Sie F2 EINF G um die Methode aus dem Speicher...

Страница 120: ...lstellen wollen W HLE TRENNMETHODE A 1 UNBENANNTE METH 2 LEERE METHODE 3 LEERE METHODE 4 UNBENANNTE METH 5 LEERE METHODE 6 LEERE METHODE 7 LEERE METHODE 8 LEERE METHODE 9 LEERE METHODE 10 LEERE METHOD...

Страница 121: ...LEERE METHODE 7 LEERE METHODE 8 LEERE METHODE 9 LEERE METHODE 10 LEERE METHODE 11 LEERE METHODE 12 LEERE METHODE F1 KOPIE F2 EINF G F3 NULLST F4 N NAME F4 Dr cken Sie F4 N NAME UNBENANNTE METH NAME ED...

Страница 122: ...eerzeichen in den Text eingef gt F3 Es wird ein Zeichen im Text gel scht F4 Hiermit wird der Hauptcursor nach rechts bewegt Mit EINGABE wird das neue Zeichen in den Methodennamen bernommen und der Hil...

Страница 123: ...mm 1 04946904 F r unregelm ige Proben mit 7 Schrauben Maximale Breite 40 mm 1 04946905 Mit Goniometer 04276911 F r aufklebbare Proben 04276912 Mit Vakuumspannvorrichtung f r D nnschliffe 04276913 F r...

Страница 124: ...etalle und Hartkeramik HV 800 mittel 0 005 0 25 3200 mittel 0 005 0 25 2700 Extrem harte Eisenmetalle HV 500 mittel 0 005 0 25 5000 Harte und sehr harte Eisenmetalle HV 350 800 mittel 0 05 0 30 1000 5...

Страница 125: ...heibenverschlei zusammen mit einem erh hten Scheibenbruchrisiko auf Plane Proben Arbeiten Sie haupts chlich mit geringerer Vorschubgeschwindigkeit die h chsten empfohlenen Scheibengeschwindigkeiten gr...

Страница 126: ...sserfreie Trennfl ssigkeit Zum Trennen von wasserempfindlichen Werkstoffen 5 l 49900030 Schleifergebnisse optimieren Schleifparameter Empfohlene Schleifparameter Material H rte Scheibe Genauigkeit Vor...

Страница 127: ...w hrend die relative Y Position gr er oder gleich der Y Stopposition ist Positionieren Sie den Probenhalter richtig und oder ndern Sie die Y Stopposition Vorschub weniger als 90 der Vorgabe Die Kraft...

Страница 128: ...osition l t sich nicht deaktivieren berpr fen Sie ob der Tisch mechanisch blockiert ist Ist dies nicht der Fall rufen Sie einen Kundendiensttechniker von Struers Encoder Fehler Der Y Tisch bewegt sich...

Страница 129: ...100mm mit Rotation Trennscheiben Durchmesser 75 bis 152 mm 3 bis 6 Max Dicke 2 mm 0 08 Hole 12 7 mm 0 5 Topfscheiben Diameter 100 mm 4 Bohrung 12 7 mm 0 5 Umlaufk hleinheit Fassungsverm gen 4 l Volume...

Страница 130: ...en F3 Nullst Schleifmethoden F3 Nullst Funktionen F4 N Name F4 N Name Proben Trenn rotation scheiben Trennparameter Parameter Schleifparameter Parameter K hlwasser Topf ndern ndern pumpe scheiben Abri...

Страница 131: ...Taste um den Vorgang abzubrechen Wenn Sie die Schnittl nge nicht kennen gehen Sie wie folgt vor Positionieren Sie die Probe mit Hilfe der Positionierungstasten richtig vor der Trennscheibe Dr cken Si...

Страница 132: ...el zur Topfscheibe ist Dr cken Sie F1 NULLST im Anschlu an den Schleifproze um die relative X Position auf null zu setzen Definieren Sie die Dicke der Glasplatte die Sie schleifen wollen indem Sie Sto...

Страница 133: ...Accutom 50 Mode d emploi Mode d emploi no 15017001 Date de parution 15 11 2012...

Страница 134: ...r l quipement Struers pour lequel il a t sp cifiquement r dig Manuels de maintenance Un manuel de service de Struers ne peut tre utilis que par un technicien sp cialiste autoris par Struers Le manuel...

Страница 135: ...curit en vigueur pour la manipulation le m lange le remplissage le vidage et l limination de l additif pour le liquide de refroidissement 6 L chantillon doit tre correctement serr dans le porte chant...

Страница 136: ...symbole WEEE contiennent des composants lectriques et lectroniques et ne doivent pas tre jet s avec les ordures m nag res Veuillez contacter les autorit s locales pour toutes informations sur la proc...

Страница 137: ...ntr le d Accutom 50 9 Groupes de fonctions 9 Signaux sonores 9 Emplacement de l interrupteur principal 9 Touches du panneau frontal 10 Affichage 11 Lecture de l affichage 12 Changer Editer les valeurs...

Страница 138: ...chantillon et le porte chantillons 27 Positionner l chantillon 28 Programmer les param tres de tron onnage 29 Meule 29 Vitesse 29 Avance 29 No Y 29 X D placement 29 Eau 29 Rotation 30 Mode Enl vement...

Страница 139: ...4 mm 1 Cl hexagonale 3 mm 1 Cl hexagonale 5 mm 2 Vis M4x20 2 Vis M4x35 1 Jeux de Mode d emploi Accutom 50 doit tre plac e sur une table stable et plane tol rance 1 mm La table doit pouvoir porter un p...

Страница 140: ...orrectement Courant requis R glage 230 ou 240V 240V 200 220V 200V Noter les deux r glages suppl mentaires 110V et 120V ne doivent pas tre utilis s R ins rer l interrupteur Remettre le porte fusible da...

Страница 141: ...tion 3 phases Si la prise fournie sur ce c ble n est pas autoris e dans le pays d utilisation celle ci devra tre remplac e par une prise homologu e Les fils lectriques devront tre branch s comme suit...

Страница 142: ...au de refroidissement doit tre remplac e au moins une fois par mois Unit de recyclage IMPORTANT Le r servoir de recyclage et le couvercle doivent tre plac s correctement sinon la pompe ne peut pas asp...

Страница 143: ...te appuyer sur ESC jusqu ce que MENU PRINCIPAL apparaisse Un bip long peut tre entendu Le MENU PRINCIPAL est le niveau le plus lev dans la structure de menus A partir de l il est possible de se d plac...

Страница 144: ...OPTIONS OPTIONS Language ENGLISH X retract Contrast 40 OFF No of final grinding sweeps 15 F1 DEFAULT VALUE Appuyer sur RETOUR pour activer le menu LANGUE LANGUAGE ENGLISH DEUTSCH FRAN AIS ESPA OL Appu...

Страница 145: ...bref indique que la commande a t accept e Bip long un bip long indique que la touche est inactive ce moment L interrupteur principal est plac au dos de la machine Utilisation des touches de contr le...

Страница 146: ...ons de 100 m Presser contin ment la touche pour augmenter la vitesse TOUCHES DE FONCTION F1 F2 F3 F4 Touches de contr le usages divers Voir au bas de chaque cran POSITION GAUCHE Se d place au menu POS...

Страница 147: ...9 METHODE VIDE 10 METHODE VIDE 11 METHODE VIDE 12 METHODE VIDE A Ent te B Texte clignotant Marqueur C Options touches de contr le D Fl che indiquant qu il y a d autres lignes dans l image Affichage A...

Страница 148: ...e X et l cran appara t comme suit POSITIONS X Position absolue 15 255 mm Position relative 5 000 mm F1 A ZERO F2 AJOUTER F3 A ZERO RELATIF F2 AJOUTER n est disponible que pour les m thodes de tron onn...

Страница 149: ...B0D15 Vitesse 2700 t m Avance 0 100 mm s Limite f MOYENNE Rotation OFF Eau ON F1 COUPE MULTI Appuyer sur RETOUR pour diter la valeur Deux crochets apparaissent autour de la valeur M thode tron 1 METHO...

Страница 150: ...sous menu appara t MEULES DE TRON ONNAGE M0D08 M1D08 M0D10 M1D10 M0D13 M1D13 B0D13 B0C13 50A13 30A13 SAW13 M0D15 M1D15 E0D15 B0D15 B0C15 50A15 40A15 10S15 30A15 UTIL 1 UTIL 2 UTIL 3 UTIL 4 UTIL 5 UTIL...

Страница 151: ...e calcul du mouvement de l chantillon pr s de la meule de tron onnage ou de la meule boisseau est facilit La valeur de l cran est toujours en rapport la distance que le porte chantillons a parcouru de...

Страница 152: ...nu principal Pour retourner au Menu principal Esc Appuyer sur ESC jusqu ce que l affichage MENU PRINCIPAL apparaisse Un bip long est entendu MENU PRINCIPAL METHODES DE TRON ONNAGE METHODES DE PREPOLIS...

Страница 153: ...E 10 METHODE VIDE 11 METHODE VIDE 12 METHODE VIDE F1 COPIER F3 EFFACER F4 NOM Apr s le choix de METHODES PREPOL l cran suivant appara t CHOIX DE METHODE DE PREPOLISSAGE 1 METHODE VIDE 2 METHODE VIDE 3...

Страница 154: ...e tron onnage et remonter le flasque externe avec la partie usin e tourn e vers le flasque interne Ins rer la tige de fermeture dans l orifice du flasque interne Fixer l g rement la vis du flasque l a...

Страница 155: ...X et Y en appuyant sur F1 dans les crans respectifs Programmer la position d arr t pour d finir la longueur de la coupe Il y a deux fa ons de programmer la position d arr t 1 Si la taille de l chanti...

Страница 156: ...0 t m en chelons de 100 t m Les valeurs de r f rence pour toutes les meules de tron onnage Struers sont d j sauv es avec les d finitions de meules D s qu une meule de tron onnage diff rente est choisi...

Страница 157: ...programm et l paisseur des coupes exc dent le nombre possible de coupes Accutom 50 indiquera automatiquement combien de coupes peuvent tre effectu es Comme mentionn plus haut Accutom 50 va compenser...

Страница 158: ...L chantillon se balance oscille autour de son centre La vitesse peut tre r gl e sur trois niveaux diff rents 1 2 ou 3 L angle peut tre r gl de 10 400 Appuyer sur F3 pour tester la rotation de l chant...

Страница 159: ...res de tron onnage corrects S assurer que la meule de tron onnage correcte est mont e Fermer le couvercle de la machine Appuyer sur MARCHE Commencer le tron onnage IMPORTANT En particulier lors de l e...

Страница 160: ...l chantillon de la meule de tron onnage Ceci est possible en appuyant sur la touche POSITION VERS LE BAS Le mouvement vers l avant de l chantillon est interrompu et l chantillon est d plac vers l arri...

Страница 161: ...te quel moment pendant l op ration en appuyant sur la touche ARRET Pour viter d interrompre le processus alors que la meule de tron onnage se trouve toujours dans l chantillon appuyer sur la touche PO...

Страница 162: ...le tube de refroidissement Avant d utiliser le mandrin vide pour la premi re fois il doit tre branch la pompe vide Accutom 50 est con u pour un branchement par une douille se trouvant dans le compart...

Страница 163: ...cl hexagonale Lors du tron onnage par rotation ou par oscillation l chantillon et le porte chantillons doivent tre serr s en cons quence pour pouvoir tourner uniform ment autour du centre de l chantil...

Страница 164: ...oisseau et o le mouvement de retour doit commencer Il y a deux fa ons de programmer la position d arr t 1 Si la taille de l chantillon est connue Appuyer sur RETOUR et utiliser MENU VERS LE HAUT LE BA...

Страница 165: ...re avec les d finitions de meule D s qu une nouvelle meule boisseau est choisie la vitesse recommand e sera automatiquement ins r e Le mouvement de l chantillon le long de l axe Y parall le la meule b...

Страница 166: ...re Si la position exacte d un composant sous la surface de l chantillon est connue par exemple 0 125 mm cette distance peut tre pr programm e D placer l chantillon aussi pr s de la meule boisseau que...

Страница 167: ...la meule boisseau Appuyer sur MARCHE pour pr polir le verre jusqu l paisseur pr programm e Appuyer sur F1 A ZERO pour mettre la position relative X z ro Eloigner le porte chantillons avec le verre por...

Страница 168: ...terrompt automatiquement le processus de pr polissage la position d arr t pr programm e ou apr s que la quantit pr d finie de mati re ait t enlev e L chantillon est alors r tract et la meule boisseau...

Страница 169: ...ns l unit de recyclage doit tre v rifi e apr s 8 heures d utilisation ou au moins chaque semaine L unit doit tre remplie si la pompe de rin age ne parvient plus atteindre l eau de refroidissement Ne p...

Страница 170: ...r servoir et s assurer qu il soit correctement fix Remplir le r servoir de 3 88 l d eau additionn e de 120 ml d additif Struers d eau Le niveau d eau ne doit pas tre en dessous de 5 mm du bord de l o...

Страница 171: ...ne faut donc pas m langer des meules neuves et s ches des meules humides Conserver ces meules de tron onnage dans un endroit sec en position horizontale sur un support plan La pr cision des meules bo...

Страница 172: ...une M thode 47 Copier une m thode 48 Ins rer une m thode 49 Effacer une m thode 50 Editer les noms 51 Nommer les principes d dition 52 2 Accessoires 53 3 Consommables Meules de tron onnage 54 Optimise...

Страница 173: ...ip long retentit MENU PRINCIPAL METHODES DE TRON ONNAGE METHODES DE PREPOLISSAGE FONCTIONES MANUELLES CONFIGURATION Appuyer sur MENU VERS LE HAUT LE BAS pour choisir CONFIGURATION Appuyer sur RETOUR p...

Страница 174: ...activer le menu MEULES DE TRON ONNAGE CONFIGURATION DES MEULES DE TRON ONNAGE Meule de tron onnage UTIL 1 Limite de force MOYENNE Epaisseur de la meule 0 50 mm Vitesse de la meule 3000 t m F1 MEULE PR...

Страница 175: ...pour activer le menu MEULES BOISSEAUX CONFIGURATION DES MEULES BOISSEAUX Meule boisseau UTIL 1 Vitesse de la meule boisseau 4000 t m F1 MEULE PREC F2 MEULE SUIV F4 NOM Appuyer sur RETOUR pour diter la...

Страница 176: ...gl Pendant le pr polissage le nombre de balayages accomplis avant que l chantillon ne soit d plac vers la meule boisseau peut tre r gl Tr s souvent pour pargner du temps seul un petit nombre de balaya...

Страница 177: ...u principal MENU PRINCIPAL METHODES DE TRON ONNAGE METHODES DE PREPOLISSAGE FONCTIONS MANUELLES CONFIGURATION Appuyer sur MENU VERS LE HAUT LE BAS pour choisir FONCTIONS MANUELLES Appuyer sur RETOUR p...

Страница 178: ...itesse 1 Sens de rotation F1 ROTATION MARCHE Appuyer sur MENU VERS LE HAUT LE BAS pour choisir la valeur changer Appuyer sur RETOUR pour diter la valeur Apr s avoir chang la valeur Appuyer sur RETOUR...

Страница 179: ...FONCTIONS MANUELLES ROTATION ECHANTILLONS POMPE RECYCLAGE DRESSAGE MEULE TRON ONNAGE DRESSAGE MEULE BOISSEAU Appuyer sur RETOUR pour activer l option POMPE RECYCLAGE POMPE RECYCLAGE F1 POMPE MARCHE F1...

Страница 180: ...b tonnet de dressage dans le porte chantillons et le positionner correctement Le b tonnet de dressage doit se trouver en face de la meule afin que la meule coupe des tranches du b tonnet de dressage A...

Страница 181: ...an pr c dent F1 Appuyer sur F1 pour commencer l op ration de dressage Monter la meule boisseau dresser Serrer le b tonnet de dressage dans le porte chantillons et le positionner correctement Le b tonn...

Страница 182: ...de la meule 4000 t m 0 010 mm Eau de refroidissement ON Distance Y 15 0 mm F1 DRESSAGE MARCHE Appuyer sur MENU VERS LE HAUT LE BAS pour choisir la valeur changer Appuyer sur RETOUR pour diter la valeu...

Страница 183: ...difi s GARDER EN MEMOIRE D UNE METHODE Sauver les changements dans la m thode 1 METHODE VIDE RETOUR OUI ESC NON Appuyer sur RETOUR pour garder en m moire la m thode modifi e Si la m thode n a pas d j...

Страница 184: ...DE 4 METHODE VIDE 5 METHODE VIDE 6 METHODE VIDE 7 METHODE VIDE 8 METHODE VIDE 9 METHODE VIDE 10 METHODE VIDE 11 METHODE VIDE 12 METHODE VIDE F1 COPIER F3 EFFACER F4 NOM Appuyer sur RETOUR pour voir le...

Страница 185: ...l ne s agit pas d une METHODE VIDE Appuyer sur RETOUR pour voir la m thode Esc Appuyer sur Esc pour retourner l affichage ci dessus F2 Appuyer sur F2 INSERER pour ins rer la m thode partir de la m moi...

Страница 186: ...CHOIX DE METHODE DE TRON ONNAGE 1 METH NON NOMMEE 2 METHODE VIDE A 3 METHODE VIDE 4 METH NON NOMMEE 5 METHODE VIDE 6 METHODE VIDE 7 METHODE VIDE 8 METHODE VIDE 9 METHODE VIDE 10 METHODE VIDE 11 METHO...

Страница 187: ...IDE 7 METHODE VIDE 8 METHODE VIDE 9 METHODE VIDE 10 METHODE VIDE 11 METHODE VIDE 12 METHODE VIDE F1 COPIER F2 INSERER F3 EFFACER F4 NOM F4 Appuyer sur F4 NOM METH NON NOMMEE EDITER LE NOM Texte METH N...

Страница 188: ...un espace dans le texte F3 Efface un caract re dans le texte F4 D place le marqueur principal vers la droite RETOUR place le nouveau caract re dans le nom de la m thode et d place le marqueur auxiliai...

Страница 189: ...uverture max de 40 mm 1 04946904 Pour chantillons irr guliers avec 7 vis Largeur max de 40 mm 1 04946905 Avec goniom tre 04276911 Pour chantillons adh rents 04276912 Avec mandrin de c ramique vide pou...

Страница 190: ...YENNE 0 005 0 25 3200 MOYENNE 0 005 0 25 2700 M taux ferreux extr mement durs HV 500 MOYENNE 0 005 0 25 5000 M taux ferreux durs et tr s durs HV 350 800 MOYENNE 0 05 0 30 1000 5000 MOYENNE 0 05 0 30 1...

Страница 191: ...avance plus lev es il y aurait une usure de meule excessive ainsi qu un risque plus lev de brisure de la meule Echantillons plus plats Utiliser tout d abord des vitesses d avance basses la vitesse de...

Страница 192: ...0 20 m 20 30 m 10 5 2 4000 Carbures fritt s c ramique dure et composites durs HV 600 B0P10 ELEV E MOYENNE BASSE 0 1 0 3 0 3 0 5 0 5 1 0 5 10 m 10 20 m 20 30 m 10 5 2 4000 Sp cification No de cat Corro...

Страница 193: ...arr t Y inf rieure Y relative Tentative de commencement d un processus de tron onnage lorsque la position Y relative est sup rieure ou gale l arr t Y Positionner le porte chantillons correctement et...

Страница 194: ...t pas tre d sactiv V rifier qu il n y a pas de blocage m canique de la table Si cela n est pas le cas appelez un technicien de service Struers Erreur encoder La table Y ne se d place pas ou l encoder...

Страница 195: ...Meules de tron onnage Diam tre 75 152 mm 3 6 Epaisseur max 2 mm 0 08 Orifice 12 7 mm 0 5 Meules boisseaux Diam tre 100 mm 4 Orifice 12 7 mm 0 5 Unit de recyclage Contenu 4 l D bit 800 ml min Moteur 55...

Страница 196: ...lissage F3 Effacer manuelles F4 Nom F4 Nom Rotation Meules de chantillon tron onnage Param tres de Editer Param tres de Editer Pompe de Meules tron onnage Param tres pr polissage Param tres recyclage...

Страница 197: ...l avance Positionner l chantillon correctement en face de la meule de tron onnage l aide des touches de positionnement Appuyer sur F1 A ZERO pour remettre z ro la position relative X Appuyer sur l une...

Страница 198: ...F1 A ZERO pour mettre la position X relative z ro D finir l paisseur du verre porte objet pr polir en r glant l arr t du pr polissage la position la valeur d sir e Eloigner le porte chantillons de la...

Страница 199: ...Manual No 15017001 Date of Release 15 11 2012 Accutom 50 Spare Parts and Diagrams...

Страница 200: ...rained technician authorised by Struers The Service Manual may only be used in connection with Struers equipment covered by the Service Manual Struers assumes no responsibility for errors in the manua...

Страница 201: ...15010021D Water Cock 14940044B Recirculation Tank 14940041G Lid for Recirculation Tank complete 15010427 Bottom 15010051N Back plate 15010054E Various Parts Block and Wiring Diagram 15013052D Wiring...

Страница 202: ...4940420 15 O ring 7 65 1 78 RIO17812 20 O ring 10 82 1 78 130MP057 30 Socket for water nozzle R4940422 40 End piece for water nozzle 14940428 60 Water nozzle R4940421 70 Stopper for water nozzle R4940...

Страница 203: ...s 392MP075 Various Parts Grate 14940220 Grate large R4940222 Backstop spanner for cut off wheel mounting 14940701 2 pin spanner for cut off wheel mounting 427MP085 Allen key 2 10 pcs RGR00020 Allen ke...

Страница 204: ......

Страница 205: ......

Страница 206: ......

Страница 207: ......

Страница 208: ......

Страница 209: ......

Страница 210: ......

Страница 211: ...VCC GND D 1 X10 2 CH B 3 NC X10 1 2 X10 X10 4 CH A X10 5 4 X2 1 5V DC X2 2 GND OUT 24V AC SAFETY SWITCH IN 24V AC SOURCE GND D X4 1 X4 2 X4 3 X4 4 CUTTING MOTOR X5 1 X5 2 N24V AC X9 3 NC X9 2 EX INPUT...

Страница 212: ...WITCH NAMUR SIGN IN EXTRA INPUT NAMUR KEYBOARD SCAN WITHBEEPER X25 X26 3 X25 X26 1 X25 X26 4 X25 X26 2 W18 OPTION AT ACCUTOM 5 CR WH WH CR F3 Note Old Version GN YE BN WH New Version GN WH RD BK Signa...

Страница 213: ...B and UL508 The above has been declared according to the global method module A Date 14 01 2014 Christian Skjold Heyde Vice President R D and Production Struers A S Dansk Overensstemmelseserkl ring F...

Страница 214: ...jold Heyde Stellvertretender Gesch ftsf hrer Entwicklung und Produktion Struers A S Fran ais D claration de conformit Fabricant Struers A S Pederstrupvej 84 DK 2750 Ballerup Denmark T l phone 45 44 60...

Страница 215: ...ion free cutting of Metals Electronic components Ceramics Composites Crystals Sintered carbides Minerals Fibre reinforced materials Biomaterials teeth and bones Accutom 5 Automatic precision cut off m...

Страница 216: ...h high and low speed cutting and enables a more accurate choice of wheel speed for different cut off wheel diameters Menu control and digital readout Accutom 5 is operated from a touch pad on the ergo...

Страница 217: ...ng and 10 grinding methods Improved menu control Subsequent menus for the selection of cutting or grinding parameters greatly facilitate the operation Together with the larger display the new menu con...

Страница 218: ...adjustable in steps of 100 rpm adjustable in steps of 100 rpm Feed speed 0 005 3 000 mm s Feed speed 0 005 3 000 mm s adjustable in steps of 0 005 mm s adjustable in steps of 0 005 mm s Max pos speed...

Страница 219: ...nen von Metallen Elektronischen Komponenten Keramik Verbundwerkstoffen Kristallen Hartmetallen Mineralien Faserverst rkten Materialien Medizinischen Materialien Z hne und Knochen Accutom 5 Automatisch...

Страница 220: ...in Der Motor des Accutom 5 besitzt eine va riable Trennscheibengeschwindigkeit von 300 bis 3000 U min in Schritten von 100 U min Auf diese Weise ist sowohl ein Trennvorgang im hohen und niedrigen Gesc...

Страница 221: ...en Accutom 50 wurde mit einer Daten bank ausger stet in der 20 Trenn und 10 Schleifverfahren gespeichert werden k nnen Verbesserte Men steuerung Durch Untermen s ber die Trenn oder Schleifparameter au...

Страница 222: ...twa 20 N Mittel etwa 40 N Hoch etwa 60 N Mittel etwa 40 N Hoch etwa 60 N Positionie Y Richtung 105 mm Pr zision 0 1 mm rungsbereich X Richtung 60 mm Pr zision 0 005 mm Probengr sse Gr sste L nge der a...

Страница 223: ...de d formations des M taux composants lectroniques c ramiques composites cristaux carbures fritt s min raux mat riaux renforc s en fibres biomat riaux dents et os Accutom 5 Tron onneuse automatique de...

Страница 224: ...onnage variable atteignant 3000 t m Le moteur d Accutom 5 a des vitesses de meule de tron onnage variant de 300 3000 t m en chelons de 100 t m Ceci garantit une vitesse de tron onnage autant lev e que...

Страница 225: ...ge Accutom 50 est quip e d une base de donn es capable de garder en m moire 20 m thodes de tron onnage et 10 m thodes de pr polissage Contr le par menus am lior Les sous menus pour le choix des param...

Страница 226: ...e de pos max Y 13 mm s X 10 mm s max Y 13 mm s X 10 mm s Limites de pression basse env 20 N Limites de pression basse env 20 N moyenne env 40 N moyenne env 40 N lev e env 60 N lev e env 60 N Marge de...

Отзывы: