background image

14 

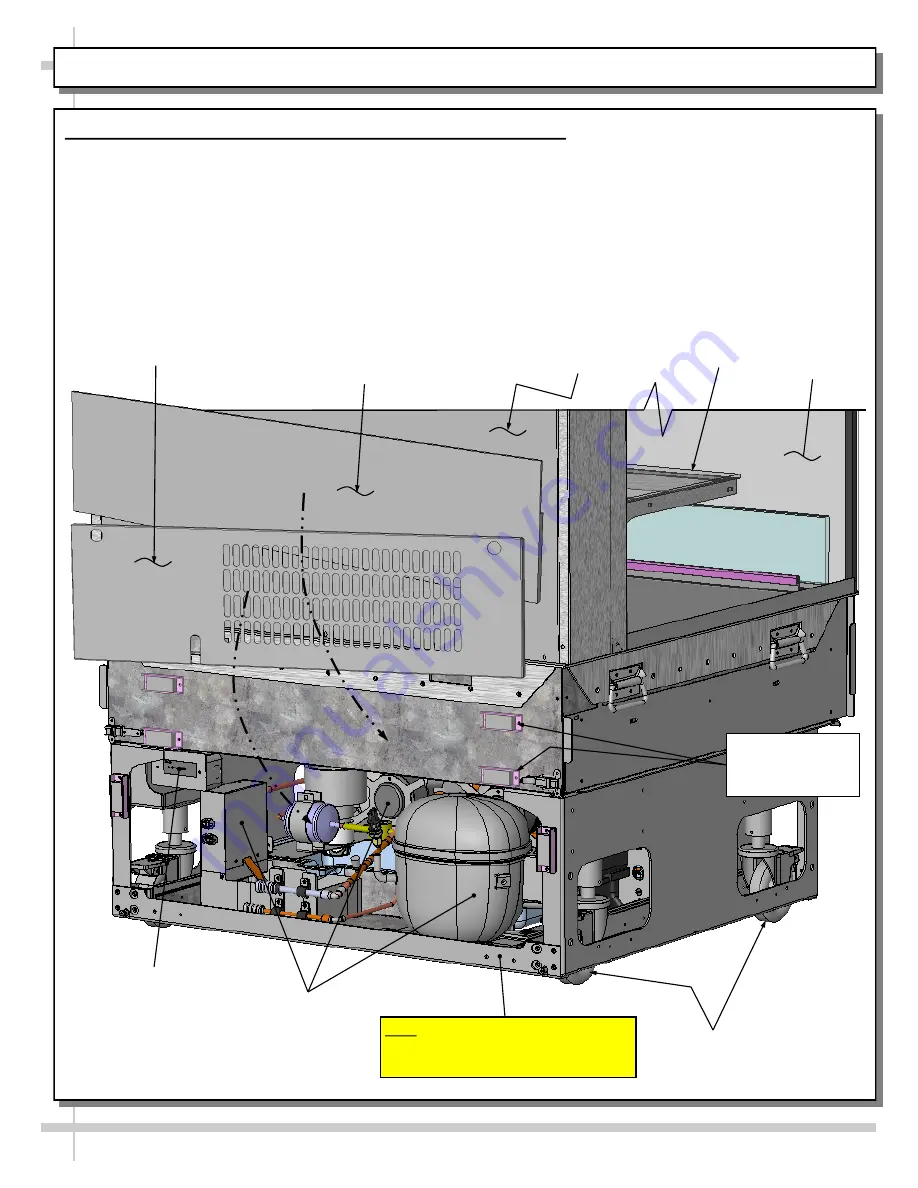
CASE DESIGN, CONT’D: REAR VIEW OF FREE STANDING, SELF-SERVICE MERCHANDISERS 

2. Rear View Of Free Standing, Self-Service Merchandisers 


 

Model illustrated below may not reflect every feature or option of your particular merchandiser. 

 

Solid back rear panel is shown. Rear sliding doors with acrylic perforated plenums may be on your model.  

 

Power cord route may differ depending upon customer request. 

 

See previous page for front view of merchandiser.


Field 

Access Box 

Condenser 

Package 

Casters (Typ.) 

Note: Do Not Remove  This Shipping 

Brace (As It Is Opposite Condenser 

Package Access Side Of Case). 

Shelving 

Glass End 

Panel (Typ.) 

Air Intake Grille  

(Removed For Illustrative 

Purposes Only) 

Lower Back Panel Shown         

Removed From Case (Attaches 

To Case Via Magnets) 

Solid Back Rear Panel / 

May Be Rear Sliding Doors 

On Certain Cases. 

Magnets For Rear 

Panel & Air Intake 

Grille (Typ.) 

Содержание Reveal NR3633RSSV

Страница 1: ...UMS SEE PAGES 10 11 FOR PANEL GRILLE TOE KICK ATTACHMENT INSTRUCTIONS Model With Rear Sliding Doors and Acrylic Perforated Plenums Cladding Attached Perforated Rear Panel Model Shown Cladding Attached Models Are Shipped WITHOUT Panels and Cladding Attached See Pages 10 and 11 for Component Attachment Instructions Structural Concepts Corporation 888 E Porter Road Muskegon MI 49441 Phone 231 798 888...

Страница 2: ...DRIVERS MAIN POWER SWITCH CONDENSER COIL FILTER CASE DESIGN CONT D NIGHT CURTAIN ACCESS AND OPERATION CASE DESIGN CONT D TUB AREA AFTER DECK PAN REMOVAL CASE DESIGN CONT D LED LIGHT SWITCH LOCATIONS LED LIGHTS THERMOMETER CASE DESIGN CONT D REAR SLIDING DOOR REMOVAL REAR PERFORATED PLENUM CONTROL CASE DESIGN CONT D CONDENSER PACKAGE SELF CONTAINED UNITS ONLY PRODUCT PLACEMENT HONEYCOMB AIRFLOW CON...

Страница 3: ... 13 5 8 32 7 8 33 D x 47 3 4 W NR4840RSSV 20 3 8 39 5 8 33 D x 47 3 4 W NR4847RSSV 27 7 8 47 1 8 33 D x 47 3 4 W NR4855RSSV 35 1 4 54 5 8 33 D x 47 3 4 W NR6033RSSV 13 5 5 32 7 8 33 D x 59 3 4 W NR6040RSSV 20 3 8 39 5 8 33 D x 59 3 4 W NR6047RSSV 27 7 8 47 1 8 33 D x 59 3 4 W NR6055RSSV 35 1 4 54 5 8 33 D x 59 3 4 W NR7233RSSV 13 5 8 32 7 8 33 D x 71 3 4 W NR7240RSSV 20 3 8 39 5 8 33 D x 71 3 4 W ...

Страница 4: ...display refrigerators are intended for use in an area where environmental conditions are controlled and maintained so that the ambient temperature does not exceed 80 F 27 C and 55 maximum humidity If unsure if your unit is Type I or II see tag next to serial label See SERIAL LABEL LOCATION INFORMATION LISTED TECH INFO SERVICE section in this manual for sample serial labels COMPLIANCE Performance i...

Страница 5: ...a with any refrigerants on the List of Prohibited Substances for that specific end use in accordance with California Code of Regulations title 17 section 95374 This disclosure statement has been reviewed and approved by Structural Concepts and Structural Concepts attests under penalty of perjury that these statements are true and accurate CAUTION GFCI BREAKER USE REQUIREMENT If N E C National Elec...

Страница 6: ... Remove Air Intake Grille From Case To prevent damage to case lift air intake grille UP and OFF case Toe Kick Rear grille is held in place by magnets No screw removal is required Place air intake grille in secure location while removing case from pallet 3 Disconnect Case From Pallet Use Phillips driver to remove screws from shipping brackets Remove and discard shipping brackets from pallet Place J...

Страница 7: ...aution 4 people are required for this task Carefully lower to floor using ramp if available Slide pallet from under case as required Maintain support of case at all times or center of gravity may cause case to fall See illustration at right 7 Casters Locking After case is at desired position and height use level to check that case is level and plumb Readjust height as needed as instructed in step ...

Страница 8: ...pright F Nylon thumbscrews 4 per shelf secure shelving during shipment Note Remove and discard thumbscrews using pliers if necessary after case is installed so shelves can be disassembled to clean or service G Rear shelf support rail H Left and right glass shelf cover assemblies glass is affixed to covers with 2 sided tape from factory Caution Glass pieces ARE NOT IDENTICAL Notches on underside me...

Страница 9: ...e to space constraints it may be necessary to pull out condenser package to maneuver power cord plug around components and into receptacle Turn main power switch on Check that case is energized Lift deck pans to confirm that fans are rotating Turn on LED light switch at front left header 10 Turn On LED Lights See CASE DESIGN CONT D LED LIGHTS LED LIGHT SWITCH THERMOMETER section in manual for LED ...

Страница 10: ...ed into position remove shipping brace at air intake side of condenser package only opposite end of that shown below Note Shipping Brace Is ONLY To Be Removed From Air Intake Side of Condenser Package 12 Attaching Front Panel Components Carefully remove components from packaging Note All front panel components may be attached to case via magnets WITHOUT screw attachments Attach front toe kick to c...

Страница 11: ...on below 16 Attaching Rear Grille Use finger holes to place rear grille s inner hooks onto case rear s lower shoulder screws Snap onto case s two 2 rear vertical magnets Note Components may be removed in reverse order they were shown being attached on this sheet Hook Unlocked Latch Typ Rear Grille Side Panel Typ Rear Upper Panel Slots Side Panel Typ Inserts Hooks Locked Latch Hook Rear Grille Inne...

Страница 12: ... acrylic security cover must rest against upper security cover stop Lock at both ends of cover with locking mechanism Important After locking in place store keys in safe yet accessible place If removing acrylic security cover store in safe location away from foot traffic or work areas that could lead to scratching or marring of acrylic surfaces See CLEANING SCHEDULE TO BE PERFORMED BY STORE PERSON...

Страница 13: ...ums controlled by rear door brackets opening and closing action See next page for rear view of merchandiser Deck Pans Honeycomb Air Diffuser Solid Back Rear Panels Acrylic Air Deflector Shelving Air Return Right Glass End Panel Left Glass End Panel Handles For Pushing or Pulling Unit Into Position Casters Typ Thermostat and Main Power Switch Thermometer Condenser Package Clean Sweep Coil Cleaner S...

Страница 14: ...r model Power cord route may differ depending upon customer request See previous page for front view of merchandiser Field Access Box Condenser Package Casters Typ Note Do Not Remove This Shipping Brace As It Is Opposite Condenser Package Access Side Of Case Shelving Glass End Panel Typ Air Intake Grille Removed For Illustrative Purposes Only Lower Back Panel Shown Removed From Case Attaches To Ca...

Страница 15: ...nstructions Remove shipping brace by removing 4 screws Remove 4 screws from the controller DC driver box cover to access electrical components Note Only certified electricians are to access electrical components in case After accessing controller and or DC drivers return components to case in reverse order they were removed Main Power Switch Thermostat Terminal Block DC Drivers Contactor Magnetic ...

Страница 16: ... night curtain shown green for illustrative purposes Attach magnets to front of honeycomb housing D Side view of night curtain attachment to honeycomb housing E Dual access models only Night curtains optional are on top of case as shown Unwind and attach via magnets OUTSIDE acrylic air deflector Caution To retract curtain carefully break magnet s hold on front of honeycomb housing slowly rewind cu...

Страница 17: ...nly Caution Turn main power off before accessing tub area Illustration below shown after removal of deck pans After cleaning or servicing in tub area return deck pans to case and return power to case Refrigeration Line Route Case Rear Case Front Drain Evaporator Coil Cover TXV Evaporator Fans Refrigeration Lines Evaporator Coil Acrylic Return Airflow Deflector Air Discharge ...

Страница 18: ...ight orifice with no gap to work properly See TROUBLESHOOTING section in manual if LED lights malfunction LED Light At Underside Of Header LED Lights At Underside Of Shelves Light Switch Thermometer 8 Thermometer Function Placement Cases with lower rear sliding doors have different thermometer location than units with solid back rear lower plenums as shown in illustrations below Thermometer provid...

Страница 19: ...ivot the bottom of the door out Return doors to case in reverse order they were removed 10 Rear Perforated Plenum Control Optional acrylic perforated plenums are shown Your unit may have solid back panel Units with acrylic perforated plenums have sliding doors with angled brackets that insert into acrylic perforated plenum slots as shown below As doors open and close acrylic perforated plenums fol...

Страница 20: ...l Hot Gas Loop Condensate Pan Sight Glass Compressor 11 Condenser Package Self Contained Units Only Assembly disassembly and servicing to be performed by licensed refrigeration contractor Condensate Package Configuration Illustration below may not reflect every feature or option of your particular condenser package Controller DC Driver Evaporator Section Drain PVC Optional Clean Sweep Condenser Co...

Страница 21: ...can be placed on decking or steps risers within self service display area A wide range of product may be displayed 2 Honeycomb Airflow Consideration Airflow from honeycomb air diffuser is designed to flow over and around product to return air grille at case front Caution You must keep the honeycomb air diffuser unblocked by product for airflow to reach return air grille Caution You must ALSO keep ...

Страница 22: ...y with paper towel Remove streaks or heat stains from stainless steel by rubbing with club soda Weekly Magnetic Condenser Coil Filter Self Contained Units Only This filter helps prevent dust particles from entering condenser coil It is accessible at air intake side of case Clean magnetic condenser coil filter by following either step 1 or 2 then follow step 3 1 Magnetic condenser coil filter is di...

Страница 23: ...rubbing method If electric coil overflow condensate pan is dirty clean it and in same manner while cleaning rest of condenser package After thoroughly cleaning condensate pan with scrub brush and solution rinse thoroughly with clean water in spray bottle and wipe dry with sponge or paper towel Use moist cloth to wipe off dust debris that collects on various parts fans sight glass overflow pan etc ...

Страница 24: ...care not to dislodge the heating wire that prevents condensation on the honeycomb retainer B Apply pressure to collapse the honeycomb to allow it to be pulled out of honeycomb retainer C Pry downward away from honeycomb retainer Clean honeycomb with warm water and soap solution Submerse if necessary Use brush to dislodge stubborn or sticky residue Dry by using vacuum s blow mode Honeycomb Air Diff...

Страница 25: ... Remove the Clean Sweep rail Wash rails brushes in hot water and mild soap solution If brushes are worn they must be replaced Call Technical Service Department to replace Toll Free number is listed at end of manual Clean condensing coil Use air pressure or industrial strength vacuum clean the dust and dirt that may collect on the condenser coil Caution Coil fins are sharp Handle with care Reattach...

Страница 26: ...ct must be pre chilled before placing in case Check that the case is not in the sun or near a heat or air conditioning vent See OVERVIEW NSF TYPE COMPLIANCE WARNINGS PRECAUTIONS section in this manual for specifics If case is located near outside doors temperature fluctuation can hinder unit s ability to maintain temperature Check air return grilles area at front of decking for obstructions DO NOT...

Страница 27: ...d ALL THE WAY into the LED light orifice with no gap See illustrations below left Power may not be reaching the case Contact store management to have trained service provider perform troubleshooting Troubleshooting to be performed by trained service providers only is on next page If case light still do not come on it may need to be replaced Contact Structural Concepts Technical Service Department ...

Страница 28: ...drain into Swap out regularly until case has completely drained When power to case is restored condensate pan should function properly and water will no longer overflow onto flooring Check that the drain trap is free of debris Check that the drain PVC is correctly positioned over condensate pan Check store conditions To prevent condensation in Type I environments maximum conditions are to be 55 hu...

Страница 29: ...that the fan shroud is properly secured Fans Are Not Working Check that the MAIN power switch is on Check that fans are plugged in at the fan shroud Check for foreign material obstructing fan performance Check that fan blades freely rotate within fan shrouds Check that power is going to fans Check that fan wiring is connected on terminal blocks System Not Operating Check that the utility power is ...

Страница 30: ...d Temperature changes during defrost mode but will return to normal Fourth LED will indicate defrost cycle in progress Check that case is not in sun or near a heat or air conditioning vent If case is located near outside doors temperature fluctuation can hinder unit s ability to maintain temperature Check that condenser coil has been cleaned Check that magnetic air filter attached to air intake gr...

Страница 31: ...Is Not Operating Check that the utility power is on Check that the MAIN power switch is on Check the circuit breaker box for tripped circuits Condensing Unit Is Not Operating Check that the power is turned on Determine if temperature controller settings are properly set See your case s serial label for your model s specified settings See SERIAL LABEL LOCATION INFORMATION LISTED TECH INFO SERVICE s...

Страница 32: ... system Check that liquid line filter dryer is not plugged Check that close offs are intact around condensing coil and that air is not recirculating Check that store ambient temperature isn t above maximum allowed See OVERVIEW TYPE COMPLIANCE WARNINGS PRECAUTIONS WIRING PLUGS section in this manual Head Pressure Too Low Check if sight glass is flashing or showing low charge Check that suction pres...

Страница 33: ...re is no air recirculation around evaporator coil Check that evaporator coil is not iced up High Suction Pressure Check for refrigerant overcharge Check that compressor reed valves aren t bad Look for high suction low head pressure Perform pump down Check that the cooling load isn t high Product must be pre chilled before placing in refrigerated section of case Check that case is at least 15 feet ...

Страница 34: ...MI 49441 Phone 231 798 8888 Fax 231 798 4960 www structuralconcepts com 34 SERIAL LABEL LOCATION INFORMATION LISTED TECH INFO SERVICE Serial Label Location Information Listed Technical Information Service Serial labels are located near the electrical access on your case Serial labels contain electrical temperature refrigeration information as well as regulatory standards to which the case conforms...

Страница 35: ...eing made will resume 3 If the instrument is switched off before pressing the Prg key all modifications to parameters will be lost Set Set aux Prg mute def Prg mute Set Set def Set aux aux def Set Prg mute Structural Concepts Corp 888 E Porter Rd Muskegon MI 49441 Ph 231 798 8888 Fax 231 798 0393 www structuralconcepts com I Oper Manuals PUB Templates Carel Controller Carel Controller IR33 pub Thi...

Страница 36: ...P alarms reset temp monitoring Summary Table of Alarm and Signals Display Buzzer and Relay Structural Concepts Corp 888 E Porter Rd Muskegon MI 49441 Ph 231 798 8888 Fax 231 798 0393 www structuralconcepts com 36 I Oper Manuals PUB Templates Carel Controller Carel Controller IR33 pub This data derived from Carel Material ir33 030220441 rel 2 0 01 05 2006 ...

Страница 37: ...F F 50 200 dP1 Maximum defrost duration evaporator min F 1 250 d6 Display on hold during defrost C 0 2 dd Dripping time after defrost min F 0 15 d 1 Display of defrost probe 1 C F F Structural Concepts Corp 888 E Porter Rd Muskegon MI 49441 Ph 231 798 8888 Fax 231 798 0393 www structuralconcepts com 37 I Oper Manuals PUB Templates Carel Controller Carel Controller IR33 pub This data derived from C...

Страница 38: ...sonable attorney fees and costs Remedies of SCC SCC s rights and remedies shall be cumulative and may be exercised from time to time In a proceeding or action relating to the breach of this Agreement by Purchaser Purchaser shall reimburse SCC for reasonable costs and attorney s fees incurred by SCC No waiver by SCC of any breach of Purchaser shall be effective unless in writing nor operate as a wa...

Отзывы: