background image

Operating Instructions

Preparing an Alkaline Cleaning Solution

Page 8 

© Copyright 2019 Stratasys. All rights reserved.

Stratasys Confidential

Preparing an Alkaline Cleaning Solution

SUP706 Support material is removed from printed models with an alkaline cleaning solution in 
the cleaning station.

To prepare the alkaline cleaning solution:

1. Make sure that the cleaning station tank is clean. Remove all foreign substances, such as 

material deposits from previous cleaning jobs.

2. Fill the cleaning station with water (see 

“Filling the Tank” (page 7)

).

3. While the cleaning station is agitating the  water:

a. Add 2% NaOH (caustic soda) (CAS 1310-73-2), in the quantity shown in the table 

below.

b. Mix the solution for 15  minutes.

c. Add 1% Na

2

SiO

3

 (CAS 6834-92-0), in the quantity shown in the table below.

d. Mix the solution for 15  minutes.

Important:

• Before preparing the alkaline cleaning solution, read 

“Safety Guidelines” 

(page 4)

.

• In the following steps, only use chemicals with the indicated CAS number.

Quantity

Water volume (liters)

16 gallons (60 liters)

2% NaOH (kg)

2.6 pounds (1.2 kg)

1% Na

2

SiO

3

 (kg)

1.3 pounds (0.6 kg)

Содержание BVCA

Страница 1: ...DOC 03200 Rev B CSIIP CleanStation 3D Model Cleaning System User Guide...

Страница 2: ...subject to change without notice Liability Stratasys shall not be liable for errors contained herein or for incidental or consequential damages in connection with the furnishing performance or use of...

Страница 3: ...le 10 Removing Models After Cleaning 12 Draining the Tank 13 Maintenance 16 Removing the Cover 16 Removing and Cleaning the Jet Plate 17 Cleaning the Filter 21 Testing the Jets 22 Flushing the Cleanin...

Страница 4: ...ing general guidelines together with the instructions provided throughout this guide ensure user safety while operating and maintaining the CSIIP CleanStation Never operate the cleaning station while...

Страница 5: ...ver pour water onto caustic soda Mixing it with water creates heat that could ignite other materials For information see DOC 08380 Working with Alkaline Cleaning Solution Waste Disposal Fully cured mo...

Страница 6: ...ntrolled from the operator panel Figure 1 Operator panel Agitation control adjusts the intensity of liquid circulation in the tank Controller adjusts the timer and starts and stops the cleaning cycle...

Страница 7: ...el see Figure 1 page 6 4 Set the selector switch to OFF 5 Set the CONTROL VALVE to CLEAN PARTS 6 Open the FILL VALVE 7 Fill the tank until the water reaches between 1 2 inches 2 5 cm and 5 cm below th...

Страница 8: ...its from previous cleaning jobs 2 Fill the cleaning station with water see Filling the Tank page 7 3 While the cleaning station is agitating the water a Add 2 NaOH caustic soda CAS 1310 73 2 in the qu...

Страница 9: ...FILL VALVE to SHUT 3 Set the CONTROL VALVE to CLEAN PARTS 4 Set the Agitation control to LOW 5 Set the SELECTOR to CLEAN PARTS Setting the Timer By default the timer is set to four hours Set the CSIIP...

Страница 10: ...ting and Stopping the Cleaning Cycle To start the cleaning cycle If the SELECTOR is set to OFF set it to CLEAN PARTS If the SELECTOR is set to DRAIN TANK a Set the SELECTOR to CLEAN PARTS b Make sure...

Страница 11: ...Stopping the Cleaning Cycle Page 11 Copyright 2019 Stratasys All rights reserved Stratasys Confidential To manually stop the cleaning cycle On the controller press and or Set the SELECTOR to OFF Figu...

Страница 12: ...odels under running water until they do not feel slippery 3 Dry the models with paper towels or allow them to air dry Warning Chemical Hazard Always wear neoprene safety gloves a mask and safety goggl...

Страница 13: ...tructions page 5 Draining the Tank Without Using the Drain Pump To drain the tank without using the drain pump 1 Close the tank cover 2 Put on gloves mask and safety goggles 3 If local regulations all...

Страница 14: ...e that the drain hose is securely in place 5 Open the operator panel 6 Set the CONTROL VALVE to DRAIN TANK 7 Set the SELECTOR to DRAIN TANK 8 When liquid stops flowing stop the pump by setting the SEL...

Страница 15: ...help the liquid flow more freely through the filter 2 Use the pump see Draining the Tank Using the Drain Pump page 14 3 If there is still excess liquid or residue in the tank use a spatula to push th...

Страница 16: ...if the filter is blocked Removing the Cover To remove the cover 1 Close the cover 2 Using a 7 16 inch 11 mm socket wrench remove the nuts on both sides of the cover Figure 9 Cover nuts 3 Lift off the...

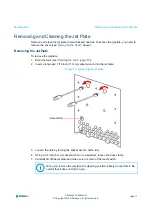
Страница 17: ...Plate To remove the jet plate 1 Drain the tank see Draining the Tank page 13 2 Insert a long neck 7 16 inch 11 mm socket wrench into the jet plate Figure 10 Loosening the jet plate 3 Loosen the nuts...

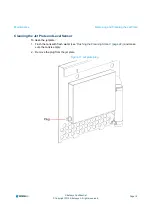
Страница 18: ...sys All rights reserved Stratasys Confidential Cleaning the Jet Plate and LevelSensor To clean the jet plate 1 Flush the tank with fresh water see Flushing the Cleaning Station page 22 and make sure t...

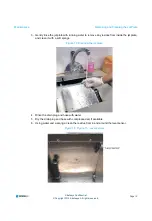
Страница 19: ...with running water to remove any residue from inside the jet plate and clean it with a soft sponge Figure 12 Cleaning the jet plate 4 Rinse the drain plug and hose with water 5 Dry the drain plug and...

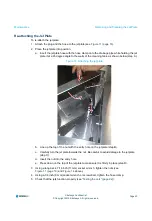
Страница 20: ...of the cleaning tank as shown below step A Figure 14 Attaching the jet plate b Line up the top of the nut with the entry hole on the jet plate step B c Carefully turn the jet plate towards the nut Be...

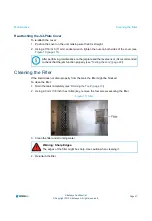
Страница 21: ...the liquid does not drain properly from the tank the filter might be blocked To clean the filter 1 Drain the tank completely see Draining the Tank page 13 2 Using a 3 mm 1 8 inch hex Allen key remove...

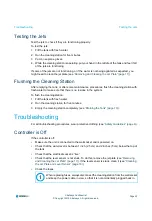
Страница 22: ...t there is no residue in the system To flush the cleaning station 1 Fill the tank with fresh water 2 Run the cleaning station for five minutes 3 Empty the cleaning station completely see Draining the...

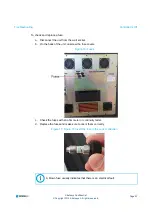
Страница 23: ...onnect the unit from the wall socket b On the back of the unit unscrew the fuse covers Figure 16 Fuses c Check the fuses with an ohm meter or continuity tester d Replace the fuses and make sure to ori...

Страница 24: ...placed See DOC 08380 Working with Alkaline Cleaning Solution Make sure that the liquid temperature is not above 86 F 30 C If so check that the cooling fans behind the back panel are functioning While...

Страница 25: ...n the nuts on either side of the cover Figure 19 Cleaning station cover nuts 3 Adjust the position of the cover until it is straight 4 Tighten the nuts Insufficient Agitation Test that the jets are wo...

Страница 26: ...automate the cleaning of printed blood vessel models and can be purchased from Stratasys Figure 20 Blood Vessel Cleaning Apparatus kit contents The kit consists of the following items Item Description...

Страница 27: ...16 inch or 11 mm securing the cover to the CSIIP cleaning station and remove the cover Figure 21 Removing the CSIIP cover 3 Remove the jet plate as described in Removing and Cleaning the Jet Plate pag...

Страница 28: ...ng tank Figure 22 New jet plate placed in location of removed jet plate 6 Release the level sensor spring clip slowly and verify that the level sensor sits inside the slot in the spring clip Figure 23...

Страница 29: ...7 Secure the jet plate to the side of the cleaning tank as shown in Figure 23 using the 2 washers and screw nuts you removed 8 Secure the cover hold down bracket to the top 2 screw studs of the jet pl...

Страница 30: ...ge 30 Copyright 2019 Stratasys All rights reserved Stratasys Confidential Securing the Safety Cover 1 Place the safety cover supplied in the BVCA kit over the 4 screw studs on the CSIIP cleaning stati...

Страница 31: ...e the filter basket from the BVCA kit over the drain at the bottom of the cleaning tank with the lever up while pressing down on the lever to secure the filter basket in place Figure 26 Filter basket...

Страница 32: ...e cleaning fixture as shown in Figure 27 6 Push and hold in the button on the water supply connector shown in Figure 27 while pushing the manifold down to connect the water supply pipes to the manifol...

Страница 33: ...6 Open the cover and adjust the pressure regulator see Figure 27 so the pressure gauge on the manifold shows 1 bar 7 On the CSIIP control panel turn the Agitation control up slowly and as the pressur...

Страница 34: ...connector shown in Figure 27 and slowly raise the manifold to remove the manifold from the tank 4 Remove the filter basket at the bottom of the tank by lifting the lever on the side of the filter bas...

Страница 35: ...side the tank and use the CSIIP cleaning station as before 9 Secure the original metal cover on the CSIIP see Installing the BVCA Kit page 27 Figure 32 Securing the original metal CSIIP cover To use t...

Страница 36: ...ay Eden Prairie MN 55344 1 888 480 3548 US Toll Free 1 952 937 3000 International 1 952 937 0070 Fax 1 Holtzman St Science Park PO Box 3496 Rehovot 76124 Israel 972 74 745 4000 972 74 745 5000 Fax c s...

Отзывы: