


- 25 -
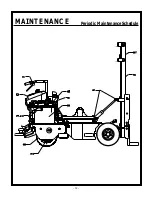
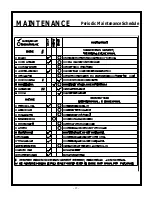
MAINTENANCE
Engine
ENGINE
Refer to engine manual for specific engine informa-
tion.
ENGINE OIL AND FILTER
Replace oil at 20 hours, then change oil
every 100 hours. Change the oil filter every
200 hours.
Remove the oil filler cap, drain bolt and oil
filter when required). Drain oil into a
suitable container.
Clean and install the drain bolt, tighten se-
curely. When required install new oil filter,
lightly oil filter seal.
Fill with the recommended oil, fill to the
upper limit mark on the dipstick, and tighten
the oil filler cap securely.
Run engine for 2 3 minutes, stop engine
and check oil level and check for leaks.
NOTE:
Please dispose of used motor oil and filter
in a manner that doesnt harm the
environment.
Under heavy loads, change engine oil and filter
more frequently.
AIR CLEANER
Foam Pre-cleaner: Clean in warm soapy
wa-
ter, rinse and dry thoroughly. Apply oil to the foam
and squeeze out excess oil. The engine will smoke
if too much oil is left in the foam.
Paper Element: Tap the element lightly on a hard
surface to remove excess dirt or blow pressurized
air (30 psi max.) through the filter from the air
cleaner cover side. Do not brush the dirt off.
Replace elements if damaged or excessively dirty.
SPARK PLUG
Recommended spark plug:
BPR6ES (NGK)
W20EPR-U (NIPPONDENSO)
To ensure proper engine operation, the spark plug
must be properly gapped and free of deposits.
Clean and replace at scheduled maintenance. Clean
engine before removing spark plug. Visually
inspect the spark plug, discard if insulator or tip is
damaged. Check that the spark plug washer is in
good condition. If spark plug is to be reused, clean
with a wire brush and set plug gap .028 - .031in (.70
- .80mm). Thread the spark plug in by hand to
prevent cross threading. After the spark plug is
seated, tighten with a spark plug wrench to com-
press the washer.
If installing a new spark plug, tighten 1/2
turn after the spark plug seats to compress
the washer.
If reinstalling a used spark plug, tighten 1/8
1/4 turn after the spark plug seats to
compress the washer.
NOTICE:
The spark plug must be securely tightened.
An improperly tightened spark plug can
become very hot and may cause engine
damage.
Use only the recommended spark plug or
equivalent. A spark plug that has an
improper heat range may cause engine
damage.
ENGINE RPM
Start the engine and allow it to warm up to normal
operating temperature, check the idle speed 1,400 +
100, and adjust idle stop screw as required.
Check the full speed, Honda 3,600 + 100 and adjust
full speed stop screw as required.
Содержание Lift Jockey LJS2000
Страница 2: ......
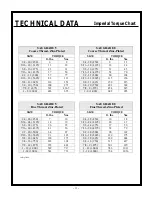
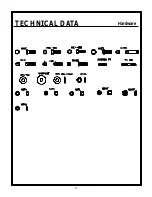
Страница 13: ...13 TECHNICAL DATA Hardware...
Страница 34: ...34 MAINTENANCE Periodic Maintenance Schedule...
Страница 35: ...35 MAINTENANCE Periodic Maintenance Schedule...
Страница 38: ......
Страница 40: ...40 PARTS LIST Tilt Cylinder Front Cowl Assembly...
Страница 41: ...41 PARTS LIST Tilt Cylinder Front Cowl Assembly...
Страница 42: ...42 PARTS LIST Engine Cowl Assembly...
Страница 43: ...43 PARTS LIST Engine Cowl Assembly...
Страница 44: ...44 PARTS LIST Engine Assembly...
Страница 45: ...45 PARTS LIST Engine Assembly...
Страница 46: ...46 PARTS LIST Pump Assembly...
Страница 47: ...47 PARTS LIST Pump Assembly...
Страница 48: ...48 PARTS LIST Battery Hose Clamp Assembly...
Страница 49: ...49 PARTS LIST Battery Hose Clamp Assembly...
Страница 50: ...50 PARTS LIST Steering Housing Assembly...
Страница 51: ...51 PARTS LIST Steering Housing Assembly...
Страница 52: ...52 PARTS LIST Hydraulic Tank Assembly...
Страница 53: ...53 PARTS LIST Hydraulic Tank Assembly...
Страница 54: ...54 PARTS LIST Steering Handle Bar Fuel Tank Assembly...
Страница 55: ...55 PARTS LIST Steering Handle Bar Fuel Tank Assembly...
Страница 56: ...56 PARTS LIST Platform Brake Pedal Assembly...
Страница 57: ...57 PARTS LIST Platform Brake Pedal Assembly...
Страница 58: ...58 PARTS LIST Brake Linkage Assembly...
Страница 59: ...59 PARTS LIST Brake Linkage Assembly...
Страница 60: ...60 PARTS LIST Wheelmotor Brake Tire Assembly...
Страница 61: ...61 PARTS LIST Wheelmotor Brake Tire Assembly...
Страница 62: ...62 PARTS LIST Quick Change Hub Assembly...
Страница 63: ...63 PARTS LIST Quick Change Hub Assembly...
Страница 64: ...64 PARTS LIST Hand Foot Mast Control Assembly...
Страница 65: ...65 PARTS LIST Hand Foot Mast Control Assembly...
Страница 66: ...66 PARTS LIST Mast Assembly...
Страница 67: ...67 PARTS LIST Mast Assembly...
Страница 68: ...68 PARTS LIST Mast Assembly...
Страница 69: ...69 PARTS LIST Mast Assembly...
Страница 70: ...70 PARTS LIST Lift Frame Assembly...
Страница 71: ...71 PARTS LIST Lift Frame Assembly...
Страница 72: ...72 PARTS LIST Hydraulic Piping Schematic...
Страница 73: ...73 PARTS LIST Hydraulic Piping Schematic...
Страница 74: ...74 PARTS LIST Hydraulic Piping Schematic...
Страница 75: ...75 PARTS LIST Hydraulic Piping Schematic...
Страница 76: ...76 PARTS LIST Hydraulic System Schematic...
Страница 77: ...77 PARTS LIST Hydraulic System Schematic...
Страница 78: ...78 PARTS LIST Electrical Wiring Schematic...
Страница 79: ...79 PARTS LIST Electrical Wiring Schematic...
Страница 80: ...80 PARTS LIST 55398 Decal Identification...
Страница 82: ...82 PARTS LIST Decal Identification...
Страница 84: ......
Страница 85: ......
Страница 86: ......


