


49
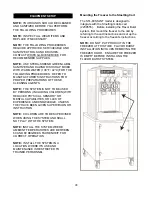
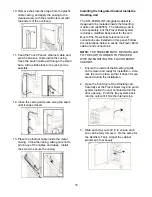
Installing the Touch Panel and Mounting
Bracket
The Touch Panel is the control unit for the
Flavor Burst
®
system. Normal operating
functions are performed using the Touch Panel
and the freezer draw handle. The Touch Panel
is mounted to the top of the freezer with the
Touch Panel mounting bracket.
NOTE:
IF YOUR FREEZER HAS A
ROUNDED TOP, CONTACT WHITE GLOVE
SERVICE FOR ALTERNATE MOUNTING
KITS.
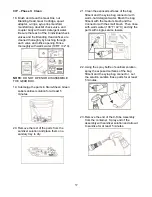
1. Prepare detergent water by mixing several
drops of Dawn
®
dish soap with a gallon of
warm water (108°F / 42°C).
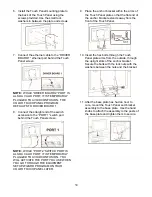
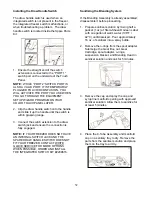
2. Determine where you wish to mount the
Touch Panel. It is typically mounted in the
middle of the freezer, centered above the
middle spout on a multi-barrel freezer, or
centered above the spout with the Flavor
Burst assembly attached (as shown in these
instructions). Clean the top surface of the
freezer where the mounting bracket will be
attached, between the front edge and the
hopper with detergent water. Rinse the area
with warm water (108°F / 42°C) and dry with
a single service towel.
NOTE:
THE SURFACE MUST BE FREE
FROM DUST AND OILS OR THE ADHESIVE
WILL NOT CURE PROPERLY.
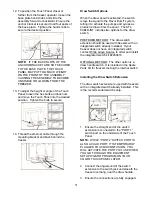
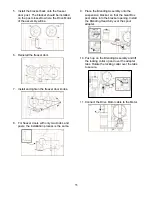
3. Use the ampule provided to prime the
cleaned area before mounting the Touch
Panel mounting bracket.
NOTE
: LIQUID INSIDE THE AMPULE
ENHANCES ADHESION.
4. Set the mounting plate on the freezer where
it will be attached. Measure and mark with
a pencil around the base plate.
5. Remove the protective covering from the
adhesive strip on the bottom of the base
plate.
The front of the plate is the side
with the posts that are closest together
.
Apply the base plate to the freezer within
the pencil marks. Press firmly and allow the
adhesive to cure
for at least 1 hour
.
NOTE:
IF THE ADHESIVE DOES NOT HAVE
TIME TO CURE PROPERLY, THE CONSTANT
WEIGHT OF THE TOUCH PANEL CAN PULL
THE ADHESIVE AWAY FROM THE FREEZER
SURFACE. THIS COULD EVENTUALLY
RESULT IN THE TOUCH PANEL ASSEMBLY
FALLING OFF THE FREEZER.
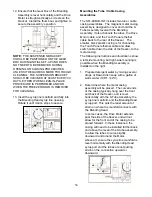
Содержание Flavor Burst
Страница 2: ......
Страница 9: ...6 PAGE INTENTIONALLY LEFT BLANK...
Страница 11: ...8 General System Overview Figure 1...
Страница 13: ...10 Integrated Cabinet Continued Figure 2...
Страница 17: ...14 Syrup Pump and Related Parts Figure 4...
Страница 19: ...16 Sanitizer Pump and Related Parts Figure 5...
Страница 21: ...18 Electronic Parts and Connections Continued Figure 6...
Страница 23: ...20 Spare Parts Kit Figure 7...
Страница 24: ...21 PAGE INTENTIONALLY LEFT BLANK...
Страница 36: ...33 PAGE INTENTIONALLY LEFT BLANK...
Страница 50: ...47 PAGE INTENTIONALLY LEFT BLANK...
Страница 75: ......
Страница 76: ......