background image

24

TC1044SCP

A

4580D

4580D

ON

ON

ON

ON

ON

ON

ON

ON

.1J63

.1J63

1J63

1J63

503  0D

503 0D

WD 09

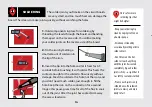
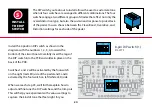
This kit comes with 24" of lead wire. 
Cut the wire into six, 2" sections and nine 1" sections. 
Strip around 3/32" off both ends of all wires with 
.6mm/22gauge stripper.

The 2" sections will attach the in, out and DC jacks 
at the top of the PCB and the 1" sections will attach 
the breakout board to the bottom center of the PCB.

Insert the stripped ends of the wires into the holes 
on the component side of the PCB and solder them on 
the back.

9

9

StewMac’s PCB 
Holder (#0500) 

is perfect for soldering 
tiny parts and wires. 
With two free hands 
and the ability to rotate 
the board, you’ll easily 
find the perfect angle 
to work angle.

INSTALL 13

LEAD WIRES

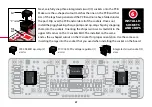
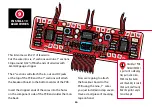
Now we’re going to attach 
the breakout board to the 
PCB using the nine, 1"  wires 
you just installed in step seven. 
Have a small piece of masking 
tape on hand.

Содержание 12251

Страница 1: ...1 TWO KINGS BOOST DOUBLE POWERED ROYAL TONE INSTRUCTION GUIDE ...

Страница 2: ...oughttheBluesBreakercircuitandsoupedituptosuitwhathethoughtitshouldbe thenpackedtwointoa singleenclosurecalledtheKingofTone Inadditiontothesurfacecontrols eachsidecanbeindependentlysetviainternalDIPswitchestoOverdrive normal which isalowergaindrivesound CleanBoost whichfunctionsasacleanboostwithjustahairofgain AndDistortionmode which iscapableofachievinghighergaindistortedsounds Bothsidescanbesetd...

Страница 3: ...Tech Wrench Set 3691 or nut drivers sockets PC Board Holder 0500 TOOLS AND SUPPLIES REQUIRED OR RECOMMENDED Not pictured 1 Phillips screwdriver and supplies to paint your pedal clear silicone adhesive spray finish Power Model 12251 requires a standard 9V DC center negative power supply not included and consumes less than 100mA ...

Страница 4: ... or OptiVISOR 1685 Multimeter PM16B 3607 Our Pedal BuildingTool Set 2318 is the perfect companion for new pedal builders who do not already have a lot of tools and supplies TOOLS AND SUPPLIES HELPFUL Soldering Aids 0521 ...

Страница 5: ...istor 4 7357 Yellow Violet Black Brown Brown 4 7K resistor 2 7359 Brown Black Black Red Brown 10K resistor 2 7362 Red Violet Black Red Brown 27K resistor 2 7398 Yellow Violet Black Red Brown 47K resistor 2 7369 Brown Black Black Yellow Brown 1M resistor 6 7367 Orange Orange Black Red Brown 33K resistor 2 7409 Red Red Black Orange Brown 220K resistor 2 7381 Brown Black Black Orange Brown 100K resis...

Страница 6: ...capacitor 2 7304 1J63 10nF capacitor 8 7331 1µF capacitor 2 7308 1J63 WIMA 0 01 100 1N5817 rectifier diode 3 7522 1N914 rectifier diode 8 7521 ON 22nF capacitor 2 7332 50K trim pot 2 100739 503 0D 1N4001 1S1588 rectifier diode 4 101259 100pF capacitor 2 100721 WIMA 0 022 100 PARTS LIST CONT ...

Страница 7: ... 3PDT latching footswitch 1 1611 Adhesive foam tape squares 4 7560 B25K linear taper pot 2 7461 A100K linear taper pot 2 7455 B100K Linear taper pot 2 7453 Control knobs 6 7501 TC1044 SCPA voltage regulator 1 100732 JRC 45880D op amp 2 100733 Integrated circuit socket 3 7484 PARTS LIST CONT ...

Страница 8: ...668 W 24 of lead wire 22 gauge 1 5960 1 4 mono jack 1 4652 1 4 Stereo jack 1 4653 2 1mm DC power connector 1 7467 Battery clip 1 1225 2 1mm DC power connector 1 7468 Only for kit 12251 Only for kit 12255 Only for kit 12255 Only for Kit 12255 Two for Kit 12251 PARTS LIST CONT ...

Страница 9: ... If you re using primer followed by paint method paint 3 coats with 45 minutes between coats 7 Now add your 2 Kings Boost sticker and any other desired decoration paint pens acrylic paint Sharpie etc Allow drying time 8 Add 3 coats of clear coat glaze with 45 minutes between coats Wait at least 2 hours before adding parts Give your pedal a custom paint job by painting and adding the stickers provi...

Страница 10: ...e ohmic value the greater the resistance to this flow of current For example a 100Ω resistor creates ten times as much resistance as a 10Ω resistor Resistor values are indicated by colored bands read from left to right The first color in the code is usually the one painted closest to a lead When a gold or silver band is UNDERSTANDING ELECTRONIC COMPONENTS 4 7KΩ 1 K 1 000 Band 1 Band 2 Band 3 Multi...

Страница 11: ...rows pointing to it Installing capacitors with the polarity backwards will make the circuit malfunction and quickly destroy the capacitor even causing it to explode CAPACITORS The two main uses of capacitors are to store electricity and to block the flow of DC current Capacitor values are typically printed on the component The key values with caps are their voltage and capacitance The voltage spec...

Страница 12: ... circuit and acts as a power switch when you plug in your guitar UNDERSTANDING ELECTRONIC COMPONENTS CONT DIODES Diodes are used where you want electricity to flow in only one direction such as power rectification and also to limit how much current can flow to create clipping distortion Diodes are also polarized so they need to be installed in the correct orientation The stripe around one end mark...

Страница 13: ...cause our ears don t hear changes in volume in a linear fashion as you might expect As the volume increases a greater change in signal or sound pressure is required to perceive a smooth transition LED LED stands for Light Emitting Diode and functionally LEDs are very similar to regular diodes LEDs are most often used as indicator lights in pedals They are polarized just like diodes and electrolyti...

Страница 14: ...esoldered joints are messy and more likely to fail 1 Hold components in place for soldering by threading the leads through the board and bending them apart on the reverse side You will be making your solder joints on the reverse side of the board 2 Tin the iron by melting a small amount of solder onto the tip of the iron 3 Insert the tip into the hole and let it heat for 4 5 seconds before touchin...

Страница 15: ...white In many cases components must be inserted in a specific direction due to polarity so follow the graphics carefully For example diodes are polarized so they must be installed in the correct orientation Solder the diodes on the opposite side of the board known as the component side INSTALL 15 DIODES 2 2 Note the stripe around one end of the diode This marks the negative minus lead On the PCB t...

Страница 16: ...ext we re going to add a bunch of resisitors to our PCB Like in the previous step you ll find an outline of each resistor and its value printed in their proper location on the PCB Resistors are not polarized so it doesn t matter which lead goes in which hole Match resistors to the values on the PCB a few at a time and solder in place Clip the leads close to the board but not touching the board so ...

Страница 17: ... 100K resistors OPTIONAL MODIFICATION It s a great practice to always check your resistors on a multimeter to be sure they display the correct ohms before installing In rare cases a resistor might be labeled incorrectly or could be an open circuit and you wouldn t want to find that out post install The right side footswitch will engage this resistor The left side footswitch will engage this resist...

Страница 18: ...ed Black Orange Brown 27K resistor 2 7398 Red Violet Black Red Brown 33K resistor 2 7409 Orange Orange Black Red Brown INSTALL 26 RESISTORS 3 3 Installing low profile components that sit closer to the board now will make installing taller components easier later on 101J 100V 100uF ...

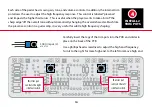
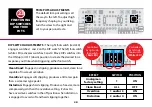
Страница 19: ...p edge off the overall tone without dramatically changing the overall character Much like the presence control in a guitar amp it is very useful for subtle high frequency shaping Carefully insert the legs of the trim pots into the PCB and solder in place on the back of the PCB Use a phillips head screwdriver to adjust the high end frequency Turn it to the right for more high end to the left to rem...

Страница 20: ...ettings for each side of the pedal Install the 4 position DIP switch as shown in the diagram with the numbers 1 2 3 4 towards the bottom of the circuit board Carefully insert the legs of the DIP switch into the PCB and solder in place on the back of the PCB Switches 1 and 2 will be activated by the footswitch on the right red LED side of the pedal and 3 and 4 activated by the footswitch on left wh...

Страница 21: ... folded under the part Flip over the PCB and solder all of the sockets Once cool install the piggybacking charge pump and op amp chips by snapping them into the sockets Orienting the chips is critical A small dot in the upper left corner on the IC sockets MUST be installed on the same end as the u shaped cutout on the IC socket for proper orientation Use the same care inserting the legs into the s...

Страница 22: ...gative minus lead On the circuit board the circle for this cap s location has a round through hole on one side and a square through hole on the other insert the capacitors with their stripe facing the round hole side On polarized caps of this type there s a second way to identify the negative lead it is the shorter of the two leads 100µF capacitor 1 7312 10 0 uF 10µF capacitor 3 7310 10 uF 1µF cap...

Страница 23: ...apacitor 2 7304 1J63 10nF capacitor 8 7331 1µF capacitor 2 7308 1J63 WIMA 0 022 100 WIMA 0 01 100 INSTALL 16 CAPACITORS The remaining capacitors below are not polarized However best practice is to solder these caps in place with all text facing the same direction 1J63 1J63 8 8 ...

Страница 24: ...ns will attach the breakout board to the bottom center of the PCB Insert the stripped ends of the wires into the holes on the component side of the PCB and solder them on the back 9 9 StewMac s PCB Holder 0500 is perfect for soldering tiny parts and wires With two free hands and the ability to rotate the board you ll easily find the perfect angle to work angle INSTALL 13 LEAD WIRES Now we re going...

Страница 25: ...tape the leads to the breakout board on the component side to prevent them from slipping out of the holes Carefully flip the PCB and breakout board over and solder the wires in place on the breakout board Once the solder joints have cooled remove the tape SOLDER BREAKOUT BOARD TO THE PCB 10 10 4580D ON ON ON ON ON ON ON ON 1J63 1J63 503 0D 503 0D ...

Страница 26: ...arts on the PCB Remove the nuts and washers from the six pots and insert their threaded shafts into their coordinating holes on the OUTSIDE of the pedal housing Reattach nuts and washers inside housing and lightly tighten Remove the nut and washer from the footswitch and insert threaded shaft into the footswitch hole from INSIDE the housing Add nut and washer to footswitch and thread only a few th...

Страница 27: ...side up over the pots The shaft of the footswitch will help to support the PCB Manuever the lugs of the pots and the PCB until the lugs of the pots slip into their appropriate holes in the PCB Once all the lugs have popped through the board solder them in place Remove the nuts and washers on the pots to free the PCB group of parts from the housing Reattach the nuts and washers to pots and switch 1...

Страница 28: ...lugs on the footswitch Rotate the PCB pots breakout board and footswitch until the pots rest somewhere comfortably on the outside of the housing and solder Making sure all the lugs are through the holes in the breakout board and breakout board is flat against the footswitch solder the lugs to the breakout board Once the solder has cooled on the lugs remove the washer and nut from the footswitch an...

Страница 29: ... be in the lower left position thread the two ends of the wire leads coming from the battery clip through the tiny hole to the left of the battery compartment opening in the PCB Guide the two leads under the PCB and tack the ends to the back of the middle volume pot with a small piece of tape Once you ve threaded the battery wires through the hole make a small knot with the wires to prevent tensio...

Страница 30: ... shorter lead is closest to the outside of the enclosure Feed the leads through the plastic plug press the plug down until it s tight in the bezel The LED will be held in place when you solder the leads to the switches and circuit board For a more secure mount you can run a bead of clear silicone adhesive around the plastic plug Repeat above steps for red and white LEDs INSTALL 2 LED INDICATOR LIG...

Страница 31: ...ile carefully inserting the shafts of the pots and footswitch into their holes Once the LED leads are through the PCB and the shafts TC1044SCPA 4580D ON ON ON ON ON ON ON ON 103J100 103J100 1J63 1J63 102 1E TC1044SCPA 4580D ON ON ON ON ON ON ON ON 63 1J63 1J63 102 1E of the pots and footswitch are in their holes reattach the washers and nuts for the last time promise Using a 14mm wrench tighten th...

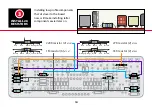
Страница 32: ...gram on the right and solder the battery clip red wire and the positive and negative wires coming from the PCB Once solder joints have cooled tighten the nut with a pair of needle nose pliers Do not over tighten because you could crack the DC bushing PLEASE NOTE The DC jack and input jack are different for models 12251 and 12255 so choose step 17 20 according to your model INSTALL THE DC JACK FOR ...

Страница 33: ... wire on the left side of the PCB to the lug that corresponds with the tip connection The tip lug should be the one closest to the outside wall of the enclosure Solder the wire on the right side of the PCB to the sleeve lug which is the center lug of the three lugs as shown in the diagram Now solder the black wire that is coming from the battery clip to the ring lug which will be the right most lu...

Страница 34: ... enough to allow the jack to rotate Solder the inside left wire to the longer lug of the DC jack Solder the inside right wire to the shorter lug of the DC jack Once solder joints have cooled tighten the nut with a pair of needle nose pliers Be careful not to tighten to tightly because you can crack the bushing of the jack WD 19 1 WD 19 2 INSTALL THE DC JACK FOR MODEL 12251 DC only 19 19 ...

Страница 35: ...k lug that corresponds with the sleeve connection The sleeve lug should be the one closest to the DC jack Solder the 2 wire on the left side of the PCB to the lug of the input jack that corresponds with the tip connection The tip lug should be the one closest to the outside wall of the enclosure Once the solder has cooled orient the jack as shown in the diagram make sure none of the connections on...

Страница 36: ... that corresponds with the sleeve connection The sleeve connection lug should be the one closest to the DC jack Solder the 2 wire on the right side of the PCB to the lug of the output jack that corresponds with the tip connection The tip connection lug should be the one closest to the outside wall of the enclosure Once the solder has cooled orient the jack as shown in the diagram make sure none of...

Страница 37: ...is is what your pedal should look like Congrats on a job well done Now simply attach the back of the pedal pop on the knobs plug this thing in and bend some tone If you are running on 9V battery remember to remove your input cable when not playing as it will drain the battery 22 22 COMPLETED VIEW with battery option ...

Страница 38: ...0D TRIM POTS ADJUSTMENTS The default trim pot setting is all the way to the left To adjust high frequency shaping to your liking turn the screw to the right and set to your personal taste EFFECT SWITCH POSITION Analogman factory setting Clean Boost ALL OFF Overdrive 1 and or 3 ON Distortion 2 and or 4 ON DIP SWITCH ADJUSTMENTS The right footswitch red LED engages switches 1 and 2 on the DIP switch...

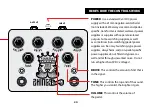
Страница 39: ...as some linear non switching pedal power supplies can be noisy Switching type power supplies daisychains and non pedal specific power supplies do not filter dirty power as well and let through unwanted noise Do not run at higher than 9V DC voltages DRIVE This controls the amount of dirt that is in the signal TONE This controls the top end of the sound The higher you crank it the brighter it gets V...

Страница 40: ... If any of our products ever break wear out or fail to exceed your every expectation simply return it for a replacement Quality you can trust For life TECHNICAL SUPPORT If you have any questions before during or after your build please reach out to our Tech Support Team by email at service stewmac com or by phone M F 9 00AM 5 00PM at 1 800 848 2273 ...

Отзывы: