15
Chapter 3: Introduction to C Programming
This lesson assumes that the Arduino IDE is correctly installed on your computer and tested. If not, refer
to Appendix A to follow the installation process.
The Basic Arduino Program
1.
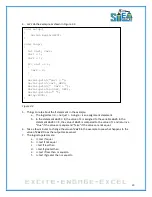
Let’s start with a simple program, as shown in Figure 3.1. This is the same program referenced in
Appendix A.
Figure 3.1: Program - First.ino
2.
The program consists of two separate functions, namely
setup
and
loop
.
You will be adding
additional functions to your code, but you must have a setup function and a loop function in
every program that you write. Referring to the program, you should note:
The setup function is used to define certain parameters on the Arduino microprocessor.
In this example, the setup function includes the statement
Serial.begin(9600);
which
sets the communication speed of the serial port on the Arduino to 9600 baud. This will
allow the Arduino to communicate with the serial monitor on the PC. The
()
after the
name setup is the parameter list passed to the function. Since there are no parameters
being passed to the function, the list is empty. However, the
()
after the name is still
required. Following the function name is a
{
at the opening, and a matching
}
at the end
of the function. Everything between the first
{
and its matching
}
belong to the
function.
The
//
indicates that whatever follows is a Comment. Comments may begin in any
column. For example, one could write:
Serial.println("Hello World");
// used to print to a serial port
Use comments to help document the program.
The word
void
in front of the function names indicate that the functions are not
returning a value. We will discuss this more later.
void setup()
{
// Your setup code here, to run once:
Serial.begin(9600);
}
void loop()
{
// Your main code here, to run repeatedly:
Serial.println("Hello World");
delay(1000);
}
Содержание Pi-Bot v2.00
Страница 67: ...67 Figure 6 15 ...
Страница 78: ...78 UltraSonicSensorTestwithLED Program ...
Страница 80: ...80 ObstacleAvoidance Program ...
Страница 82: ...82 ObstacleAvoidancewithLED Program ...
Страница 83: ...83 ObstacleAvoidancewithLED Program CONTINUED ...
Страница 90: ...90 Download and run the following program LineFollowing Program ...
Страница 91: ...91 LineFollowing Program CONTINUED ...
Страница 94: ...94 AdvancedLineFollowing Program CONTINUED ...
Страница 95: ...95 AdvancedLineFollowing Program CONTINUED ...
Страница 96: ...96 AdvancedLineFollowing Program CONTINUED ...
Страница 110: ...Appendix B Complete Pi Bot Wiring Schematic ...


