background image


6918600000


6


nell’apposito raccordo posto sul pannello frontale 
6)  Allacciare  la  bombola  del  gas  (Argon) 
all’apposito raccordo  posto sul  pannello posteriore 
della macchina.   
7)  Premere  il  pulsante 

“SELECT  MODE”

  e 

posizionarsi sul LED n.2 o 3 per Saldatura TIG con 
HF o senza HF. 


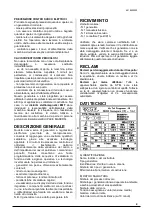
DESCRIZIONE PANNELLO


FRONTALE 


%

Select

Mode

Function

Pulse

1

v

2

%

Hz

%

%


Led abilitazione saldatura 

Led Modalità Tig HF 

Led Modalità Tig LIFT 

Led Modalità Elettrodo 

Pulsante Selezione Modalità Saldatura 

Led Pre Gas (0,1 -2 sec)  

Led Base Current 1 (10 - 90%) 

Pulsante Selezione Funzioni TIG 

Led Base Current 2 (10 - 90%) 

10 

Led Post Gas (0,1 - 10 sec) 

11 

Pulsante Attivazione Pulsazione 

12 

Led Pulsazione Attiva 

13 

Encoder Regolazione Corrente e Funzioni 

14 

Led Slope Down (0,1 – 10 sec) 

15 

Display Digitale 

16 

Led Regolazione Pulse Base Current (10–90%) 

17 

Led Corrente di Saldatura 

18 

Led Frequenza di Pulsazione (0,4 – 300 Hz) 

19 

Led Regolazione Pulse Duty Cycle (10 – 90%) 

20 

Led Slope Up (0,1 – 10 sec) 

21 

Led Sovratemperatura 

22 

Led Sub Menu’ 


SUB MENU’ 
- V.R.D. 

(ATTIVO SOLO IN 

ELETTRODO

In  Modalità  stick  Tenere  premuto    il  pulsante 

“SELECT  MODE”

  sul  pannello  frontale  della 

macchina    per  circa  3  secondi,  rilasciare    poi  il 
pulsante; il led di sub menù attivo (22) lampeggerà 
e il display mostrerà la scritta ON  o OFF  variando 
l’encoder  13.  Tramite  l’encoder  13  si  puo’  inserire 
(ON) o disinserire (OFF) la funzione VRD. 
 

- HOT START 

(ATTIVO SOLO IN


ELETTRODO

)


In  Modalità  stick  Tenere  premuto    il  pulsante 

“SELECT  MODE”

  sul  pannello  frontale  della 

macchina    per  circa  3  secondi,  rilasciare    poi  il 
pulsante  ed  eseguire  una  pressione  del  pulsante 
successiva;  il  led  di  sub  menù  attivo  (22) 
lampeggerà e il display mostrerà la scritta H.S. 
Tramite l’encoder 13 si puo’ variare il valore di Hot 
Start da 0 al 50% del valore di corrente impostato. 
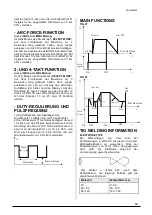
 

ARC FORCE 

(ATTIVO SOLO IN


ELETTRODO

))))


In  Modalità  stick  Tenere  premuto    il  pulsante 

“SELECT  MODE”

  sul  pannello  frontale  della 

macchina    per  circa  3  secondi,  rilasciare    poi  il 
pulsante  ed  eseguire  due  pressioni  del  pulsante 
successive;  il  led  di  sub  menù  attivo  (22) 
lampeggerà  e  il  display  mostrerà  la  scritta  A.F. 
Tramite l’encoder 13 si puo’ variare il valore di Arc 
Force da 0 al 50% del valore di corrente impostato. 
 

- FUNZIONE 2T E 4T  

(ATTIVO SOLO IN


TIG

))))


In  modalità  Tig  tenere  premuto  il  pulsante  

“SELECT  MODE”

  sul  pannello  frontale  della 

macchina  per  circa  3  secondi,  rilasciare  poi  il 
pulsante; il led di sub menù attivo (22) lampeggerà 
e  il  display  mostrerà  la  scritta  2T  o  4T  variando 
l’encoder  13.  Tramite  l’encoder  13  si  può 
selezionare la funzione 2T o 4T nelle modalità TIG 
lift o TIG HF.  
 

- REGOLAZIONE DUTY E 
FREQUENZA PULSAZIONE 

1)  Selezionare  modalità  Pulsazione  tramite  il 
pulsante 

11, 

il led 

12

 si accende. 

2)  Premere  in  sequenza  il  pulsante 

11

  il  led 

12


lampeggerà  e  sul  display  apparirà  la  scritta  Dut, 
Frd e IbP alternativamente. Tramite l’encoder 

13

 si 

puo’  variare  il  valore  di  del  duty  dal  10  al  90%,  la 
frequenza  da  0,4  a  300  Hz  e  la  corrente  di  base 
dal 10 al 90%. 
 

12 

13 

4

10 

11 

15 

16 

17 

18 

19 

14 

20 

21 

22 

Содержание TIG dp 181H

Страница 1: ...000 1 MANUALE DI ISTRUZIONE PER SALDATRICE INSTRUCTION MANUAL FOR WELDING MACHINE BETRIEBSANLEITUNG F R SCHWEI ER TE TIG TIG TIG TIG dp dp dp dp 181H 181H 181H 181H Info www stelgroup com tel 39 0444...

Страница 2: ...onized standard in force within the EEA has been used in the design EN 60974 1 Arc welding equipment Part 1 Welding power sources EN 60974 10 Arc welding equipment Part 10 Electromagnetic compatibilit...

Страница 3: ...E LA VOSTRA SALUTE Tenere il capo fuori dalla portata dei fumi Provvedere per una ventilazione adeguata dell area di lavoro Se la ventilazione non sufficiente usare un aspiratore che aspiri dal basso...

Страница 4: ...denza dei cavi di saldatura I comandi sul pannello frontale consentono una facile programmazione delle sequenze di saldatura in funzione delle esigenze operative La tecnologia inverter usata ha permes...

Страница 5: ...enti nel paese di utilizzo L impianto di rete deve essere di tipo industriale Predisporre una apposita spina che preveda l alloggiamento dei conduttori del cavo di alimentazione Per i cavi pi lunghi m...

Страница 6: ...TTRODO In Modalit stick Tenere premuto il pulsante SELECT MODE sul pannello frontale della macchina per circa 3 secondi rilasciare poi il pulsante ed eseguire una pressione del pulsante successiva il...

Страница 7: ...niche che anticorrosive GAS Il gas di protezione normalmente usato l argon puro con una quantit variabile a seconda della corrente impiegata 4 6 I min SALDATURA TIG DEL RAME Per le propriet gi descrit...

Страница 8: ...lettriche assieme ai rifiuti normali In ottemperanza alla Direttiva Europea 2002 96 CE sui rifiuti da apparecchiature elettriche ed elettroniche e relativa attuazione nell ambito della legislazione na...

Страница 9: ...ersons PREVENTION OF ELECTRIC SHOCKS Take the following precautions when working with a welding machine keep yourself and your clothes clean do not be in contact with damp or wet parts when working wi...

Страница 10: ...sumption excellent dynamic response very high power factor and yields better welding characteristics viewing of the data and of the set functions on the display The electronic components are enclosed...

Страница 11: ...ndustrial type Provide a special socket which can receive leads For longer connecting cables increase the lead section as required Upstream the mains socket must have a suitable switch provided with d...

Страница 12: ...r about 3 seconds release and press again the same button The Sub Menu LED 22 will blink and the display will show H S Regulate the encoder 13 to change the value of the Hot Start from 0 to Max 50 of...

Страница 13: ...th mechanical and anti corrosive GAS The shielding gas normally used is pure argon with a gas flow rate that varies according to the current used and joint set up 4 6 I min TIG WELDING ON COPPER Due t...

Страница 14: ...pose of electrical equipment together with normal waste In observance of European Directive 2002 96 EC on Waste Electrical and Electronic Equipment and its implementation in accordance with national l...

Страница 15: ...eine entflammbaren Dinge mit sich wie Feuerzeuge oder Streichh lzer Der Lichtbogen kann Br nde verursachen Halten Sie die Spitze der Elektrode von Ihrem K rper sowie von Personen in Ihrer N he fern VO...

Страница 16: ...ingem Gewicht und kompakten Abmessungen geringerer Energieverbrauch ausgezeichnetes dynamisches Ansprechen sehr hoher Leistungsfaktor und Wirkungsgrad bessere Schwei eigenschaften Anzeigen der Daten u...

Страница 17: ...pannung 230V Mindestspannung 184V H chstspannung 276V Tig dp 181H Sicherung 16A ANSCHLUSS Bevor Sie den elektrischen Anschluss zwischen dem Schwei ger t und dem Leitungsschalter herstellen stellen Sie...

Страница 18: ...unktionen 9 Led zur Anzeige des Base Current 2 10 90 10 Led zur Anzeige der GASNACHSTR MUNG 0 1 10 Sek 11 Led zum Einschalten der Pulsfunktion 12 Led zur Anzeige der eingeschalteten Pulsfunktion 13 En...

Страница 19: ...m Encoder 13 die 2T oder 4T Funktion w hlen DUTY REGULIERUNG UND PULSFREQUENZ 1 Die Pulsfunktion durch Bet tigen des Druckknopfs 11 w hlen die Led 12 aufleuchtet 2 Den Druckknopf 11 mehrmals bet tigen...

Страница 20: ...len beschriebene die Vorbereitung erfolgt ebenfalls wie bereits beschrieben Um die potentielle Oxydation der Schwei stelle zu vermeiden werden Zusatzwerkstoffe mit Phosphor Silizium und desoxydierende...

Страница 21: ...lter Board Isolator Side Label Stel Side Label HF generator Board Rear Panel Power Input Cable Power Switch 61320700 64421000 63266000 64436000 66046700 6608120L 61133100 6205770T 61139200 61141500 66...

Страница 22: ...IGGER 7 TORCH SWITCH 2 MIN POTENTIOMETER 4 MAX POTENTIOMETER REMOTE CONTROL 5 REG POTENTIOMETER TYPE CONNECTION PIN DESCRIPTION EARTH CLAMP A POSITIVE GAS B GAS TORCH CONN C YES TIG TIG TORCH D NEGATI...

Страница 23: ...6918600000 23 WELDING TABLE STEEL...

Страница 24: ...6918600000 24 Info www stelgroup com tel 39 0444 639525...

Отзывы: