Steinberg Systems SBS-DM-600NCV Скачать руководство пользователя страница 5

8

9

23.07.2019

DE

m)  Vergewissern Sie sich, dass das Gerät nicht an einen 

externen Stromkreis angeschlossen ist und dass es 

ausgeschaltet ist, bevor Sie die Batterie installieren 

oder austauschen.

SICHERE ENTSORGUNG VON AKKUMULATOREN UND 

BATTERIEN

Verwenden Sie für das Gerät AAA Batterien mit 9V. 

Um die Batterie einzubauen, muss man: 

1. 

Den  hinten  am  Gerät  befindlichen  Deckel  der 

Batterie mit einem Schraubenzieher öffnen.

2.  Batterien mit entsprechenden technischen 

Parametern hereinlegen.

3. 

Den Deckel der Batterie schließen und festschrauben. 

Entnehmen Sie verbrauchte Batterien aus dem Gerät. 

Führen Sie dazu die gleichen Schritte durch wie beim 

Einsetzen der Batterien. Entsorgen Sie leere Batterien bei 

den entsprechenden Abgabestellen. 

ENTSORGUNG GEBRAUCHTER GERÄTE 

Dieses Produkt darf nicht über den normalen Hausmüll 

entsorgt werden. Geben Sie das Gerät bei entsprechenden 

Sammel- und Recyclinghöfen für Elektro- und 

Elektronikgeräte ab. Überprüfen Sie das Symbol auf dem 

Produkt, der Bedienungsanleitung und der Verpackung. 

Die bei der Konstruktion des Gerätes verwendeten 

Kunststoffe  können  entsprechend  ihrer  Kennzeichnung 

recycelt werden. Mit der Entscheidung für das Recycling 

leisten Sie einen wesentlichen Beitrag zum Schutz unserer 

Umwelt. Wenden Sie sich an die örtlichen Behörden, 

um Informationen über Ihre lokale Recyclinganlagen zu 

erhalten.

The product satisfies the relevant safety 

standards.

Read instructions before use.

The product must be recycled.

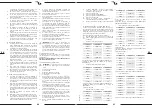
Parameter description

Parameter value

Product name

Multimeter 

Model

SBS-DM-600NCV

Battery type

9V(6F22)

Protection rating IP

20

Over Voltage Protection

CAT III 1000V

Measuring range of direct/

alternating current voltage

60mV~1000V/ 

60mV~750V

Measuring range of 

direct/alternating current 

amperage

600µA~20A; ~600A / 

600µA~20A; ~600A 

Measuring range of 

electrical resistance/

capacitance

600Ω~60MΩ/ 

9,999nF~99,99mF

Measuring range of

temperature/frequency

20~1000 ~/9.999Hz

~9,999 MHz/0,1~99,9%

Working temperature that 

guarantees the highest 

measurement accuracy [°C]

23±5 

Working temperature / 

Relative working humidity 

[°C, °F/%RH]

0~40°C/ ≤85% 

Storage temperature/ 

Relative storage humidity 

[°C, °F/%RH] 

-10~50°C/≤85% 

Dimensions [mm]

195x88x40 

Weight [kg]

0,35 

TECHNICAL DATE

The terms "device" or "product" are used in the warnings 

and instructions to refer to < Multimeter >. Do not use in 

very humid environments or in the direct vicinity of water 

tanks. Prevent the device from getting wet. Risk of electric 

shock! Do not cover the ventilation openings!

2.1. ELECTRICAL SAFETY

a) 

When measuring voltage, make sure that the knob is 

set to the appropriate range.

b) 

Exercise caution when measuring voltage above 50V.

c)  If possible, avoid connecting the device to live 

circuits.

d) 

Before taking measurements of: resistance, diode or 

continuity test, capacitance test or temperature test, 

make sure that the tested circuit is not live.

e) 

Before taking the measurements, make sure that the 

correct function and measuring range have been 

selected.

f) 

Take special care in the event of a break in the circuit 

when using the device in a system with an electric 

current transformer connected to the terminals.

g) 

Before every use, make sure that the test leads and 

probes are in good condition, e.g. the insulation is 

undamaged.

h) 

Before disassembling the battery cover, disconnect 

the test leads and probes from the device and set the 

rotary switch to the "OFF" position.

i) 

When measuring, make sure that you are holding 

the insulated parts of the test leads. 

j) 

Please observe general electrotechnical principles 

and guidelines when taking measurements. 

2.2. SAFETY IN THE WORKPLACE

a) 

Make sure the workplace is clean and well lit. A messy 

or poorly lit workplace may lead to accidents. Try 

to think ahead, observe what is going on and use 

common sense when working with the device. 

b)  Do not use the device in a potentially explosive 

environment, for example in the presence of 

flammable  liquids,  gases  or  dust.  The  device 

generates sparks which may ignite dust or fumes.

c)  If you discover damage or irregular operation, 

immediately  switch  the  device  off  and  report  it  to 

a supervisor without delay.

d) 

If there are any doubts as to the correct operation 

of the device, contact the manufacturer's support 

service.

The original operation manual is written in German. Other 

language versions are translations from the German.

U S E R   M A N U A L

1. GENERAL DESCRIPTION

The user manual is designed to assist in the safe and 

trouble-free use of the device. The product is designed 

and manufactured in accordance with strict technical 

guidelines, using state-of-the-art technologies and 

components. Additionally, it is produced in compliance 

with the most stringent quality standards.

DO NOT USE THE DEVICE UNLESS YOU HAVE 

THOROUGHLY READ AND UNDERSTOOD THIS 

USER MANUAL.

To increase the product life of the device and to ensure 

trouble-free operation, use it in accordance with this user 

manual and regularly perform maintenance tasks. The 

technical  data  and  specifications  in  this  user  manual  are 

up to date. The manufacturer reserves the right to make 

changes associated with quality improvement. 

LEGEND

2. USAGE SAFETY

ATTENTION! 

Read all safety warnings and all 

instructions. Failure to follow the warnings and 

instructions may result in electric shock, fire and/or 

serious injury or even death.

PLEASE NOTE! 

Drawings in this manual are for 

illustration purposes only and in some details may 

differ from the actual product.

EN

Class II protection device with double 

insulation.
WARNING! or CAUTION! or REMEMBER! 

Applicable to the given situation. 

(general warning sign)

Содержание SBS-DM-600NCV

Страница 1: ...UNGSANLEITUNG MULTIMETER USER MANUAL MULTIMETER INSTRUKCJA OBSŁUGI MULTIMETR NÁVOD K POUŽITÍ MULTIMETR MANUEL D UTILISATION MULTIMÈTRE ISTRUZIONI PER L USO MULTIMETRO MANUAL DE INSTRUCCIONES MULTÍMETRO DE EN PL CZ FR IT ES ...

Страница 2: ... unter Spannung steht e Stellen Sie sicher dass die richtige Funktion und der richtige Messbereich ausgewählt sind bevor Sie die Messungen durchführen f Bei Verwendung des Gerätes mit angeschlossenem Stromwandler ist bei einem Stromausfall besondere Vorsicht geboten g Vor jedem Gebrauch sollte sichergestellt werden dass sich die Leitungen und Messungssensoren in einem guten technischen Zustand bef...

Страница 3: ...et werden d Wenn Sie nicht sicher sind ob das Gerät ordnungsgemäß funktioniert wenden Sie sich an den Service des Herstellers e Reparaturen dürfen nur vom Service des Herstellers durchgeführt werden Führen Sie keine Reparaturen auf eigene Faust durch f Zum Löschen des Gerätes bei Brand oder Feuer nur Pulver Feuerlöscher oder Kohlendioxidlöscher CO2 verwenden g Kinder und Unbefugte dürfen am Arbeit...

Страница 4: ...nem Widerstand von 1 MΩ kann es einige Sekunden dauern bis sich die Messung stabilisiert hat Stellen Sie immer sicher dass der getestete Stromkreis vollständig spannungsfrei ist und alle Kondensatoren im zu testenden System entladen sind Maximale Belastung 500 V rms 10 s 3 3 2 GLEICHSTROM WECHSELSTROMSPANNUNG 1 Drehen Sie den Drehknopf auf die Position V oder m V Drücken Sie die SELECT Taste um zu...

Страница 5: ... device to live circuits d Before taking measurements of resistance diode or continuity test capacitance test or temperature test make sure that the tested circuit is not live e Before taking the measurements make sure that the correct function and measuring range have been selected f Take special care in the event of a break in the circuit when using the device in a system with an electric curren...

Страница 6: ...facturer s service point may repair the device Do not attempt any repairs independently f In case of fire use a powder or carbon dioxide CO2 fire extinguisher one intended for use on live electrical devices to put it out g Children or unauthorised persons are forbidden to enter a work station A distraction may result in loss of control over the device h Regularly inspect the condition of the safet...

Страница 7: ...he red test lead of the current clamp to the μAmAT terminal 3 Set the current clamp AC DC range additional accessory to 1mV A 4 Before measuring the DC current zero the DCA value on the current clamp panel 5 Hook the clamp clamp onto the object to be measured 6 Read the result from the display 3 3 5 RESISTANCE 1 Turn the dial to 2 Connect the black test lead to the COMT terminal and the red test l...

Страница 8: ...rnie czyścić urządzenie aby nie dopuścić do trwałego osadzenia się zanieczyszczeń j Urządzenie nie jest zabawką Czyszczenie i konserwacja nie mogą być wykonywane przez dzieci bez nadzoru osoby dorosłej k Nigdy nie mierzyć wartości napięcia gdy przewody pomiarowe są podłączone do gniazd pomiarowych wartości natężenia prądu l Zachować ostrożność podczas pracy przy napięciu powyżej DC60V lub AC42V m ...

Страница 9: ...tkie kondensatory w badanym układzie są rozładowane Maksymalne obciążenie 500 V rms 10 s 3 3 6 POJEMNOŚĆ ELEKTRYCZNA 1 Ustawić pokrętło w pozycji Nacisnąc przycisk SELECT aby wybrać tryb pomiaru pojemności 2 Podłączyć czarny przewód pomiarowy do gniazda COMT a czerwony przewód pomiarowy do gniazda VΩHz 3 Podłączyć sondy do źródła lub obciążenia przeznaczonego do wykonania pomiaru 4 Odczytać wynik ...

Страница 10: ...stnieje ryzyko że przewodnik może być pod napięciem Operacja wykrywania napięcia jest uzależniona od konstrukcji przewodnika grubości izolacji itp 3 312 WSKAZÓWKI UŻYTKOWANIA Przekroczenie zakresu wskazania spowoduje wyświetlenie się komunikatu OL Urządzenie wyłącza się automatycznie po 15 minutach bezczynności Nacisnąć przycisk SELECT w celu dezaktywowania automatycznego wyłączania się urządzenia...

Страница 11: ...CA nebo Hz stisknutí tlačítka pro volbu měření frekvence Hz nebo pracovního cyklu 10 Tlačítko D HOLD Blokování odblokování zobrazené hodnoty 11 Tlačítko MAX MIN zobrazení min nebo max hodnoty opuštění režimu stisknutí a podržení déle než 2s 12 Vstupní zásuvka hFE 13 Vstupní zásuvka VHzΩ 14 Vstupní zásuvka COM teplota 15 Vstupní zásuvka 20A 16 Vstupní zásuvka μAmA teplota adaptér proudových kleští ...

Страница 12: ... do polohy V nebo m V Stiskněte tlačítko SELECT pro přechod do zvoleného testování DC AC 2 Zapojte černý měřící kabel do zdířky COMT a červený měřící kabel do zdířky VΩHz 3 Připojte sondy ke zdroji nebo zátěži určeného k provedení měření 4 Proveďte odečet výsledku zobrazeného na displeji 3 3 3 INTENZITA STEJNOSMĚRNÉHO PROUDU STŘÍDAVÉHO PROUDU 1 Nastavte otočný knoflík do polohy µA mA nebo m V Stis...

Страница 13: ... courant plage et unité de température en appuyant sur le bouton 2 2 SÉCURITÉ AU POSTE DE TRAVAIL a Veillez à ce que votre poste de travail soit toujours propre et bien éclairé Le désordre ou un éclairage insuffisant peuvent entraîner des accidents Soyez prévoyant observez les opérations et faites preuve de bon sens lorsque vous utilisez l appareil b N utilisez pas l appareil dans les zones à risq...

Страница 14: ...abilisation de la mesure peut prendre plusieurs secondes FR FR Paramètres détaillés électriques des mesures Enregistrement de précision de lecture nombre de derniers chiffres à la température de 23 5 C et d humidité 75 RH Tension du courant continue Tension du courant alternative RMS Intensité du courant continue Intensité du courant alternatif RMS Résistance Capacité électrique Fréquence Plage Pr...

Страница 15: ...e mesure 2 Branchez le câble noir du capteur de température à la borne COMT et le câble rouge du capteur à la borne μAmAT 3 Branchez la sonde à l emplacement de votre choix pour mesurer la température 4 Lire le résultat sur l écran Attention Il est interdit d appliquer une tension sur le capteur de température 3 3 9 MESURE DE LA DIODE ET TEST DE CONTINUITÉ 1 Réglez le commutateur en position Appuy...

Страница 16: ... test di resistenza diodi continuità del circuito elettrico capacità intervalli di tensione corrente tipo di corrente intervallo e unità di misura della temperatura se il pulsante viene tenuto premuto Disattivare la funzione Auto Power Off premere e tenere premuto il pulsante 7 Pulsante RANGE modalità manuale di inserimento degli intervalli premere singolarmente ritorno alla modalità automatica te...

Страница 17: ... scarichi Carico massimo 500 V rms 10 s 3 3 6 CAPACITÀ ELETTRICA 1 Portare il commutatore rotante nella posizione Premere il pulsante SELECT per selezionare la modalità di misura della capacità 2 Collegare il cavo di misura nero al terminale di ingresso COMT e il cavo rosso al terminale VΩHz 3 Collegare le sonde alla fonte o al carico in prova 4 Leggere il risultato sul display Attenzione Il conde...

Страница 18: ...e sostituire la batteria El producto cumple con las normas de seguridad vigentes Respetar las instrucciones de uso Parámetro Descripción Parámetro Valor Nombre del producto Multímetro Modelo SBS DM 600NCV Tipo de batería 9V 6F22 Clase de protección IP 20 Protección contra sobretensiones CAT III 1000V Rango de medición de voltaje DC AC 60mV 1000V 60mV 750V Rango de medición de intensidad DC AC 600µ...

Страница 19: ...amente extintores de polvo o dióxido de carbono CO2 para apagar el aparato g Se prohíbe la presencia de niños y personas no autorizadas en el lugar de trabajo la falta de atención puede llevar a la pérdida de control del equipo h Compruebe regularmente el estado de las etiquetas de información de seguridad Si las pegatinas fueran ilegibles habrán de ser reemplazadas i Conserve el manual de instruc...

Страница 20: ...alizar la medición 4 Lea el resultado en la pantalla 3 3 4 INTENSIDAD DE LA CORRIENTE CONTINUA ALTERNA 600A CON PINZA AMPERIMÉTRICA 1 Coloque la perilla en posición 600A Pulse el botón SELECT para pasar a la prueba DC AC seleccionada 2 Conecte el cable de medición negro de la pinza amperimétrica a la entrada COMT y el cable de medición rojo a la entrada μAmAT 3 Determine el rango AC DC de la pinza...

Страница 21: ...o ES Importador Nombre del producto Modelo 4 5 6 DE Batterietyp Produktionsjahr Ordnungsnummer EN Battery type Production year Serial No PL Typ baterii Rok produkcji Numer serii CZ Typ baterie Rok výroby Sériové číslo FR Type de batterie Année de production Numéro de serie IT Tipo di batteria Anno di produzione Numero di serie ES Tipo di batteria Año de producción Número de serie NAMEPLATE TRANSLA...

Страница 22: ...42 43 23 07 2019 NOTES NOTZIEN NOTES NOTZIEN ...

Страница 23: ...Verfügung stehenden Möglichkeiten der Rückgabe oder Sammlung von Altgeräten 1 RICHTLINIE 2002 96 EG DES EUROPÄISCHEN PARLAMENTS UND DES RATES ÜBER ELEKTRO UND ELEKTRONIK ALTGERÄTE 2 Gesetz über das Inverkehrbringen die Rücknahme und die umweltverträgliche Entsorgung von Elektro und Elektronikgeräten Elektro und Elektronikgerätegesetz ElektroG Umwelt und Entsorgungshinweise Utylizacja produktu Prod...

Отзывы: