


7
UTILIZZO – USE – UTILISATION – GEBRAUCH –
USO – UTILIZAÇÃO – GEBRUIK – BRUG –
ANVÄNDNING – KÄYTTÖ – ΧΡΗΣΗ – UŻYTKOWANIE –
KORIŠTENJE – UPORABA – ALKALMAZÁS –
POUŽITÍ – POUŽÍVANIE –
КАК РАБОТАТЬ С ПНЕВМОИНСТРУМЕНТОМ –
BRUK – KULLANIM – UTILIZARE – УПОТРЕБА –KORIŠĆENJE –
NAUDOJIMAS – LIETOŠANA – KASUTAMINE
1
B
2
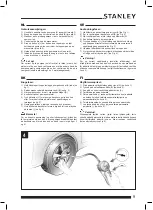
IT
Fasi di utilizzo:
1) Tenere premuta la levetta della testina di gonfiaggio (A)
(vedere Fig. 1).
2) Inserire la testina sulla valvola del pneumatico (B) (vedere
Fig. 2).
3) Ad inserimento avvenuto, rilasciare la levetta (A).
4) Controllare la pressione sul manometro.
5) Premere il pulsante (
+
) per gonfiare il pneumatico e
rilasciarlo poco dopo, controllando l'avvenuto gonfiaggio sul
manometro (vedere Fig. 3).
6) Ripetere l'operazione fino al raggiungimento della pressione
desiderata.
7) Se la pressione del pneumatico eccede, scaricare aria
premendo il pulsante (
–
) (vedere Fig. 4).
Attenzione!
Per una corretta attività di gonfiaggio (e/o scarico aria),
impugnare con una mano la pistola, mentre, con l'altra mano,
tenere saldamente la testina di gonfiaggio, agganciata sulla
valvola del pneumatico (come illustrato nelle figure 3 e 4).
GB
Usage phases:
1) Press and hold the tab of the inflation head (A) (see Pic. 1).
2) Connect the head on the tyre valve (B) (see Pic. 2).
3) Once the insertion has been done, release the tab (A).
4) Check the pressure on the gauge.
5) Press the button (
+
) to inflate the tyre and release it shortly
after, verifying that the inflation has been done on the gauge
(see Pic. 3).
6) Repeat the operation until the desired pressure has been
reached.
7) If the tyre pressure exceeds, discharge air by pressing the
button (
–
) (see Pic. 4).
Warning!
For a correct activity of inflation and/or deflation, you have to grip
the gun by your hand, while, with the other hand, hold firmly the
inflation head, hooked on the tyre valve (as shown in pictures
3 and 4).
FR
Phases d'utilisation :
1) Tenir le levier de la tête de gonflage (A) enfoncé (voir la
Fig. 1).
2) Insérer la tête sur la valve du pneu (B) (voir la Fig. 2).
3) Une fois qu'elle a été insérée, relâcher le levier (A).
4) Contrôler la pression sur le manomètre.
5) Appuyer sur le bouton (+) pour gonfler le pneu et le relâcher
peu de temps après, en contrôlant que le gonflage a été
effectué sur le manomètre (voir la Fig. 3).
A


