background image

12 

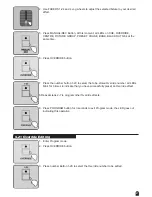
4.6 Delete a Scene

 1.  Enter Program mode.
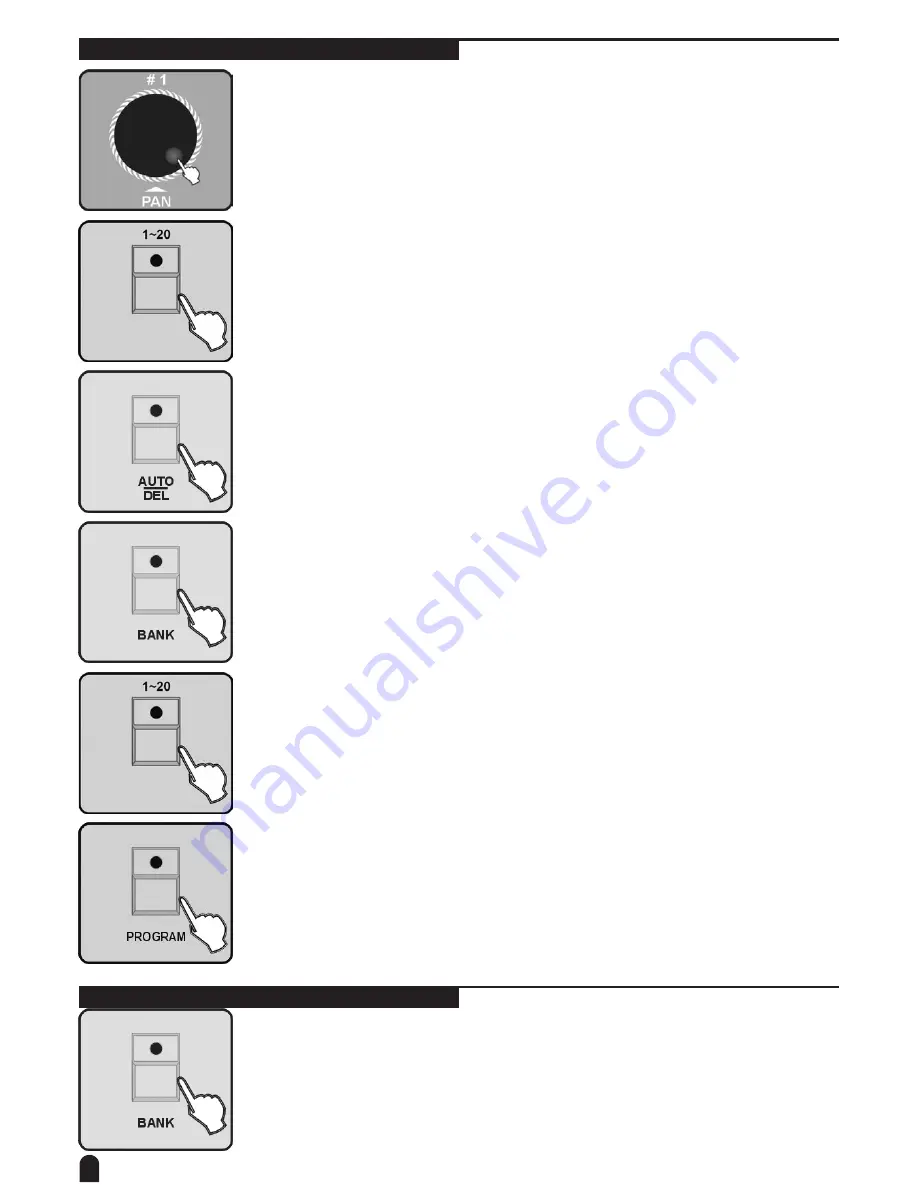
 2.  Use the Jog wheel #1 to select the Bank number of the being deleted scene.

 3.  Press the number button 1-20 to select the scene you are going to delete.

 4.  Press the button AUTO/DEL.

 5.  Press the button BANK.

 6.  Then press the number button 1-20, the scene will be deleted, all LEDs and the


Segment Display will blink for three times briefly indicating this operation, then the 


LCD will show the bank and the scene number of the deleted scene.

 7.  If you don‘t intend to continue your programming, press and hold down the


PROGRAM button for three seconds to exit Program mode, the LED goes out  


indicating this selection

4.7 Bank copying

 1.  Enter Program mode.

 2.  Press BANK button

Содержание Invader 2420

Страница 1: ...Owner s Manual DMX Controller Invader 2420 ...

Страница 2: ...e Editing 27 4 22 Program a CUE 29 4 23 CUE Editing 29 4 24 Delete a CUE 30 4 25 Store a Blackout Scene 31 5 Setting Menu 31 5 1 Create a new Fixture Profile 32 5 2 Modify a Fixture Profile 34 5 3 Delete a Fixture Profile 35 5 4 Patch a Fixture 35 5 5 Reverse channel setup 36 5 6 Fade mode setup 37 5 7 Blackout mode select 38 5 8 Midi channel select 38 5 9 Chase run by inside outside time 39 5 10 ...

Страница 3: ...he power cord and make sure that it does not become clamped Never tie knots in the power cord and do not bind it together with other cables Lay the power cord so that no one can step on or stumble over it A damaged power cord can cause a fire or an electrical shock Check the power cord from time to time Should it become damaged contact our customer service department to have it replaced Always ope...

Страница 4: ... 60 x CUEs Combined many chases together and operate the chases at the same tine X X 20 x override Can assign one or more than one of the fixtures to perform special function like X X follow spot during the operation 20 overrides can be set in the controller 20 x Centre Can set each fixture s central position of the movement you can set up to 20 centre X X positions Remote DMX Addressing only for ...

Страница 5: ... by unqualified people could cause damage or faulty opera tion Contact your nearest dealer CAUTIONS This unit is NOT intended for home use After having removed the packaging check that the unit is NOT damaged in any way If in doubt DON T use it and contact an authorized dealer Packaging material plastic bags polystyrene foam nails etc MUST NOT be left within children s reach as it can be dangerous...

Страница 6: ...Light Connect to USB Light 19 Faders These faders are used to control the intensity 20 CF card CF card port can be used to upgrade software copy data and introduce to light bank 21 Stand alone Extra easy controllers Incorporated for Master Slave immediate pre programmed light shows 22 Multi function number buttons 1 20 Function buttons The descriptions of the Function buttons 1 Fixture Select 20 u...

Страница 7: ... the current activity or programming state 26 Jog wheel Used to adjust the chase speed within the range of 0 1 second to 5 minutes 3 2 Rear View 1 Power in AC100 240V 50 60Hz 2 Power Switch This switch turns On Off the power 3 STROBE Trigger non DMX strobe Signal 12V DC 4 AUDIO 0 1V 1Vp p 5 MIDI IN or MIDI THRU Receives MIDI data 6 DMX Out Two connectors sends DMX signals to DMX fixtures use 3 pin...

Страница 8: ... these buttons 3 Slide Faders 1 24 or use the CENTRE or PRESET or SCENE have saved to change the output of each channel You can also use the jog wheel 1 2 to control the PAN PAN FINE or use the jog wheel 3 4 to control TILT TILT FINE 4 Once the scene is satisfactory press MANUAL REC button to program this scene into memory At this moment the LEDs on CUE OVERRIDE CENTRE FIXTURE GROUP PRESET CHASE B...

Страница 9: ...st MOVEMENT parameter use Jog wheel 2 to select the adjusting MOVEMENT parameter options position range fade time or wait time loop use Jog wheel 3 4 to adjust parameter values 6 Repeat Steps 2 5to select MOVEMENT for other FIXTURE 7 Press MANUAL REC to store into memory all the LEDs on CUE OVERRIDE CENTRE FIXTURE GROUP PRESET CHASE BANK BLACKOUT blink to indicate this operation 8 Press BANK use J...

Страница 10: ...Faders 1 24 or use the CENTRE PRESET SCENE have saved to change the output of each channel you can also use the Jog wheel 1 2 to adjust PAN PAN FINE or use Jog wheel 3 4to adjust TILT TILT FINE or press MOVEMENT to add MOVEMENT function 5 Press MANUAL REC to store LEDs on CUE OVERRIDE CENTRE FIXTURE GROUP PRESET CHASE BANK BLACKOUT blink at the same time 6 Press the button BANK 7 Press the number ...

Страница 11: ...cene you are going to copy 4 Press MANUAL REC to store LEDs on CUE OVERRIDE CENTRE FIXTURE GROUP PRESET CHASE BANK BLACKOUT blink at the same time 5 Press BANK Then use the Jog wheel 1 to select the BANK number to copy the scene 6 Press the number button1 20 then copy the Scene to the right position All LEDs and the Segment Display will blink for three times briefly indicating this operation then ...

Страница 12: ... press the number button 1 20 the scene will be deleted all LEDs and the Segment Display will blink for three times briefly indicating this operation then the LCD will show the bank and the scene number of the deleted scene 7 If you don t intend to continue your programming press and hold down the PROGRAM button for three seconds to exit Program mode the LED goes out indicating this selection 4 7 ...

Страница 13: ...f the being copied bank and the bank is being copied to and the scene number of the programmed scene 7 Press the button PROGRAM for three seconds to exit Program mode the LED goes out indicating this selection 4 8 Program a Chase Note The chase should be programmed after the scene is set Each chase can have 200 scenes max 1 Enter Program mode 2 Press the button CHASE LEDs on CHASE will be all lit ...

Страница 14: ...mes briefly indicating the store succeed 7 Repeat Step 4 6 each chase can have 200 scenes max 8 Press the button PROGRAM for three seconds to exit Program mode the LED goes out indicating this selection 4 9 Program all the Scenes in a Bank 1 Enter Program mode 2 Press the button CHASE use jog wheel 1 to select the page number choose the programming chase 3 Press the number button 1 20 to select th...

Страница 15: ... Step 3 7 can join 200 scenes max to the chase 9 Finally press the button CHASE to store the chase then exit the programming state 10 Press the button PROGRAM for three seconds to exit Program mode the LED goes out indicating this selection 4 10 Program a step 1 Enter Program mode 2 Press the button CHASE use jog wheel 1 to select the page number of the chase to select the program 3 Press the numb...

Страница 16: ... the system will remember the last FADE TIME or WAIT TIME 7 Press the button MANUAL REC all LEDs blink for 3 times to indicate that you have successfully programmed a step 8 Repeat steps 2 3 to select other steps 9 Press the button CHASE to store and exit the programming state 10 Press the button PROGRAM for 3 seconds to exit Program mode the LED goes out indicating this operation 4 11 Insert Step...

Страница 17: ...umber of the inserted scene 7 Press the number button 1 20 to select the scene to be inserted 8 Use the Jog wheel 3 4 to adjust the CHASE FADE TIME and WAIT TIME If you do not make any adjustments the system will remember the last FADE TIME or WAIT TIME 9 Press the button MANUAL REC all LEDs blink for 3 times to indicate that you have successfully inserted a step into a chase 10 Repeat steps 5 9 y...

Страница 18: ...CHASE use jog wheel 1 to select the page number choose the programming chase 3 Press the number button 1 20 to select the chase number to delete from 4 Use Jog wheel 2 to select the scene location you want to delete 5 Press AUTO DEL all LEDs blink for 3 times to indicate that you have successfully deleted the scene 6 Repeat steps 4 5to delete more scenes from the chase 7 Press the button CHASE to ...

Страница 19: ...utton AUTO DEL 4 Press the number button 1 20 to select the chase to be deleted all LEDs blink for 3 times to indicate that you have successfully delete the chase 5 Repeat the steps 2 4 to delete more chases 6 Press the button PROGRAM for 3 seconds to exit Program mode the LED goes out indicating this operation 4 14 Program a Preset 1 Enter Program mode 2 Press the button FIXTURE 3 Press the butto...

Страница 20: ...LACKOUT blink at the same time 6 Press the button PRESET 7 Use Jog wheel 1 to select the preset group number 1 20 8 Press one of the number button 1 10 to store a COLOUR preset or press one of the number button 11 20 to store a GOBO preset all LEDs blink for 3 times to indicate that you have successfully store a Preset 9 Repeat Steps 2 8 to program more presets 10 Press the button PROGRAM for 3 se...

Страница 21: ...ogram Preset 7 Move FADER 1 24 to change COLOUR GOBO channel values The codes of the channel feature of ARRT CODE are C and G in the fixtures bank output for the convenience to check other channels but the channel output will not be stored in the preset 8 Press MANUAL REC button at this moment all LEDs on CUE OVERRIDE CENTRE FIXTURE GROUP PRESET CHASE BANK BLACKOUT blink at the same time 9 Press P...

Страница 22: ...p 4 will cover the one in step 10 4 16 Program a Fixture Group 1 Enter Program mode 2 Press FIXTURE button 3 Press the number button1 20 to select one or more fixtures to make the fixture group 4 Press MANUAL REC button at this moment all LEDs on CUE OVERRIDE CENTRE FIXTURE GROUP PRESET CHASE BANK BLACKOUT blink at the same time 5 Press FIXTURE GROUP button 6 Press the number button 1 20 to select...

Страница 23: ...ROUP button 3 Press the number button 1 20 to select the fixture group number to be edited 4 Press FIXTURE button 5 Press the number button 1 20 to select one or more fixtures to make the fixture group 6 Press MANUAL REC button at this moment all LEDs on CUE OVERRIDE CENTRE FIXTURE GROUP PRESET CHASE BANK BLACKOUT blink at the same time 7 Press FIXTURE GROUP button ...

Страница 24: ...ogram mode 2 Press FIXTURE button 3 Press the number button 1 20 to select the concerned fixtures to be programmed 4 Move FADERS1 24 and use Jog wheel 3 4 to change the centre position of PAN TILT where you desired The codes of the channel feature of ARRT CODE are P PF T TF in the fixtures bank for the convenience to check other channels there would be some output of the channels but the channel o...

Страница 25: ...8 Repeat steps 2 7to program more Centre positions 9 Press PROGRAM button for 3 seconds to exit Program mode the LED goes out indicating this operation 4 19 Centre Editing 1 Enter Program mode 2 Press CENTRE button 3 Press the number button1 20 to select the edited Centre position number 4 Press FIXTURE button 5 Press the number button 1 20 to select the concerned fixtures to be programmed ...

Страница 26: ...ROUP PRESET CHASE BANK BLACKOUT blink at the same time 8 Press CENTRE button 9 Press the number button 1 20 to select the location to store the Centre all LEDs blink for 3 times to indicate that you have successfully edited a Centre position 10 Press PROGRAM button for 3 seconds to exit Program mode the LED goes out indicating this operation NOTE If you press different buttons in step 3 and 9 the ...

Страница 27: ... Press the number button 1 20 to select the to be stored Override number all LEDs blink for 3 times to indicate that you have successfully preset an Override effect 8 Repeat steps 2 7 to program other Override effects 9 Press PROGRAM button for 3 seconds to exit Program mode the LED goes out indicating this operation 4 21 Override Editing 1 Enter Program mode 2 Press OVERRIDE button 3 Press number...

Страница 28: ...RE FIXTURE GROUP PRESET CHASE BANK BLACKOUT blink at the same time 8 Press OVERRIDE button 9 Press the number button 1 20 to select the Override number you chose in step 2 all LEDs blink for 3 times to indicate that you have successfully edited an Override effect 10 Press PROGRAM button for 3 seconds to exit Program mode the LED goes out indicating this operation Note If you press different button...

Страница 29: ...the LEDs on the chosen number buttons will be lit 5 Press MANUAL REC button all LEDs blink for 3 times to indicate that you have successfully stored a CUE 6 Repeat steps 4 6 to store more CUEs 7 Press PROGRAM button for 3 seconds to exit Program mode the LED goes out indicating this operation 4 23 CUE Editing 1 Enter Program mode 2 Press CUE button use jog wheel 1 to select the page number 3 Press...

Страница 30: ...xit Program mode the LED goes out indicating this operation 4 24 Delete a CUE 1 Enter Program mode 2 Press and hold AUTO DEL button 3 Press CUE use jog wheel 1 to select the page number 4 Then press the number button 1 20 all LEDs blink for 3 times to indicate that you have successfully deleted a CUE 5 Press PROGRAM button for 3 seconds to exit Program mode the LED goes out indicating this operati...

Страница 31: ...T FINE 4 Once the effect is adjusted press MANUAL REC button to store at this moment all LEDs on CUE OVERRIDE CENTRE FIXTURE GROUP PRESET CHASE BANK BLACKOUT blink at the same time 5 Press BLACK OUT STAND ALONE button all LEDs blink for 3 times to indicate that you have successfully stored a Black Scene 6 Press PROGRAM button for 3 seconds to exit Program mode the LED goes out indicating this oper...

Страница 32: ...kout mode select 8 Midi channel select 9 Chase run by inside outside time 10 Auto remote address 11 Read CF card 12 Write CF card 13 Modify Password 14 Enable Password 15 Erase all memory 16 audio input range adjust 17 Channel value display mode You can select the Menu by Jog wheels and press ENTER MAIN MENU to enter sub Menus for editing 5 1 Create a new Fixture Profile 1 Enter Menu Mode 2 Turn j...

Страница 33: ...MENU button to change the trait of the channel 5 Use Jog wheel 2 and 4 to change the trait Turn Jog wheel 2 to change the position of the cursor and Jog wheel 4 to change the trait of the channel or characters 6 Press ENTER MAIN MENU to enter 7 Use jog wheel 2 to select profile ACME LIBRARY or OTHER LIBRARY you want to store the fixture profile 8 Press ENTER MAIN MENU button all LEDs blink for 3 t...

Страница 34: ...hange the position of the cursor and Jog wheel 4 should change the trait of the channel The amount of the letters must be below 26 it can be include ten numbers one the length of the Fixture name should be below 16 and it must be begin with letters 6 Press ENTER MAIN MENU Button to change the trait of the channel 7 Use Jog wheel 2 and 4 to change the name of the FIXTURE Turn Jog wheel 2 to change ...

Страница 35: ...eel 4 to delete the ACME s 4 Press ENTER MAIN MENU Button to enter and LCD will show NO 5 Turn Jog wheel 1 to chose Yes 6 Press ENTER MAIN MENU Button all LEDs shaking for 3 times means success 7 Repeat 3 6 to delete other FIXTURE PROFILE 8 Back to the last menu please press ESC CLEAR button 5 4 Patch a Fixture 1 Enter Menu Mode 2 Turn Jog wheel 1 up to when the 04 Patch a Fixture is shown on the ...

Страница 36: ...times 6 Repeat 3 5 to patch all the fixtures 7 Back to the last menu please press ESC CLEAR button 5 5 Reverse channel setup 1 Enter Menu Mode 2 Turn Jog wheel 1 up to when the 05 Reverse channel setup is shown on the monitor press ENTER MAIN MENU Button to enter 3 Press number Button 1 20 to chose the fixture which needs to reverse 4 Turn Jog wheel 2 to change the position of the cursor and Jog w...

Страница 37: ...hannels 8 Back to the last menu please press ESC CLEAR button 5 6 Fade mode setup 1 Enter Menu Mode 2 Turn Jog wheel 1 up to when the 06 Fade mode setup is shown on the monitor press ENTER MAIN MENU button to enter 3 Turn Jog wheel 2 to select only pan tilt or all channel 4 Press ENTER MAIN MENU Button to enter all the LEDs will blink for 3 times then back to the last menu ...

Страница 38: ... the LEDs will blink for 3 times then back to the last menu 5 8 Midi channel select 1 Enter Menu Mode 2 Use Jog wheel 1 up to when the 08 Midi channel select is shown on the monitor Press ENTER MAINMENU Button to enter 3 Use Jog wheel 2 to chose the channel of MIDI 0 16 it s enlarge mode when the value of the MIDI channel is 0 so MIDI can receive the information of 1 16 channels 4 Press ENTER MAIN...

Страница 39: ...10 Auto remote address This function is used only for the fixtures which can be addressed long distance ensure the unit match this requirements before operation or it will be of no effect 1 Enter Menu Mode 2 Turn Jog wheel 1 up to when the 10 Auto remote address is shown on the monitor Press ENTER MAIN MENU Button to enter 3 Use Jog wheel 2 to select Yes enter or NO quit to the main menu 4 Press E...

Страница 40: ...m files PRO or bank files CIF in the directory of DIR2420 which under the root directory of CF card then you can read them out by this function And you have to patch the profile in order to use it normally Every time read the CF card please don t move it or the card or the files will be damaged The format of the CF card should be FAT else you have to convert it to FAT by PC and copy it to CF card ...

Страница 41: ...the controller immediacy more at best So please store the files in the CF card or computer and read up the files which you have to use only 5 12 Write CF card You can store the finished program to the directory of DIR2420 which under the root directory of CF card Every time read the CF card please don t move it or the card or the files will be damaged The format of the CF card should be FAT else y...

Страница 42: ...r Press ENTER MAIN MENU button to enter 3 Use Jog wheel 1 to select power on password or memory protect password Press ENTER MAIN MENU Button to enter 4 Use number Button 1 10 to input 6 digit old password 10 equal to number 0 if the password is wrong it will hint to input continually 5 It will hint to input new 6 digit password after get exact password You have to input the same password twice it...

Страница 43: ...se Jog wheel 2 to select Enable or Disable 6 Press ENTER MAIN MENU Button to enter all the LEDs blink for 3 times indicate that you have set successfully 7 Press ESC CLEAR Button to back to the last menu 5 15 Erase all memory 1 Enter Menu Mode 2 Turn Jog wheel 1 up to when the 15 Erase all memory shown on the monitor Press ENTER MAIN MENU button to enter 3 The LCD hint to input 6 digit memory prot...

Страница 44: ...eel 2 to choose the sensitivity of the sound 0 100 The bigger the number the higher the sensibility Then you can test the sensibility 4 Press ENTER MAIN MENU Button to store and back to the main menu back to the main menu without any change Press ESC CLEAR Button 5 17 Channel value display mode 1 Enter Menu Mode 2 Turn Jog wheel 1 up to when 17 Channel value display mode shown on the moni tor pres...

Страница 45: ...ter into manual mode or sound mode or auto mode 6 1 Running scene Scene can be open solely in the manual mode but in the sound or auto mode it should circulate with some BANK 1 Manual Mode 1 Press BANK Button 2 Press MANUAL REC to into manual mode The LED of MANUAL REC will be on 3 Use Jog wheel 1 to select the bank you anticipate 4 Press number Button to open the scene 2 Sound Mode 1 Press BANK B...

Страница 46: ...ment Loop time then enter next step 3 Auto Mode 1 Press BANK Button 2 Press AUTO DEL Button to enter auto mode the LED of AUTO DEL will on 3 Use Jog wheel 1 to select the bank you anticipate 4 Use Jog wheel 3 or 4 to adjust current FADE TIME or WAIT TIME or use TAP INSERT Button to adjust the speed of the scene NOTE When you press TAP INSERT to adjust the speed adjusting the running speed of the s...

Страница 47: ...page 2 Press MANUAL REC to enter manual mode the LED of MANUAL REC will be on 3 Press number Button 1 20 to select the program you anticipate 4 Use Jog wheel 2 to run the last or next step 2 Sound Mode 1 Press CHASE Button use jog wheel 1 to select chase page 2 Press MUSIC BANK COPY Button to enter sound mode the LED of MUSIC BANK COPY will be on ...

Страница 48: ... anticipate You can choose much more than one CHASE and they will run on the train that you select them 4 Setting to CHASE RUN BY INSIDE TIME then it will run as the FADE TIME or FADE TIME of the step that you set when store the chase Setting to CHASE RUN BY OUTSIDE TIME then it will run as the FADE TIME or FADE TIME you set last time you can also adjust by turn the joy wheel 3 or 4 or use TAP INS...

Страница 49: ...ere are two ways to operate A When CUE or CHASE or BANK running press OVERRIDE button Then press FIXTURE button and use number button 1 20 to choose light so you can push the handspike to change the effect B When CUE or CHASE or BANK running press OVERRIDE button then use 1 20 button to open the effect that be programmed 7 Fog Machine operation 7 1 Set up another 481CH DMX signal to control the fo...

Страница 50: ... light with the DMX information 2 Setting keep the power on hold the STROBE button press PROGRAM button to enter setting menu Use jog wheel 2 to set the strobe speed of the simulate strobe light Use jog wheel 3 or 4 to set the value of DIMMER 0 255 or SPEED 0 255 that out of the strobe light Press ENTER MAIN MENU button to store press PROGRAM button to exit 3 Control Press STROBE button then the c...

Страница 51: ...79 Turn on or turn off scenes from Bank 9 12 MIDI 1 80 99 Turn on or off Chase 41 60 MIDI 1 100 119 Turn on or off CUE4 1 60 MIDI 1 120 127 No function Bank 13 Bank 16 MIDI 4 00 79 Turn on or turn off scenes from Bank 13 16 Bank 17 Bank 20 MIDI 5 00 79 Turn on or turn off scenes from Bank 17 20 Bank 21 Bank 24 MIDI 6 00 79 Turn on or turn off scenes from Bank 21 24 Bank 25 Bank 28 MIDI 7 00 79 Tur...

Страница 52: ... rily IL 2420 controller nonsupport long file name or the controller can t read up the profile information 10 2 IM 1200S CIF is the profile of ACME IM 1200S 10 3 Enactment special code so the controller should distil some channel characteristic to manage ARRT CODE D DIMMER DIMMER P PAN PAN PF PAN FINE PAN FINE in 16 channel mode T TILT TILT TF TILT FINE TILT FINE in 1 6 channel mode G ALL GOBO COR...

Страница 53: ... DISPLAY INFORMATION MAX 4 CHARACTER DON T HAVE BLANK CHANNEL FUNCTION 1 N SHUT SHUTTER 2 D DIM DIMMER 3 C C_C CYAN 4 C C_M MAGENTA 5 C C_Y YELLOW 6 C CTC CTC 7 C COLR COLOUR 8 G GOB1 GOBO1 9 G R_G1 GOBO 1 ROT 10 G RG1L GOBO 1 ROT LOW 11 G GOB2 GOBO2 12 G R_G2 GOBO 2 ROT 13 G RG2L GOBO 2 ROT LOW 14 N EFFT EFFECT 15 N R_EF ROT EFFECT 16 N IRIS IRIS 17 N FCUS FOCUS 18 N ZOOM ZOOM 19 P PAN PAN 20 PF ...

Страница 54: ...ARACTER DISPLAY INFORMATION MAX 4 CHARACTER DON T HAVE BLANK CHANNEL FUNCTION D DIM DIMMER N SHUT SHUTTER P PAN PAN PF P_F PAN FINE T TILT TILT TF T_F TILT FINE PT PT_S P T SPEED G GB1 GOBO 1 G RGB1 GOBO 1 ROT G GB2 GOBO 2 G RGB2 GOBO 2 ROT G GB3 GOBO 3 G ROB3 GOBO 3 ROT C COL1 COLOUR 1 C COL2 COLOUR 2 C CYAN CYAN C YELO YELLOW C MAGT MAGENTA C CYMM CMY MACRO N FROS FROST N PRSM PRISM N RPRS PRISM...

Страница 55: ...e capital letters and suffix with CIF transitorily or the controller can t read up the profile information 3 Don t change the group which contain 4 Display information should be no more than 4 character and without blank 12 EC Declaration of Conformity We declare that our products lighting equipment comply with the following specification and bears CE mark in accordance with the provision of the E...

Страница 56: ...ithout further notice 14 Disposal Never throw the device into the regular household waste at the end of its useful life This prod uct is subject to the European Directive 2002 96 EC Dispose of the device through an approved disposal centre or at your community waste facility Observe the current existing regulations In case of doubt contact your disposal facility The packaging is certified via a du...

Отзывы: