background image

1

2

4
6

23
23
25

27
27
28

29
29
29
29
29
30
30

31

31

32

32
32

33

34

SPORTSART

C580R COMMERCIAL BIKE

TABLE OF CONTENTS

1. INTRODUCTION....................................................................................................

2. IMPORTANT SAFETY PRECAUTIONS ...............................................................

3. ASSEMBLING YOUR BIKE

List of Parts............................................................................................................
Step-by-step Instructions.......................................................................................

4. UNDERSTANDING THE DISPLAY CONSOLE

Display Features.....................................................................................................
Display Functions...................................................................................................
Button Functions.....................................................................................................

5. HOW TO OPERATE YOUR BIKE

Quick Start.............................................................................................................
Workout Setup.......................................................................................................
Cool Down.............................................................................................................

6. PROGRAMS

Manual ..................................................................................................................
Random.................................................................................................................
Interval (1:1, 1:2, 2:2)............................................................................................
Fat Burn................................................................................................................
Plateau..................................................................................................................
Wt Loss/Cardio/Custom HR..................................................................................
Fit Test ..................................................................................................................

7. USER PARAMETER SETTING............................................................................

8. AUTOMATIC CHANNEL SCAN............................................................................

9. MAINTAINING THE BIKE.......................................................................................

10. GUIDELINES FOR EXERCISE

How long should I exercise .................................................................................
How often should I exercise.................................................................................

11. TROUBLESHOOTING.........................................................................................

12. Wiring Schematic..................................................................................................

Содержание C580R

Страница 1: ...STANDING THE DISPLAY CONSOLE Display Features Display Functions Button Functions 5 HOW TO OPERATE YOUR BIKE Quick Start Workout Setup Cool Down 6 PROGRAMS Manual Random Interval 1 1 1 2 2 2 Fat Burn P...

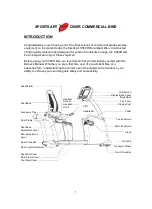
Страница 2: ...self with this Owner s Manual Whether you are a first time user of a recumbent bike or a seasoned pro understanding the correct use of the equipment will enhance your ability to achieve your exercise...

Страница 3: ...y way Keep your hands away from moving parts Wear proper workout clothing Do NOT wear overly loose clothing Do not wear shoes with leather soles or high heels Tie all long hair back Do not rock the un...

Страница 4: ...The weight limit for this bike is 150 kgs 330 lbs Before beginning any exercise program you should consult with your doctor It is recommended that you undergo a complete physical examination CAUTION 3...

Страница 5: ...the instructions IMPORTANT The packing for this bike was designed to protect it during shipment Please store the original packing in a safe place in case you need to ship the unit in the future Before...

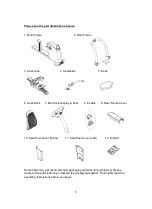
Страница 6: ...Electronic Display Post 8 Pedals 9 Rear Frame Cover 10 Seat Post Cover Right 11 Seat Post Cover Left 12 Tool Kit Some parts may get mixed amongst packaging material during shipping Please locate all t...

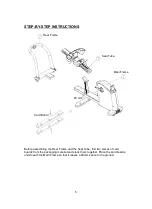
Страница 7: ...Frame and the Seat Tube find two pieces of card boards from the packaging material and stack them together Place the card boards underneath the Main Frame so that it leaves a 60mm space to the ground...

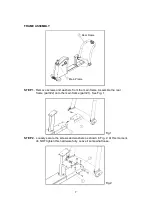
Страница 8: ...from the main frame Assemble the rear frame part 2 onto the main frame part 1 See Fig 1 Loosely secure the screws and washers as shown in Fig 2 At this moment do NOT tighten this hardware fully Leave...

Страница 9: ...washers are provided to secure the seat tube to the rear frame Please secure two sets of hardware from below then secure one set into each side one on the left and one on the right At this moment do N...

Страница 10: ...y tighten the hardware Leave it somewhat loose See Fig 5 When screws at A B and C locations are in place loosely pull the rear frame part 2 backward away from the front of the bike Use the tool provid...

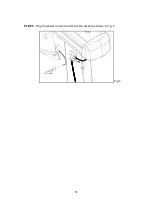
Страница 11: ...STEP 5 Plug the power cord connector into the socket as shown in Fig 7 Fig 7 10...

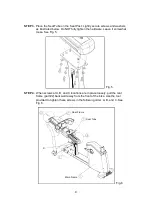
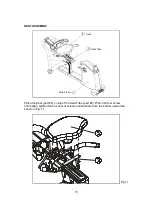
Страница 12: ...ASSEMBLY STEP 1 Place the Handlebar part 4 on the Seat Tube part 3 When the four screw holes align secure them in the order shown in part A of Fig 8 Fig 8 screw spring washer flat washer 11 Handlebar...

Страница 13: ...STEP 2 STEP 3 Pull the cable plugs through the gap and connect them into the sockets on the frame Connect cables as shown in Fig 10 Fig 9 Fig 10 12...

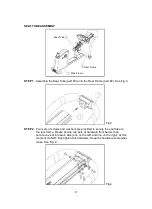
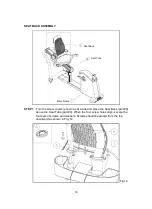
Страница 14: ...Place the Seat part 5 on top of the Seat Tube part 3 When the four screw holes align tighten the four sets of screws and washers from the bottom upward as shown in Fig 11 Fig 11 Seat Seat Tube Main F...

Страница 15: ...as A aside and place the Seat Back part 6 above the Seat Tube part 3 When the four screw holes align secure the four sets of screws and washers Screws should be placed from the top downward as shown...

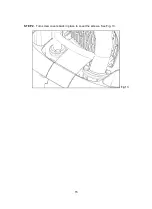
Страница 16: ...STEP 2 Turn screw covers back in place to cover the screws See Fig 13 Fig 13 15...

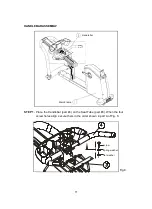
Страница 17: ...ELECTRONIC DISPLAY PEDESTAL ASSEMBLY STEP 1 Connect all data cables in the pedestal part 7 as shown in Fig 14 Fig 14 Electronic Display Pedestal Main Frame 16...

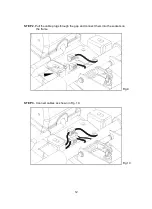
Страница 18: ...ecure screw B in place but do not fully tighten it Loosely secure screws C in place but do not fully tighten them yet Finally tighten all screws first B then C to secure the Display Pedestal Put the s...

Страница 19: ...nch provided See Fig 16 Note that pedals are side specific The left pedal threads counterclockwise The right pedal threads clockwise Right and left are defined as the exerciser s right and left sides...

Страница 20: ...COVER INSTALLATION STEP 1 Assemble the Rear Frame Cover part 9 onto the Main Frame part 1 as shown in Fig 17 Fig 17 19 Rear Frame Cover Post cover R Post cover L Main Frame...

Страница 21: ...Fig 18 Assemble the Right Seat Post Cover part 10 and Left Seat Post Cover part 11 onto the Main Frame See Fig 19 Secure both covers with the four screws provided Screw in from the right hand side See...

Страница 22: ...is built into SportsArt products For areas where a PAL or a SECAM System is used please find the NTSC to PAL SECAM Adapter in the Tool Kit Use this adapter to convert your NTSC system to the PAL or S...

Страница 23: ...shown in Fig 21 To operate Cardio Theater connect cardio theater devices to the RJ45 socket on the left side of the display See Fig 23 Connect CSAFE applications to the RJ45 sockets shown in Fig 21 Th...

Страница 24: ...DISTANCE total distance accumulated 0 01 to 9999 Km or Miles 4 CALORIES total calories burned 0 0 to 9999 K CAL 5 CAL Hr calories per hour 0 0 to 999 9 K CAL 6 METS metabolic burn rate 0 0 to 99 0 7 H...

Страница 25: ...n the age input 10 RPM revolutions per minute 0 to 250 11 WATTS total watts already worked out 0 to 9999 12 DOT MATRIX displays program profiles and related information during workout 13 PERCENT COMPL...

Страница 26: ...ss these buttons to adjust functions up or down To increase or decrease adjustments rapidly hold either button down 9 CLEAR a Pressing this button clears input data b The 7 segment display will automa...

Страница 27: ...T to lock onto one row of data press this button again to resume scanning 3 Simultaneously press VOL and FULL SPLIT buttons to adjust screen brightness When the letter B appears at the top of the scre...

Страница 28: ...o set up your goal 1 TIME the time setting ranges from 5 00 to 99 00 The preset value is 30 00 Use keys or press numeric keys 0 9 to adjust the value Press ENTER to confirm your choice 2 DISTANCE the...

Страница 29: ...ning Workout Goal The goal value remains on the control panel for reference during the workout Once a workout goal is completed a message ACCU DATA will appear to show the user actually accumulated wo...

Страница 30: ...erval combinations follow 1 1 1 minute REST 1 minute WORK 1 2 1 minute REST 2 minutes WORK 2 2 2 minutes REST 2 minutes WORK You can also modify the resistance level during either REST or WORK periods...

Страница 31: ...s circumstance only manual adjustments by pressing WORKOUT LEVEL can be made at this time 3 Once you enter a cardio program the following figures appear Heart Figure Target Heart Rate Green Dot target...

Страница 32: ...kout time The unit of TIME is in Hours Press ENTER to see the next setting or press STOP to leave this setting This setting cannot be changed 4 The next value shows you the TFT program version Press E...

Страница 33: ...vel In general it is recommended that you maintain your heart rate in the training zone for at least ten minutes to realize an aerobic benefit As your fitness level increases you will be able to maint...

Страница 34: ...as described on page 31 It is recommended that the unit should be powered up for 5 to 10 minutes before scanning For best result please conduct scanning for 2 to 3 times 2 How can I review my workout...

Страница 35: ...utor AV Board FAN Cardio Board TV Signal AV Signal 10 2 TFT Panel HeadPhone Magnet HandTouch L HandTouch R Speed Sensor HTR Bridge HTR Board FAN Driver Board HRC Board Power Transformer Power Switch C...

Отзывы: