Customer Service 1-888-707-1880
Dyaco Canada Inc. 2021
Email: [email protected]
16
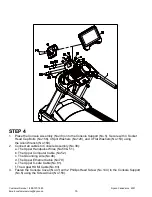
STEP 4
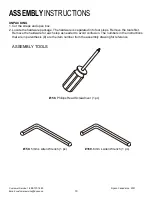
1. Place the Console Assembly (No.38) onto the Console Support (No.5). Secure with 4 Socket
Head Cap Bolts (No.156), 4 Split Washers (No.120), and 4 Flat Washers (No.153) using
the Allen Wrench (No.159).
2. Connect all cables to Console Assembly (No.38):
a. The Upper Handpulse Wires (No.50 & 51).
b. The Upper Computer Cable (No.52).
c. The Grounding wire (No.46).
d. The Upper Ethernet Cable (No.79).
e. The Upper C-safe Cable (No.81).
f. The Upper HDMI Cable (No.83).
3. Fasten the Console Cover (No.41) with 2 Phillips Head Screw (No.144) to the Console Support
(No.5) using the Screwdriver (No.158).

