


SPORT SERIES
OWNER’S MANUAL
www.spinning.com 800.847.SPIN (7746)
7
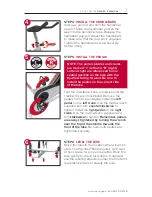
STEP 4:
INSTALL THE HANDLEBARS
Unscrew, pull out and hold the handlebar
pop-pin. Slide the handlebar post all the
way into the handlebar tube. Release the
handlebar pop-pin. Adjust the handlebars
to make sure that the pop-pin is engaged.
Tighten the handlebar pop-pin securely
before riding.
STEP 5:
INSTALL THE PEDALS
Turn the resistance knob clockwise until the
crank arms are immobilized. Remove the
pedals from the packaging. Install the
left
pedal
on the
left crank
. Use the multi-wrench
supplied and turn
counterclockwise
to
tighten. Install the
right pedal
on the
right
crank
. Use the multi-wrench supplied and
turn
clockwise
to tighten.
Remember, pedals
are always tightened by turning the wrench
over the top of the spindle towards the
front of the bike.
Be sure both pedals are
tightened securely.
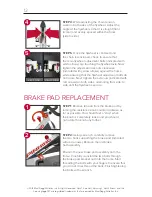
STEP 6:
LEVEL THE BIKE
Move the bike to the location where it will be
used. Your Spinner® Bike requires 4 x 6 feet
of floor space for proper operation. Rock the
bike gently to check for wobble. If needed,
use the leveling adjusters under the front and
rear stabilizer bars to steady the bike.
4
6
5
NOTE: The pedal spindles and cranks
are marked “L” (left) and “R” (right).
Left and right are referenced from a
seated position on the bike with the
flywheel facing forward. Be sure to
install the pedals on the correct side
of the bike.


