Spinning Sport series Скачать руководство пользователя страница 11

©2014 Mad Dogg Athletics, Inc. All rights reserved. Spin®, Spinner®, Spinning®, Spin Fitness® and the 

Spinning logo  ® are registered trademarks that are owned by Mad Dogg Athletics, Inc.

8

WARNING!


SAVE THESE INSTRUCTIONS

THE MOMENTUM OF THE FLYWHEEL OF THE  BIKE WILL KEEP THE PEDALS TURNING EVEN AFTER 
YOU STOP PEDALING OR IN THE EVENT THAT YOUR FEET SLIP OFF OF THE PEDALS.  DO NOT 
DISMOUNT THE BIKE OR ATTEMPT TO REMOVE YOUR FEET FROM THE PEDALS UNTIL BOTH THE 
PEDALS AND THE FLYWHEEL HAVE STOPPED COMPLETELY.  FAILURE TO COMPLY MAY LEAD TO LOSS 
OF CONTROL AND SERIOUS PERSONAL INJURY.

TESTING THE BIKE

Use this checklist to perform the bike test procedure. 

• Re-check all bolts. Make sure that they have been tightened and that 

no parts are missing.

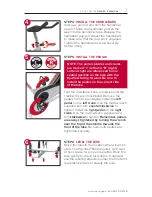
• Test the handlebar post and seat post to make sure that they move 

freely and that you are able to lock them at different positions.

• Check the saddle to make sure that it is level, tight and does not 

rotate around or tilt. Tighten and adjust as needed.

• Test the seat slider for movement from front to rear, and check it by 

locking it at different settings.

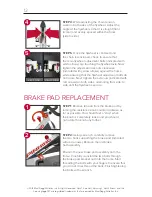
• The brake tension (resistance) can be adjusted using the red 

resistance knob.  Pressing down on the red knob will apply the brake 

if you need to stop quickly.

• Adjust the seat post and handlebar post to your needs.  Refer to the 

Guide to Ride

 or www.spinning.com.   

• Pedal at a moderate pace and test for proper and smooth resistance  

changes while varying the amount of turns on the resistance knob.

• To move the bike after testing is complete, stand in front of the 

bike, grasp the handlebars and tip the bike toward you until the 

transportation wheels are touching the floor.  Roll the bike to the 

desired location and then gently lower the rear of the bike back to the 

floor.  Make sure to adjust the leveling feet so that the bike remains 

stable at all times.

Содержание Sport series

Страница 1: ...SPORT SERIES OWNER S MANUAL www spinning com 800 847 SPIN 7746 1 OWNER S MANUAL...

Страница 2: ...and programs we re here to help you get the most out of every ride Whether your goal is to lose a few pounds stay in shape or train for the next race the team at Spinning is here to help you every ste...

Страница 3: ...ke 6 Bike Assembly 8 Testing the Bike 9 Troubleshooting 10 Lubricating the Chain 11 Chain Tension Adjustment 12 Brake Pad Replacement 13 Warranty 2014 Mad Dogg Athletics Inc All rights reserved Spin S...

Страница 4: ...their lives with the help of the Spinning program The Spinner bike with accompanying DVDs gives you everything you need to join them Ready to get started These guidelines will give you the insight you...

Страница 5: ...the bike The body weight for individuals riding the Spinner S1 S3 S5 or S7 should not exceed 250 pounds 113 5 kg Spinner bikes have a weighted flywheel and a fixed gear which does not allow riders to...

Страница 6: ...a slow pace before attempting to increase your pedaling speed Focus on form posture and smooth transitions between movements Always ride with proper footwear Keep shoe laces tucked in and foot straps...

Страница 7: ...ars featuring a contoured tactile grip surface and an ergonomic design that facilitates proper Spinning hand positions An adjustable resistance knob to keep you in control of your ride Simply turn the...

Страница 8: ...ts located under the saddle Be sure to re tighten the nuts after making your angle adjustment and before riding your bike PREVENTING RUST After each use raise the handlebar post and seat post to the h...

Страница 9: ...7746 Serial No ____________________________________________ STEP 2 ATTACH THE STABILIZER BARS Lift the back of the bike and remove the plastic shipping guards Have someone help you tilt the bike forw...

Страница 10: ...ighten Install the right pedal on the right crank Use the multi wrench supplied and turn clockwise to tighten Remember pedals are always tightened by turning the wrench over the top of the spindle tow...

Страница 11: ...you are able to lock them at different positions Check the saddle to make sure that it is level tight and does not rotate around or tilt Tighten and adjust as needed Test the seat slider for movement...

Страница 12: ...the pop pins are correctly locked into place SADDLE PAIN Check to ensure that the saddle is centered and level Adjust the level as necessary using the outside bolts shown in RED Remember that it does...

Страница 13: ...ke and take care not to allow lubricant to drip onto the floor STEP 4 Use a chain lube such as SPINTECH Silicone Fitness Lube or other oil based lubricant with a spray nozzle Use the included spray tu...

Страница 14: ...th sides of the flywheel STEP 3 To tighten the chain use an Allen wrench to turn the adjustment screws indicated with white arrows in a clockwise rotation equally on both sides To loosen the chain use...

Страница 15: ...frame while ensuring that the flywheel adjustment bolts do not rotate Next tighten the axle nuts indicated with red arrows on both sides alternating from side to side until the flywheel is secure STE...

Страница 16: ...AVAILABLE FOR INSPECTION UNTIL THE CLAIM IS FINALIZED WHENEVER CLAIMS ARE SETTLED MAD DOGG ATHLETICS INC RESERVES THE RIGHT TO BE SUBROGATED UNDER ANY EXISTING INSURANCE POLICES THE CLAIMANT MAY HAVE...

Страница 17: ...t are owned by Mad Dogg Athletics Inc 14 Take time now to enter your Spinner bike serial number in the space below serial number is located on the bottom crossbar If parts are missing or if you have a...

Страница 18: ...08 Fax 1 310 823 7408 www spinning com MAD DOGG ATHLETICS EUROPE Industrieweg 20A 3144 CH Maassluis The Netherlands Phone 31 0 1059 04508 Fax 31 0 1059 00054 2014 Mad Dogg Athletics Inc All rights res...

Отзывы: