


©2014 Mad Dogg Athletics, Inc. All rights reserved. Spin®, Spinner®, Spinning®, Spin Fitness® and the
Spinning logo ® are registered trademarks that are owned by Mad Dogg Athletics, Inc.
10
LUBRICATING THE CHAIN
The chain on your bike has been factory set and lubricated. It should
not require lubrication initially. However, during heavy use of your
Spinner® bike, it may become necessary to lubricate your chain to
reduce chain-associated noise. If you have any questions regarding
lubricating your chain, contact customer service at
800.847.SPIN (7746)
for assistance.
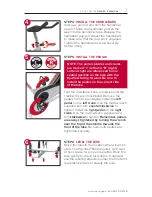
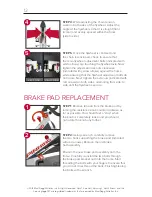
STEP 1:
Locate the flywheel adjustment cover on the
front right side of the chainguard. Note the recess in
the cover for finger grip.
STEP 2:
Using your fingers, gently pop out the
flywheel adjustment cover from the chainguard. This
will expose a small section of the chain near the front
sprocket.
STEP 3:
Cover the floor under the bike and take care
not to allow lubricant to drip onto the floor.
STEP 4:
Use a chain lube such as SPINTECH® Silicone
Fitness Lube or other oil-based lubricant with a spray
nozzle. Use the included spray tube to keep the
lubricant spray focused on the chain area near the
sprocket. Do not use a wax-based lubricant.
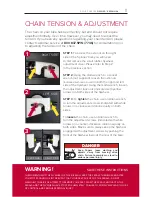
STEP 5:
Turn the resistance knob clockwise until the
flywheel is locked and cannot rotate. With the flywheel
locked, spray the lube onto the chain. Loosen the
brake and rotate the crank carefully and slowly, by
hand, approximately an eighth of a turn, and then lock
the flywheel again. Spray lube onto the next portion
of the chain. Repeat the above steps a total of eight
times to lubricate the entire chain.
STEP 6:
Carefully replace the flywheel adjustment
cover so that it is flush to the outside of the chainguard.
Your Spinner bike is now ready for testing.
1
2
3-5
SPINTECH® lubricants,
polish, grease and
tools are available at
www.spinning.com
DANGER
Keep fingers, loose clothing and
objects away from moving drive
chain. Failure to comply may lead to
serious personal injury.


