Exterior Lightbar Connect-n-Go System
nROADS Connect-n-Go 1018
15.
Driver Module Replacement:
1. Verify power has been removed from light bar before attempting service.
2. Remove top cover.
3. Unplug 3 pin power/ data connector and LED module connectors from driver module assembly, noting location.
4. Remove driver module.
5. Snap new driver module assembly into housing.
6.
Plug light modules into closest connector available and connect power and input wires.
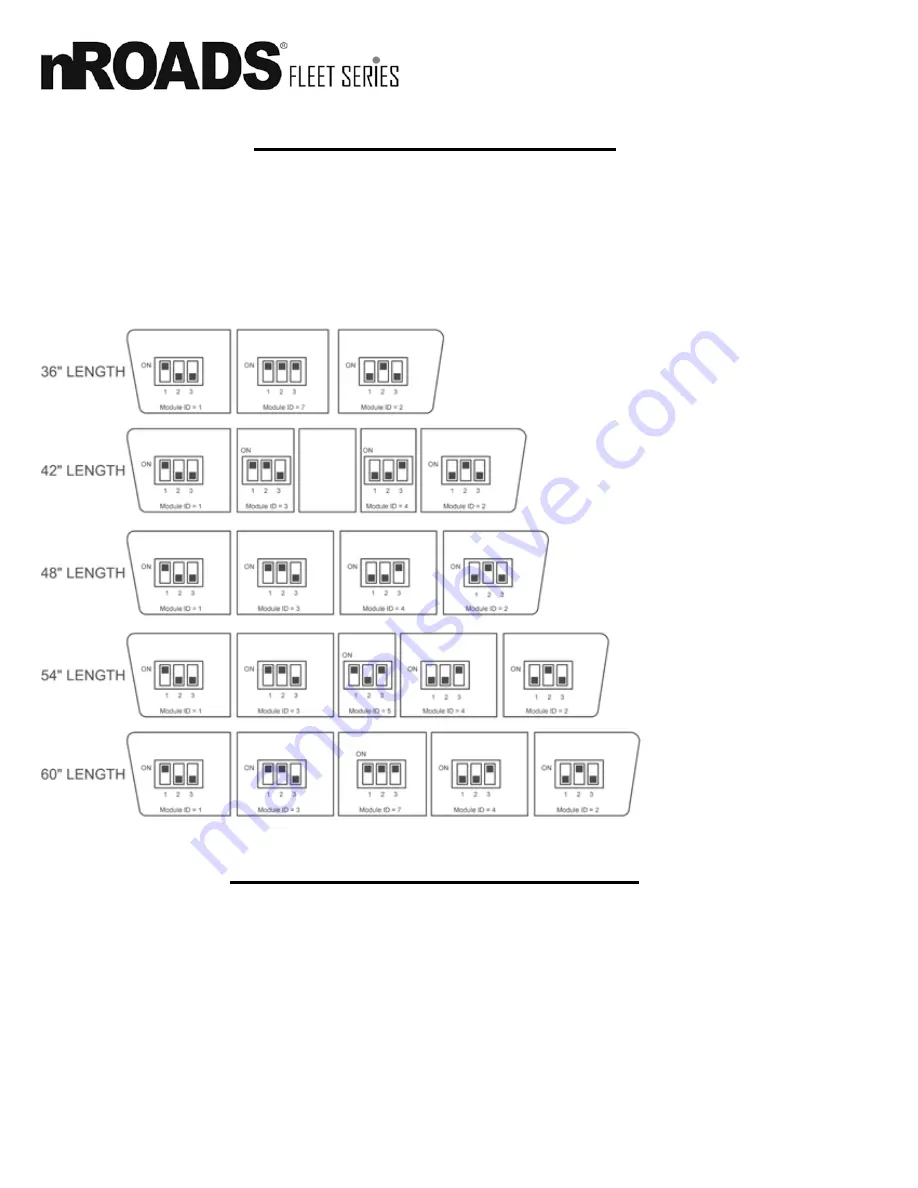
7. Set DIP switches.
8. Apply power to lightbar and activate input wire(s) to verify proper operation.
9. Replace top cover with new SOS factory screws to maintain warranty seal.
*
Controller Board Location, location will match wire side exit
(Refer to Page 6 for DIP Switch Settings)
DRIVER MODULE REPLACEMENT
The Connect-n-Go mpower® replacement module will automatically sync with the nROADS® Fleet Lightbar. The system will recognize when
a module has been removed, see that a new module has been added, and assign the “missing” mod ID to the new light. To replace a module,
perform the following steps:
1. Disconnect and remove the module to be replaced.
2. Connect the replacement module to the same lightbar harness that was previously used.
3. Turn on the lightbar by activating any button on the hand held controller, then deactivate the button, and wait for the system to recognize the
newly plugged in module (about 15 seconds.)
4. The module will flash its ID when it has paired with the lightbar:
a. ID #1 is in the Rear Driver position.
b. ID #2 is in the Rear Passenger position.
c. ID #3 is in the Front Driver position.
d. ID #4 is in the Front Passenger position.
5. Finish mounting the replacement module.
6. If an mpower® module is not acting as desired, refer to Program 6, 7, 8, or 9 on Pages 10, 11 for reprogramming steps.
*
*
*
*
*
*
*
*
MPOWER® MODULE REPLACEMENT


