background image

59

Additional Information

 KLV-HG26M1/KLV-SG21M1

2-179-781-

E1

(2)

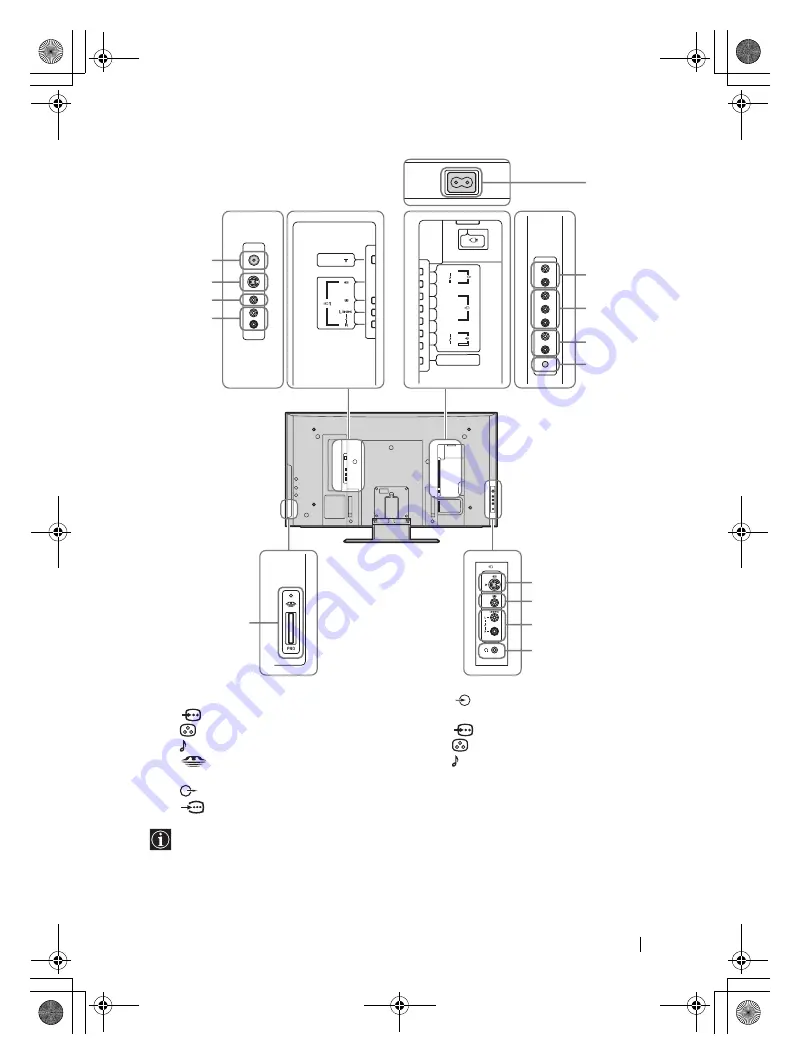
A

Connect the supplied coaxial cable

B

1: AV1 S video input jack

C

1: AV1 Video input jack

D

1: AV1 Audio input jacks

E

: “Memory Stick” slot

F

Connect the supplied AC power cord

G

: Variable Audio output jacks

H

3: AV3 Y P

B

/C

B

 P

R

/C

R

 jacks

I

3: AV3 Audio input jacks

J

0

: Auto Startup button

K

2: AV2 S video input jack

L

2: AV2 Video input jack

M

2: AV2 Audio input jacks

N

i

: Headphones jack

0

3

3

P

B

/C

B

P

R

/C

R

L

R

L

R

Y

2

A

B
C
D

G

H

J

I

E

K
L

M

N

F

To avoid a noisy picture, do not connect external equipment to connectors 

B

 and 

C

, or 

K

 and 

L

 at the same time.

(continued)

01gb01co.book  Page 59  Thursday, July 29, 2004  4:45 PM

Содержание WEGA KLV-HG26M1

Страница 1: ...2 179 781 E1 2 LCD Color TV KLV HG26M1 KLV SG21M1 2004 Sony Corporation Quick Start Guide Operating Instructions KLV HG26M1 KLV SG21M1 2 179 781 E1 2 01gb01co book Page 1 Thursday July 29 2004 4 45 PM ...

Страница 2: ...KLV HG26M1 KLV SG21M1 2 179 781 E1 2 01gb01co book Page 2 Thursday July 29 2004 4 45 PM ...

Страница 3: ...KLV HG26M1 KLV SG21M1 2 179 781 E1 2 Quick Start Guide Operating Instructions 01gb01co book Page 3 Thursday July 29 2004 4 45 PM ...

Страница 4: ...the AC power cord into an AC power outlet This plug cannot be used and should be destroyed To prevent the risk of fire or electric shock do not expose the unit to rain or moisture Dangerously high voltages are present inside the unit Do not open the cabinet Refer servicing to qualified personnel only Important information Information on a feature 1 2 Sequence of instructions Shaded buttons on the ...

Страница 5: ...st Time Operation Switching On the TV and Tuning the TV Automatically 30 Menu System Introducing and Using the Menu System 32 Picture Adjustment 32 Sound Adjustment 34 Screen Control 36 Features 39 Set Up 40 Other Functions Sleep Timer Function 44 Screen Memo Function 45 Memory Stick About the Memory Stick Feature 46 Inserting and Removing a Memory Stick 49 Using the Memory Stick Memory Stick Home...

Страница 6: ...ear cover Connect an antenna VCR and AC power cord to your TV Select the language of the menu screens Tune your TV Change the broadcast channels into a different order Quick Start Guide 1 Checking the Accessories Supplied Remote Control RM Y1103 1 Size AA Batteries R6 Type 2 Coaxial Cable 1 Do not remove ferrite cores Rear Cover 1 KLV SG21M1 only AC power cord 1 01gb01co book Page 4 Thursday July ...

Страница 7: ...Remote Control Make sure you insert the supplied batteries observing the correct polarity Always remember to dispose of used batteries in an environmentally friendly way Do not use different types of batteries together or mix old and new batteries continued 01gb01co book Page 5 Thursday July 29 2004 4 45 PM ...

Страница 8: ... Do not connect to the AC power outlet before all connections are complete OUT IN For more details regarding VCR connection refer to Connecting Optional Equipment on page 58 VCR Connect the supplied coaxial cable Connect the supplied AC power cord RCA cable is optional Connecting an antenna Connecting a VCR with an antenna Connect the supplied AC power cord 01gb01co book Page 6 Thursday July 29 20...

Страница 9: ...le of the rear cover and then remove it from the TV 2 Bundle the cables and secure them with the clips on both sides of the TV 3 Put the cables from both sides together and secure them with the clip at the bottom It may not be possible to fasten cables that are too thick with the clips If all the cables cannot be stored inside leave some of them hanging down on both sides of the TV If the cables a...

Страница 10: ...es Attaching the rear cover Hold the rear cover as illustrated below fitting the five KLV HG26M1 or four KLV SG21M1 detents on the rear cover into the corresponding holes on the TV then push the rear cover back onto the TV 5 Attaching the Rear Cover KLV HG26M1 KLV SG21M1 01gb01co book Page 8 Thursday July 29 2004 4 45 PM ...

Страница 11: ... Press the Power switch on the TV to switch it on When you adjust the angle make sure that the cables are not caught between the TV and the stand If some of the cables get caught divide them into two groups at the clip and pull them in the opposite direction to free them up When adjusting the angle hold the stand with your hand so that it does not come loose or fall off Be careful not to catch you...

Страница 12: ...ppears automatically on the screen Auto Startup Press or on the remote control to select the language then press OK to confirm your selection The Auto Tuning menu appears in the selected language 7 Selecting the Language of the Menu Screens To perform Auto Startup later press 0 on the rear panel of the TV Do you want to start automatic tuning Yes No Language Select language English m 01gb01co book...

Страница 13: ...This procedure could take some minutes Please be patient and do not press any buttons otherwise the auto tuning will not be completed properly If no channels are found during the auto tuning process a new menu appears automatically on the screen asking you to connect the antenna Please connect the antenna see page 6 and press OK The auto tuning process will start again Do you want to start automat...

Страница 14: ...annel 01 02 03 04 05 06 07 08 09 10 11 Exit MENU Program Sorting Select new position 01 01 02 03 04 05 06 07 08 09 10 11 Exit MENU 1 Press or to select the program number with the channel you want to rearrange then press 2 Press or to select the new program number position for your selected channel then press 3 Repeat steps 1 and 2 if you want to change the order of the other channels 4 Press MENU...

Страница 15: ...allation of the unit on the wall should be carried out by qualified service personnel Improper installation may render the unit unsafe in the event of an earthquake etc Carrying Before carrying the unit disconnect all the cables from the unit When you carry the unit by hand hold the unit as illustrated on the right Do not hold the rear cover only As the rear cover comes off easily the unit may fal...

Страница 16: ...le may cause the unit to fall down and cause injury Do not hang this unit from the ceiling Ships and other vessels Do not install this unit on a ship or other vessel If the unit is exposed to water it may cause fire or damage the unit Water and moisture Do not use this unit near water for example near a bathtub or shower room Also do not expose to rain moisture or smoke This may result in fire or ...

Страница 17: ...ower outlet changed Wiring Unplug the AC power cord when wiring cables Be sure to unplug the AC power cord for your safety when hooking up Moisture Do not touch the AC power cord with a wet hand If you plug unplug the AC power cord with a wet hand it may cause electric shock Cleaning Clean the AC power plug regularly If the plug is covered with dust and it picks up moisture its insulation may dete...

Страница 18: ...t in fire or electric shock Servicing Do not open the cabinet Entrust the unit to qualified service personnel only Moisture and flammable Do not let this unit get wet Never spill liquid of any kind on the unit If any liquid or solid object does fall through openings in the cabinet do not operate the unit It may result in electric shock or damage to the unit Have it checked immediately by qualified...

Страница 19: ...e humidity and temperature of the area where the unit is located Placement Never place the unit in hot humid or excessively dusty places Do not install the unit where it may be exposed to mechanical vibrations Recommended place for the unit Place the unit on a stable level surface Otherwise the unit may fall and cause injury Accessories Secure the unit properly If the unit is not secured properly ...

Страница 20: ...t and ask your dealer or Sony service center to exchange it Fluorescent lamp This unit uses a special fluorescent lamp as its light source If the screen image becomes dark flickers or does not appear the fluorescent lamp has run down and should be replaced For replacement consult qualified service personnel When not in use For environmental and safety reasons it is recommended that the unit be swi...

Страница 21: ...heating which may cause fire or damage to the unit When installing the unit on the wall When installing the unit using a stand Never install the unit as follows Leave at least this much space 10 cm 30 cm 10 cm 10 cm Leave at least this much space 10 cm 30 cm 10 cm Air circulation is blocked Air circulation is blocked Wall Wall continued 01gb01co book Page 19 Thursday July 29 2004 4 45 PM ...

Страница 22: ...t night time Therefore closing the windows or using headphones is suggested When using headphones adjust the volume so as to avoid excessive levels as hearing damage may result Handling the remote control Handle the remote control with care Do not drop or step on it or spill liquid of any kind onto it Do not place the remote control in a location near a heat source or in a place subject to direct ...

Страница 23: ...1 E1 2 Overview Checking the Accessories Supplied Remote Control RM Y1103 1 Size AA batteries R6 Type 2 Rear Cover 1 KLV SG21M1 only Coaxial Cable 1 AC power cord 1 Do not remove ferrite cores 01gb01co book Page 21 Thursday July 29 2004 4 45 PM ...

Страница 24: ...urned on Standby Sleep indicator flashes in red The TV is receiving remote control signals Standby Sleep indicator flashes in red repeatedly and the Power indicator is off There is a problem with the TV For more details refer to Self diagnosis function on page 66 For the connectors on the rear panel of the TV refer to Connecting Optional Equipment on page 58 Remote control sensor Memory Stick indi...

Страница 25: ... this remote control to your VCR or DVD This setup depends on the manufacturer For more details refer to Remote Control Configuration for VCR DVD on page 62 4 Selecting the input source Press this button repeatedly until the input symbol of the desired source appears on the screen 5 Turning on the Sleep Timer function Press this button to set the TV to automatically switch to the standby mode afte...

Страница 26: ...ing the TV volume Press these buttons to adjust the volume of the TV qh Recording programs on your VCR If the VCR is selected press this button to record programs qj Selecting the TV mode Press this button to switch off video input qk Selecting a picture mode Press this button repeatedly to change the picture mode For more details refer to Picture Adjustment on page 32 ql Selecting a sound effect ...

Страница 27: ...emote Control Make sure you insert the supplied batteries observing the correct polarity Always remember to dispose of used batteries in an environmentally friendly way Do not use different types of batteries together or mix old and new batteries 01gb01co book Page 25 Thursday July 29 2004 4 45 PM ...

Страница 28: ...o the AC power outlet before all connections are complete OUT IN For more details regarding VCR connection refer to Additional Information on page 58 VCR Connect the supplied coaxial cable RCA cable is optional Connecting an antenna Connecting a VCR with an antenna Connect the supplied AC power cord Connect the supplied AC power cord 01gb01co book Page 26 Thursday July 29 2004 4 45 PM ...

Страница 29: ...e rear cover and then remove it from the TV 2 Bundle the cables and secure them with the clips on both sides of the TV 3 Put the cables from both sides together and secure them with the clip at the bottom It may not be possible to fasten cables that are too thick with the clips If all the cables cannot be stored inside leave some of them hanging down on both sides of the TV If the cables are not n...

Страница 30: ...h the rear cover back onto the TV Removing the rear cover Please attach the rear cover to the TV after connecting the cables 1 Hold the lower right or left corner of the rear cover as illustrated below and pull it towards you In the same way detach the lower left or right corner of the rear cover from the TV 2 Hold the rear cover with both hands as illustrated below and pull it towards you KLV HG2...

Страница 31: ...gle make sure that the cables are not caught between the TV and the stand If some of the cables get caught divide them into two groups at the clip and pull them in the opposite direction to free them up When adjusting the angle hold the stand with your hand so that it does not come loose or fall off Be careful not to catch your fingers between the TV and the stand 15 01gb01co book Page 29 Thursday...

Страница 32: ...by selecting the appropriate option in the Set Up menu 1 Connect the TV to the AC power outlet 220 240 V AC 50 Hz 2 Press the Power switch on the TV to switch it on The first time you switch on the TV the Language menu appears automatically on the screen Auto Startup To perform Auto Startup later press 0 on the rear panel of the TV 3 Press or on the remote control to select the language then press...

Страница 33: ...A If you want to keep the broadcast channels in the tuned order go to step 7 B If you want to store the broadcast channels in a different order 1 Press or to select the program number with the channel you want to rearrange then press 2 Press or to select the new program number position for your selected channel then press The selected channel now moves to its new program position and the other cha...

Страница 34: ...u allows you to alter the picture adjustments To do this After selecting the item you want to alter press OK then press or repeatedly to adjust it This menu also allows you to customize the picture quality for the Personal mode based on the program you are watching Picture Mode Dynamic For enhanced picture contrast and sharpness Standard For a picture with contrast to suit your room s lighting con...

Страница 35: ...or AV2 jack Hue cannot be adjusted for Memory Stick input Sharp Press or to soften the picture Press or to sharpen the picture Sharp cannot be adjusted for Memory Stick input Backlight Press or to darken the Backlight Press or to brighten the Backlight 3D NR Noise Reduction Auto Off Select to reduce the noise level 3D NR Noise Reduction cannot be adjusted for an input signal from the Y PB CB PR CR...

Страница 36: ...ound technology is incorporated under license from SRS Labs Inc Treble Press or to decrease higher frequency sounds Press or to increase higher frequency sounds Bass Press or to decrease lower frequency sounds Press or to increase lower frequency sounds Balance Press or to emphasize the left speaker Press or to emphasize the right speaker Intelligent Vol On Off Volume level of the channels will st...

Страница 37: ... channel 1 B for sound channel 2 or Mono for a mono channel if available If you select other equipment connected to the TV set the Dual Sound option to Stereo A or B Reset Cancel OK Select OK to reset the sound to the factory preset Only Treble Bass and Balance are restored to the factory settings when you reset the sound 01gb01co book Page 35 Thursday July 29 2004 4 45 PM ...

Страница 38: ...lor Tone Reset Personal 50 50 25 0 3 5 Auto On Cool Picture Adjustment Select Set End OK MENU Screen Format Screen Shift Smart Screen Control Select Set Back OK End MENU Screen Format Screen Shift Smart Screen Control Select Set End OK MENU Screen Format Screen Shift 4 3 Screen Control Select Set Back OK End MENU Screen Format Screen Shift 4 3 Screen Control m KLV HG26M1 KLV SG21M1 01gb01co book P...

Страница 39: ...6 9 picture size Zoom Wide screen format for letterbox movies Wide For a 16 9 broadcast To do this KLV SG21M1 1 After selecting this option press OK 2 Press or to select the desired screen format and press OK 4 3 Conventional 4 3 picture size 16 9 For a 16 9 broadcast You can adjust the position of the image when Smart 14 9 or Zoom is selected If parts of the top and bottom of the screen are cut o...

Страница 40: ...to adjust the position of the picture V Shift Vertical Shift KLV HG26M1 only Press to move the screen up Press to move the screen down H Shift Horizontal Shift Press to move the screen to the left Press to move the screen to the right Reset Select OK to reset to the factory settings Screen Shift cannot be adjusted for Memory Stick input When Screen Format is set to 4 3 or Wide V Shift Vertical Shi...

Страница 41: ...udio equipment is connected To do this 1 After selecting this option press OK 2 Press or to select the desired output On The sound of the TV is output through the TV speakers Off The sound of the TV is not output through the TV speakers Menu Color The Menu Color option allows you to alter the background color of the menus To do this 1 After selecting this option press OK 2 Press or to select White...

Страница 42: ...d Tuning the TV Automatically on page 30 Program Sorting The Program Sorting option allows you to change the order in which the channels TV Broadcast appear on the screen To do this 1 After selecting this option press 2 Follow step 6 B of Switching On the TV and Tuning the TV Automatically on page 31 Select Set End OK MENU Language Auto Tuning Program Sorting Program Labels AV Preset Manual Progra...

Страница 43: ...ws you to designate a name for any external equipment you have connected to this TV To do this 1 After selecting this option press 2 Press or to select the input source you wish to name then press 3 A label automatically appears in the label column a If you want to use one of the predefined labels press or to select the desired label AV1 AV2 AV3 VIDEO DVD CABLE GAME CAM or SAT b If you want to set...

Страница 44: ...the channel frequency of the TV Broadcast directly If you do not know the channel frequency press or to search for it When you have tuned to the desired channel press OK If you cannot tune to the desired channel with the above procedure try the following procedure 1 Press OK to exit the Channel option 2 Select the Tuning mode and press OK or 3 Press or to select Manual then press OK 4 Follow step ...

Страница 45: ...manually fine tune the TV to obtain a better picture if the picture is distorted To do this 1 Press PROG to select the program number with the channel you want to fine tune manually You cannot select the program number set to skip in the Skip option see step D below 2 When the program you want to fine tune appears on the screen select the Fine option and press 3 Press or to adjust the fine tuning ...

Страница 46: ...mer function allows you to set the TV to switch itself automatically to the standby mode after a specified time period You can select the time period from among 30 minutes 60 minutes 90 minutes and 120 minutes If you switch off the TV and switch it on again the Sleep Timer function is reset to Off The message Sleep timer will end soon Power will be turned off appears on the screen 1 minute before ...

Страница 47: ...u to temporarily freeze and review the picture on the screen This is useful to check and make a note of information displayed on the screen such as a mail address or a recipe If you change the input source or the channel the Screen Memo function is canceled When the Screen Memo function is on the picture remains still on the screen but the sound continues to play When the Screen Memo function is o...

Страница 48: ...g JPEG stands for Joint Photographic Experts Group which is the organization that implemented this format DCF stands for Design rules for Camera File systems which has specifications established by the Japan Electronics and Information Technology Industries Association JEITA MPEG is a format for compressing a moving image extension mpg Unsupported image types Still images stored in TIFF or any oth...

Страница 49: ...size Once attached to a Memory Stick Duo adapter Memory Stick Duo is physically the same size as a standard Memory Stick and thus can be used with products compliant with the standard Memory Stick Notes on Memory Stick Duo To use a Memory Stick Duo with this unit attach it to the Memory Stick Duo adapter before inserting it into the unit Make sure that you attach the Memory Stick Duo to the adapte...

Страница 50: ...r store Memory Stick media in a location subject to High temperature such as near a heater or inside a hot car High humidity Direct sunlight Corrosive substances Magnetic fields Excessive dust Static electricity or electric noise Electric surges Store and carry Memory Stick media in its original case to ensure protection of stored data Make a backup of stored data On formatting the Memory Stick Th...

Страница 51: ...se Insert the Memory Stick into the Memory Stick slot with the b mark facing forward as illustrated on the right until it clicks The Memory Stick access lamp flashes then goes out Be sure to insert the Memory Stick correctly If the Memory Stick is forced in the wrong way the Memory Stick or the slot may be damaged Insert only a Memory Stick into the Memory Stick slot Attempting to insert other obj...

Страница 52: ...0 KLV HG26M1 or 16 KLV SG21M1 thumbnail images To close the Memory Stick Home press Memory Stick again Memory Stick OK Slide Show Option Select Folder 100MSDCF Memory Stick Home Sel No 1 1234 Size 1024x768 File SPJP0001 JPG Date 7 15 2002 12 34 81 Set OK Memory Stick Home mark Folder name for the selected folder Index of thumbnail images contained in the selected folder Press or to select an image...

Страница 53: ... the image file according to the file name or the renewal date in the ascending descending order Filter Filters only still images Still or moving images Movie out from the content To cancel the filter select Off The Sort Filter functions can be activated only when Digi Camera Mode is set to Off Filter setting information is displayed on the Memory Stick Home Memory Stick Displays the type the used...

Страница 54: ...les in the subfolder In this case wait until the Memory Stick access lamp goes off before performing any operations or set Digi Camera Mode to Off 1 Insert a Memory Stick that contains the images you want to view 2 Press Memory Stick on the remote control The Memory Stick Home appears on the screen 3 Press or to highlight Select Folder and then press OK The Select Folder menu appears 4 Press to se...

Страница 55: ...der appears 5 Press and press or to select an image file that you want to view Then press OK The index menu for a thumbnail image appears You can select any of the following options Press or to select the option and press OK If the selected folder contains more image files than can be displayed on the screen press or press to select the slider and press The index of subsequent images appears as yo...

Страница 56: ...a related file icon all the related files will also be deleted You cannot rotate or delete the images on the Memory Stick if the write protect switch is set to LOCK If an image has been rotated it remains on the Memory Stick and is displayed this way again the next time Option Description Return Returns to Memory Stick Home Information Displays the information of the selected image file Protect Pr...

Страница 57: ...n N Play pause Plays back a moving image During playback the button display is changed to the X pause button When the playback is finished playback stops with the first image of the moving image file displayed x Stop Stops playback Full Screen Displays a moving image on the full screen and starts playback automatically To return to the Movie Player press or OK The TV automatically displays the app...

Страница 58: ...return to Memory Stick Home If you have set Advan Slds to Auto Press OK If you have set Advan Slds to Manual Press OK to display the index menu for Slide Show then press or to select Return and press OK 1 Insert a Memory Stick that contains the images you want to view 2 Press Memory Stick on the remote control The Memory Stick Home appears on the screen 3 Press or to highlight Select Folder then p...

Страница 59: ...Option menu No still file No still image files are contained in the currently selected folder although Filter is set to Still in the Option menu Cannot play Data in the moving image file are corrupted Memory Stick locked The write protect switch on the Memory Stick is set to LOCK Release the lock Memory Stick error The image file may be corrupted The image file may not be stored in JPEG or MPEG1 f...

Страница 60: ...tertainment Inc PlayStation is a trademark of Sony Computer Entertainment Inc Using the following instructions you can connect a wide range of optional equipment to your TV Connecting cables are not supplied Headphones Hi Fi DVD Recorder PlayStation 2 VCR DVD player Rear panel of the TV S VHS Hi8 DVC camcorder 01gb01co book Page 58 Thursday July 29 2004 4 45 PM ...

Страница 61: ... G Variable Audio output jacks H 3 AV3 Y PB CB PR CR jacks I 3 AV3 Audio input jacks J 0 Auto Startup button K 2 AV2 S video input jack L 2 AV2 Video input jack M 2 AV2 Audio input jacks N i Headphones jack 0 3 3 PB CB PR CR L R L R Y 2 A B C D G H J I E K L M N F To avoid a noisy picture do not connect external equipment to connectors B and C or K and L at the same time continued 01gb01co book Pa...

Страница 62: ... or a DVD recorder to Y PB CB PR CR jacks of 3 Some DVD recorders may have component signal format If you wish to input the component signal connect the DVD recorder to Y PB CB PR CR jacks of 3 Connecting to external Audio Equipment To listen to the sound from TV on Hi Fi equipment Connect your Hi Fi equipment to the audio output jacks G if you wish to amplify the audio output from TV Next using t...

Страница 63: ... screen when you press Memory Stick For more details on using Memory Stick media refer to Using the Memory Stick Memory Stick Home on page 50 1 Connect your equipment to the designated TV jack as indicated on page 58 to 60 2 Switch on the connected equipment 3 To watch the picture of the connected equipment press the button on the remote control repeatedly until the correct input symbol appears on...

Страница 64: ...nd hold the yellow button for approximately 6 seconds until the green light starts flashing 3 Whilst the green light is flashing enter all three digits of the code for your brand see page 63 using the number buttons on the remote control If your selected code is entered correctly all three green lights will be lit momentarily 4 Turn on your VCR or DVD and check that the main functions work If your...

Страница 65: ... GRUNDIG 358 355 360 361 320 351 KENWOOD 008 HITACHI 327 333 334 LG 015 014 JVC 314 315 322 344 352 353 354 348 349 LOEWE 009 028 023 024 016 003 LG 332 338 MAGNAVOX 009 028 023 024 016 003 LOEWE 358 355 360 361 320 351 MATSUI 013 016 MATSUI 356 357 MICROMEDIA 009 MITSUBISHI 346 347 MITSUBISHI 010 ORION 328 ONKYO 022 PANASONIC 321 323 OPTINUS 004 PHILIPS 311 312 313 316 317 318 358 359 PANASONIC 0...

Страница 66: ... kg without stand and rear cover Panel System LCD Liquid Crystal Display Panel TV System D K I B G Color System PAL SECAM NTSC 3 58 4 43 only Video In Antenna 75 ohm external terminal for VHF UHF Channel Coverage D K VHF C1 C12 R1 R12 UHF C13 C57 R21 R69 CATV S01 S03 S1 S41 Z1 Z39 I UHF B21 B68 CATV S01 S03 S1 S41 B G VHF E2 E12 UHF E21 E69 CATV S01 S03 S1 S41 Terminals 1 1 1 Video input S video i...

Страница 67: ...ymptoms and remedies Here are some simple solutions to problems which may affect the picture and sound If you continue to experience problems have your TV serviced by qualified service personnel Never open the casing yourself Problem Possible remedies No picture No picture screen is dark and no sound Check the antenna connection Connect the TV to the AC power outlet and press the Power switch on t...

Страница 68: ...enu and select Picture Mode Then select the desired picture mode page 32 Picture stripe noise Make sure that the antenna is connected using the supplied coaxial cable Keep the antenna cable away from other connecting cords Do not use 300 ohm twin lead cables as interference may occur Distorted picture and noisy sound Check if any connected optional equipment is installed in front of the TV or at t...

Страница 69: ...ference may occur Communication problems may occur if infrared communication equipment e g infrared cordless headphones is used near the TV Please use headphones other than infrared cordless headphones move the infrared transceiver away from the TV until the noise is eliminated or move the transmitter and receiver of the infrared communication equipment closer together Menu item is not displayed S...

Страница 70: ...Sleep indicator on the TV flashes Refer to Self diagnosis function page 66 and contact your nearest Sony service center Problem Possible remedies Cannot insert the Memory Stick into the Memory Stick slot The Memory Stick is not facing in the correct direction Insert the Memory Stick with the b mark facing forward into the Memory Stick slot page 49 Cannot delete a file or all materials The write pr...

Страница 71: ...KLV HG26M1 KLV SG21M1 2 179 781 E1 2 01gb01co book Page 69 Thursday July 29 2004 4 45 PM ...

Страница 72: ... www sony net Printed in China Manufacturer The name and address of the Chinese manufacturer is printed here in Chinese Postal code The postal code of the Chinese manufacturer is printed here 01gb01co book Page 68 Thursday July 29 2004 4 45 PM ...

Отзывы: