


21
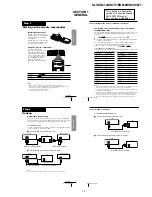
Getting Started
Getting Started
2
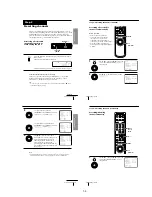
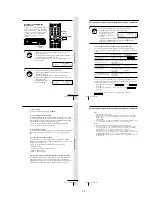
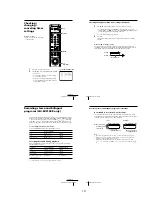
Enter the guide channel number assigned
in the program guide and press ENTER.
3
Enter the actual number on your TV (and
VCR) and press ENTER.
4
Repeat steps 2 and 3 for each channel whose numbers don’t match.
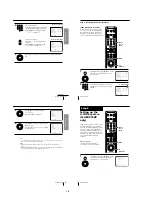
5
When you have set all channels, press OK
to confirm your channel settings.
6
After all settings are complete, press MENU to exit.
1
2
3
4
5
6
7
8
9
0
1
2
3
4
5
6
7
8
9
0
TV
2 5
–
– –
[ ENTER ]
:
:
G-CODE
TV
[ 0 – 9 ]
2 5
–
1 1 7
[ OK ]
:
:
G-CODE
TV
[ 0 – 9 ]
:
:
G-CODE
PAGE 1
TV
TV
2
– 7 3
5 9 – 4 7
5
1
1
–
2
4
–
–
4
8 6 –
–
9 6
7
– 5 5
7 7 – 3 5
8
–
–
9
8 6 – 2
1 0
3
–
–
1
1 1 8
9 0 – 2 2
[ MENU ]
[
]
MENU
OK
PLAY
Basic Operations
22
Basic Operations
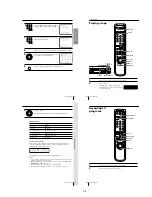
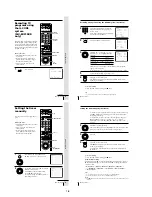
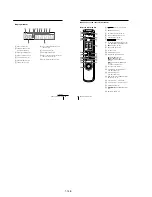
Playing a tape
Z
EJECT
CLEAR
DISPLAY
H
PLAY
M
FF
x
STOP
m
REW
X
PAUSE
1
Turn on your TV and set it to the video channel.
2
Insert a tape.
The VCR turns on and starts playing
automatically if you insert a tape with its
safety tab removed.
1
2
3
4
5
6
7
8
9
0
x
STOP
H
PLAY
M
FF
m
REW
A
EJECT
X
PAUSE
23
Basic Operations
Basic Operations
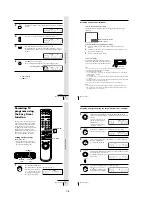
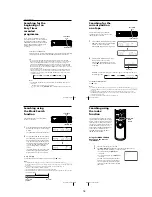
3
Press
H
PLAY.
When the tape reaches the end, it will rewind automatically.
Additional tasks
To
Stop play
Pause play
Resume play after pause
Fast-forward the tape
Rewind the tape
Eject the tape
Press
x
STOP
X
PAUSE
X
PAUSE or
H
PLAY
M
FF during stop
m
REW during stop
Z
EJECT
To use the time counter
At the point on the tape that you want to find later, press CLEAR. The
counter in the display window resets to “0:00:00.” Search for the point
afterwards by referring to the counter.
To display the counter on the TV screen, press DISPLAY.
Notes
• Tapes recorded in the LP mode on other VCRs can be played back on this VCR but
the picture quality cannot be guaranteed.
• While setting the menu on the TV screen, you cannot use the
H
PLAY,
X
PAUSE,
M
FF,
m
REW, or
x
STOP buttons.
• The counter resets to “0:00:00” whenever a tape is reinserted.
• The counter stops counting when it comes to a portion with no recording.
EP
VIDEO
APC
OK
PLAY
Basic Operations
24
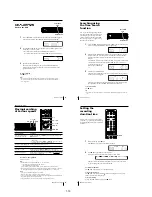
Recording TV
programs
1
Turn on your TV and set it to the video channel.
2
Insert a tape with its safety tab in place.
z
REC
x
STOP
DISPLAY
INPUT SELECT
CH +/–
TV/VIDEO
REC SPEED
1
2
3
4
5
6
7
8
9
0
1-5
Содержание RMT-V310
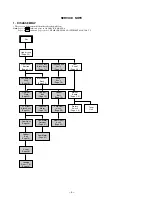
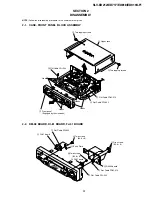
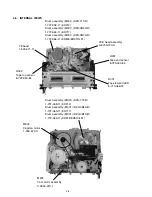
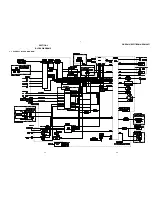
Страница 24: ...SLV ED212 ED717 ED818 ED919 LF1 3 1 3 2 SECTION 3 BLOCK DIAGRAMS 3 1 OVERALL BLOCK DIAGRAM ...
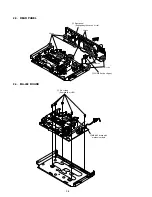
Страница 27: ...SLV ED212 ED717 ED818 ED919 LF1 3 4 AUDIO BLOCK DIAGRAM 3 7 3 8 ...
Страница 28: ...SLV ED212 ED717 ED818 ED919 LF1 3 5 TUNER BLOCK DIAGRAM 3 9 3 10 ...
Страница 29: ...SLV ED212 ED717 ED818 ED919 LF1 3 6 MODE CONTROL BLOCK DIAGRAM 3 11 3 12 ...
Страница 30: ...SLV ED212 ED717 ED818 ED919 LF1 3 7 POWER BLOCK DIAGRAM ED212 ED717 ED919KR LF1 ED818 ED919TW 3 13 3 14E ...


