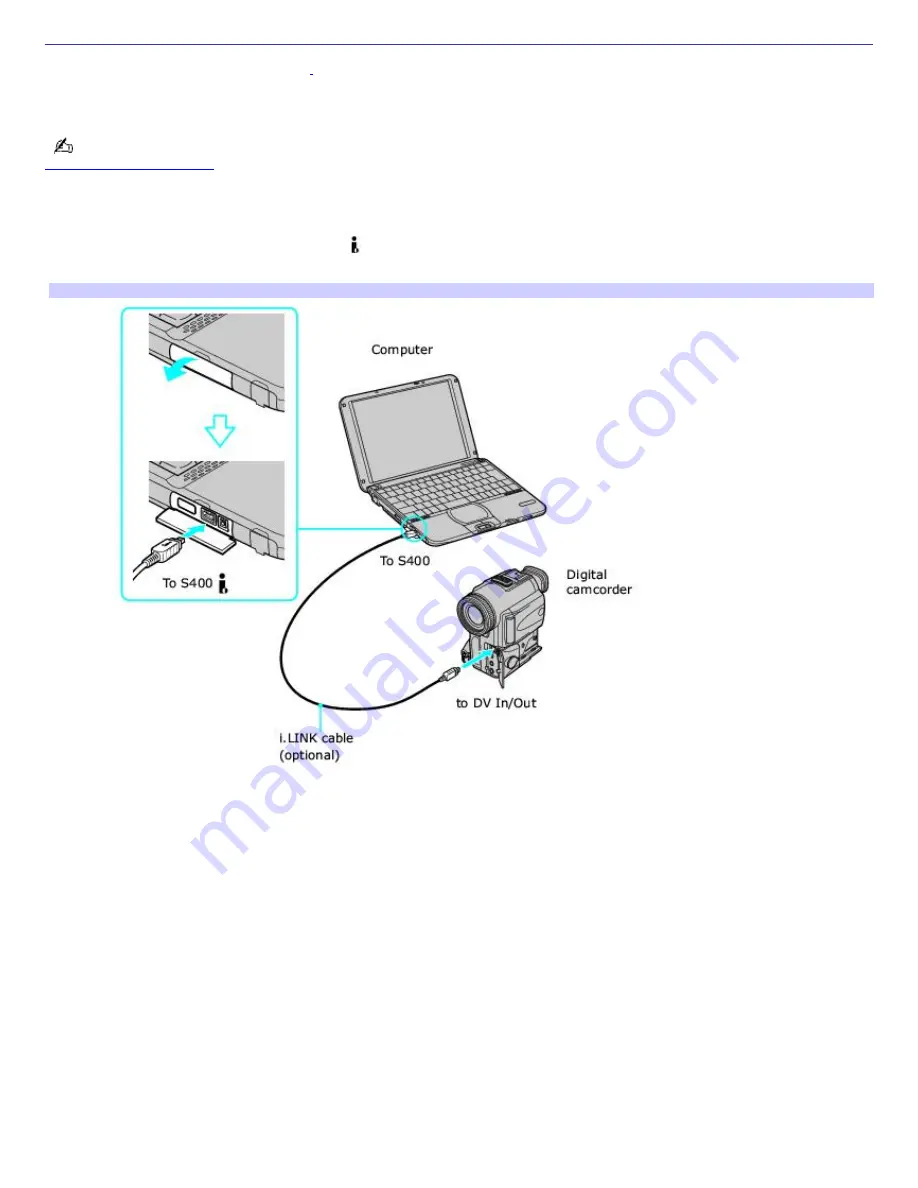
Connecting an i.LINK AV Device
Your VAIO
®
computer includes an i.LINK
®
1
S400 (IEEE1394) port, which you can use to connect a compatible i.LINK
audiovisual (AV) device, such as an i.LINK enabled digital video camera recorder. See the manual supplied with your digital
video camera recorder for more information on its installation and use.
You can purchase compatible i.LINK cables from your local retailer, through the Sony VAIO
®
Direct Web site (
http://vaio.sonystyle.com
), or by calling 1-888-315-7669 (toll free).
To connect a digital camcorder
Plug one end of an i.LINK
®
cable into the
S400 port on the left side of the computer and the other end into the
DV In/Out port on the digital camcorder.
Connecting a Digital Cam corder
Notes on connecting an i.LINK device
A connection to a Sony digital camcorder is pictured above; your digital camcorder may need to be connected
differently.
See the manual supplied with your digital camcorder for more information on its installation and use.
Only Sony digital video camera ports labeled "DV In/Out" or "i.LINK" are compatible i.LINK devices.
Do not connect more than one digital video camera at a time. The software supplied with your computer will not
recognize multiple cameras.
The i.LINK port does not supply power to external devices. If the external device requires power from the i.LINK
port, you cannot use the device with the computer.
The computer supports transfer rates up to 400 Mbps; however, the actual transfer rate is limited to the maximum
transfer rate supported by the external device. If multiple devices are connected, the transfer rate will be the
lowest maximum transfer rate for the connected devices.
The i.LINK
®
features available may vary depending on the software applications you use. See the documentation
supplied with your software for more information.
The i.LINK cables compatible with your VAIO
®
computer include cables with the following part numbers: VMC-IL4415
(a 1.5-meter cable with a 4- pin connector at each end), VMC-IL4615 (a 1.5 meter-cable with a 4-pin connector at
Page 62
Содержание PCG-SRX87 VAIO User Guide (primary manual)
Страница 39: ...16 Click OK Page 39 ...
Страница 48: ...To carry the floppy disk drive Fold the floppy disk cable into the compartment on the right side Page 48 ...
Страница 95: ...Battery icon descriptions Battery icon Battery status Charging Fully charged Discharging No battery Page 95 ...
Страница 105: ...Typical expansion memory configuration Total System Memory MB On board MB Slot MB 128 128 0 256 128 128 Page 105 ...
Страница 109: ...12 Close the computer cover and replace the three 3 fastening screws on the bottom of the computer Page 109 ...
Страница 135: ...My LCD screen continues to show the previous screen Press the Windows key and D twice to refresh the screen Page 135 ...


