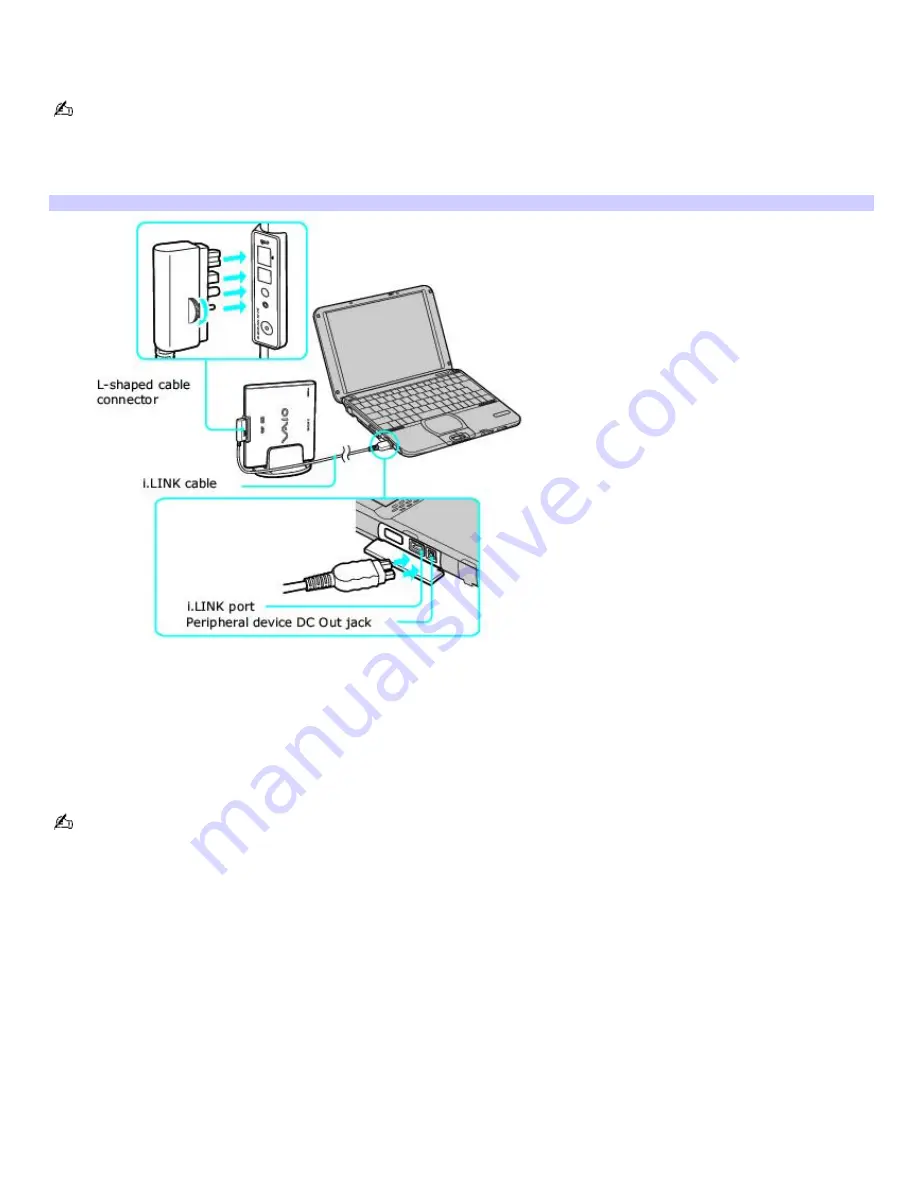
To connect an i.LINK optical disc drive
Use a VAIO
®
Computer Peripheral Cable (supplied with the i.LINK drive) to connect the optical disc drive to the computer.
Before connecting or disconnecting this drive, close any active applications to help prevent data loss.
1.
Turn on power to the computer. Insert the L-shaped plug of the VAIO
®
Computer Peripheral Cable into the
matching jack on the rear of the i.LINK drive. Secure the plug by turning the screw on the cable connector
clockwise.
Connecting i.LINK optical disc driv e
2.
Insert the straight-shaped, two-prong plug of the VAIO
®
computer peripheral cable into both the computer's
i.LINK port and peripheral device DC Out jack.
3.
The i.LINK drive's power indicator lights up, and the computer will automatically detect and identify the connected
drive.
4.
Click Start on the Windows
®
taskbar, and select My Computer to verify that an icon for the i.LINK optical disc drive
has been added in the window.
The Sony i.LINK optical disc drive is compatible only with certain Sony VAIO
®
PCG series computers preinstalled with
Microsoft
®
Windows
®
XP Home Edition or Professional.
Page 51
Содержание PCG-SRX87 VAIO User Guide (primary manual)
Страница 39: ...16 Click OK Page 39 ...
Страница 48: ...To carry the floppy disk drive Fold the floppy disk cable into the compartment on the right side Page 48 ...
Страница 95: ...Battery icon descriptions Battery icon Battery status Charging Fully charged Discharging No battery Page 95 ...
Страница 105: ...Typical expansion memory configuration Total System Memory MB On board MB Slot MB 128 128 0 256 128 128 Page 105 ...
Страница 109: ...12 Close the computer cover and replace the three 3 fastening screws on the bottom of the computer Page 109 ...
Страница 135: ...My LCD screen continues to show the previous screen Press the Windows key and D twice to refresh the screen Page 135 ...


