background image

O

p

er

at

in

g t
h

e

 C
a

mer

a

Controlling the Monitor Image

20

Controlling the Monitor 
Image

You can monitor the camera image on the monitor 
window of the main viewer.

Monitoring the camera image

1

Log in to the homepage to display the main viewer.
To log in, see “Logging in as a user” on page 15.

2

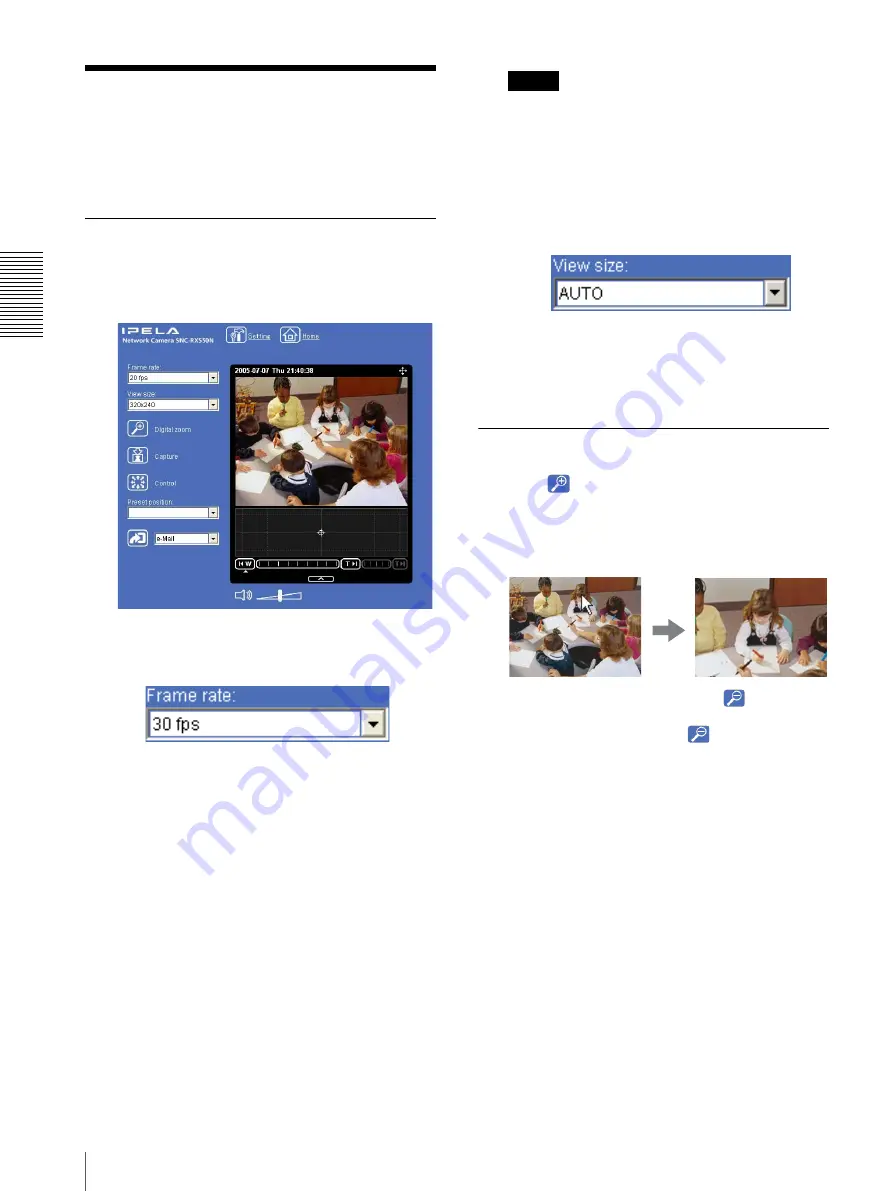
Select the frame rate (only when the camera image 
is in 

JPEG

).

Click the 

Frame rate

 list box to select the frame 

rate for transmitting the image. Selectable frame 
rates are as follows.

SNC-RX550N

1, 2, 3, 4, 5, 6, 8, 10, 15, 20, 25, 30 fps

SNC-RX550P

1, 2, 3, 4, 5, 6, 8, 12, 16, 20, 25 fps

The number refers to the frame number transmitted 
per second. 
For example, if you select 

30 fps

 for SNC-

RX550N, the image is sent at the maximum speed 
of the connected line (30 fps maximum).

Note

The frame rate options indicate the maximum 
number of frames that can be transmitted. 
The number of frames actually transmitted may 
vary depending on network environments and 
camera settings (image size and image quality 
settings).

3

Select the view size.

Click 

View size

 list box to select the view size from 

Auto

640 × 480

320 × 240

, or 

160 × 120

.

Auto

 is determined by the image size specified in 

the Camera menu (page 36)

Zooming in the monitor image

1

Click .

2

Click the point you want to zoom in.
The image is magnified by about 1.5 times with the 
clicked point at the center.

The digital zoom icon changes to 

.

3

To cancel zooming in, click 

.

Содержание IPELA SNC-RX550-B

Страница 1: ...3 990 782 11 1 Network Camera 2005 Sony Corporation SNC RX550N RX550P User s Guide Software Version 1 0 ...

Страница 2: ...according to IEC 60950 For customers in the U S A SNC RX550N only NOTE This equipment has been tested and found to comply with the limits for a Class A digital device pursuant to part 15 of the FCC Rules These limits are designed to provide reasonable protection against harmful interference when the equipment is operated in a commercial environment This equipment generates uses and can radiate rad...

Страница 3: ...REOF Sony Corporation reserves the right to make any modification to this manual or the information contained herein at any time without notice The software described herein may also be governed by the terms of a separate user license agreement IPELA and are trademarks of Sony Corporation Memory Stick and are trademarks of Sony Corporation MagicGate Memory Stick and are trademarks of Sony Corporat...

Страница 4: ... the Memory 25 Controlling Alarm Output 1 2 26 Controlling Day Night Function 26 Playing the Audio File Stored in the Camera 27 Switching TCP UDP Transmission Mode 27 Administrating the Camera Basic Operations of Administrator Menu 29 How to setup the Administrator menu 29 Configuration of Administrator menu 30 Configuring the System System Menu 32 System Tab 32 Date time Tab 33 Initialize Tab 34 ...

Страница 5: ...rminal Serial Menu 72 Others Using the Supplied Setup Program 73 Starting the Setup Program 73 Bandwidth control Tab 73 Date time Tab 74 Rebooting the Camera 74 Using the SNC audio upload tool Transmitting Audio to Camera 75 Installing the SNC audio upload tool 75 Connecting the Camera to the Computer 75 Using the SNC audio upload tool 76 Using the SNC video player Playing Video Audio File Recorde...

Страница 6: ...er or send them periodically Preset positions and Tour programs You can save up to 16 preset positions pan tilt and zoom positions of the camera and up to 5 tour programs composed from the preset positions You can activate the preset positions by synchronizing them with an external sensor input or built in object detection function Intelligent object detection function The camera is provided an in...

Страница 7: ...ecautions Be sure to follow the general safety precautions and the Operating Precautions In case of a breakdown In case of system breakdown discontinue the use and contact your authorized Sony dealer In case of abnormal operation If the unit emits smoke or an unusual smell If water or other foreign objects enter the cabinet or If you drop the unit or damage the cabinet 1 Disconnect the camera cabl...

Страница 8: ... the requirements for the computer that displays the image or controls the camera Processor Pentium 4 1 5 GHz or higher Pentium 4 2 4 GHz or higher recommended RAM 256 MB or more OS Microsoft Windows 2000 Windows XP Web browser Internet Explorer Ver 6 0 or later ...

Страница 9: ...l function Otherwise the IP Setup Program will not operate correctly To disable Windows Firewall operate as follows 1 Open Windows Firewall from Control Panel With the category display you can find Windows Firewall in Security Center 2 Select Off and click OK Assigning an IP address using the Setup Program 1 Insert the supplied CD ROM disc into your CD ROM drive After a short time a window will op...

Страница 10: ...and Secondary DNS server address in the relevant boxes Note The Third DNS server address and Fourth DNS server address are invalid for this camera 9 Set the HTTP port No Normally select 80 for the HTTP port No To use another port number type the port number between 1024 and 65535 in the text box 10 Type the Administrator name and Administrator password The factory settings of both items are admin ...

Страница 11: ... After the IP address has been assigned to the camera check that you can actually access the camera using the Web browser installed on your computer Use Internet Explorer as the Web browser 1 Start the Web browser on the computer and type the IP address of the camera in the URL box The welcome page of Network Camera SNC RX550N or Network Camera SNC RX550P is displayed 2 Click Enter The main viewer...

Страница 12: ...isplay the welcome page and the main viewer correctly To operate the welcome page and the main viewer correctly set the security level of the Internet Explorer to Medium or lower as follows 1 Select Tools from the menu bar for Internet Explorer then select Internet Options and click the Security tab 2 Click the Internet icon when using the camera via the Internet or Local intranet icon when using ...

Страница 13: ...o the installing position indoor or outdoor White balance page 37 Select the brightness of the image sent from the camera Exposure mode page 37 Brightness page 38 Select the quality of the image sent from the camera Video codec Tab page 39 Select the view size of the image View size page 18 Select whether the audio from the external microphone is sent or not Microphone page 36 Synchronize the date...

Страница 14: ... usable function 1 This function is usable with the Java applet viewer 2 This function is not usable with the Java applet viewer The access rights of the administrator and the user can be set in Setting the User User Menu of the Administrator menu on page 45 Function Administrator User Full Pan Tilt Preset position Light View Monitor a live image z z z z z z View the date and time z z z z z z Cont...

Страница 15: ...t the viewer The usable codecs and viewers are displayed depending on the Mode setting in the Video Codec Tab in the Camera menu page 39 When Mode is set to Single codec You can monitor the image of the selected video codec JPEG or MPEG4 For JPEG images you can select Java applet viewer When JPEG is selected When MPEG4 is selected When Mode is set to Dual codec You can monitor JPEG and MPEG4 image...

Страница 16: ...he welcome page The following dialog appears 3 Enter the user name and password for Administrator then click OK The user name admin and the password admin are set at the factory for the Administrator You can change them using the User menu of the Administrator menu see page 45 The Administrator menu appears About viewers You can use the following viewers ActiveX viewer This viewer can monitor the ...

Страница 17: ... To install Java Plug in Download Java 2 Runtime Environment Standard Edition JRE from the website of Sun Microsystems Inc and install it by following the instructions on the installer Notes If Automatic configuration is enabled in the Local Area Network LAN Settings of Internet Explorer the camera image may not be displayed In that case disable Automatic configuration and set the Proxy server man...

Страница 18: ...d zoom functions from the main viewer page 22 Preset position Displayed only when one or more preset positions are stored in memory Select the Preset position name from the drop down list The camera will move to the preset position that you have stored in memory using the Preset position menu Control panel Click to display the following control panel You can control pan tilt zoom and focus of the ...

Страница 19: ...itch the Day Night function on off page 26 play the audio file stored in the camera page 27 Transmission TCP UDP transmission mode Displayed only when the camera image is in MPEG4 and the ActiveX viewer is used Each click switches the transmission mode of the video audio data between TCP mode UDP Unicast mode and UDP Multicast mode page 27 The last selected mode is saved in the computer and will s...

Страница 20: ...umber transmitted per second For example if you select 30 fps for SNC RX550N the image is sent at the maximum speed of the connected line 30 fps maximum Note The frame rate options indicate the maximum number of frames that can be transmitted The number of frames actually transmitted may vary depending on network environments and camera settings image size and image quality settings 3 Select the v...

Страница 21: ...veX viewer With the Java applet viewer 3 To close the capture window click Cancel or Close Saving the captured image With the ActiveX viewer 1 Capture the monitor image 2 Click Save The Save As dialog appears 3 Select JPEG or Bit map as Save as type 4 Type the File name and specify Save in then click Save With the Java applet viewer 1 Capture the monitor image 2 Right click the mouse to display th...

Страница 22: ...ayed 1 Click is displayed 2 Click The control panel is displayed 3 Control each function using the displayed control panel Pan Tilt control Click the arrow button of the direction in which you want to move the camera Keep it pressed to move the camera continuously To return to the home position click Zoom control Click to zoom out and click to zoom in Zooming continues while the button remains pre...

Страница 23: ...e frame Optical WIDE end icon Click to move the zoom to optical WIDE end same magnification Optical TELE end icon Click to move the zoom to optical TELE end 26 magnification Digital TELE end icon Click to move the zoom to digital TELE end 312 magnification Turning off the zoom bar When you are not going to use the zoom bar click under the panorama window to turn it off Notes The zoom bar of the di...

Страница 24: ...ng the camera toward a specified point 1 Create a panorama image with the SNC panorama creator and display it 2 Click the point you want to watch on the panorama image The camera is moved to face toward the clicked point and the present image at the point is displayed in the normal camera window To rotate the panorama image To rotate the panorama image in accordance with the camera s panning direc...

Страница 25: ...ending a monitor image to an FTP server 1 Display the image on the monitor window 2 Select FTP from the trigger drop down list 3 Click The still image of the moment you click is captured and the image file is sent to the FTP server Recording a Still Image in the Memory You can capture a camera image as a still picture and record on in a Memory Stick not supplied or an ATA memory card not supplied ...

Страница 26: ...n short circuit and Off open Tip For the connection of peripheral devices to the alarm output of the I O port see the supplied Installation Manual Controlling Day Night Function You can control the Day Night function On night mode and Off day mode To use this function you need to make Day Night active in the Trigger menu of the Administrator menu page 62 1 Display the image on the monitor window 2...

Страница 27: ...all software or antivirus software on your computer In that case disable the software or select the TCP mode If you are using Windows XP Service Pack 2 disable Windows Firewall see page 9 1 Open the main viewer 2 Click TCP UDP Transmission The Select TCP UDP dialog appears 3 Click one of the buttons TCP UDP Unicast or UDP Multicast TCP This is normally selected When TCP is selected as the communic...

Страница 28: ... Real time Transport Protocol and UDP multicast techniques are adopted for video audio transmission By selecting it the network transmission load of the camera can be reduced If a router that does not correspond to the multicast or a firewall is installed between the camera and the computer the video audio may not play back properly In that case select TCP or UDP Unicast 4 Click OK to close the di...

Страница 29: ... Setting in the welcome page or in the main viewer to display the Administrator menu How to setup the Administrator menu 1 Log in the homepage to display the welcome page You can learn how to log in on page 15 Logging in as a user 2 Select the viewer language on the welcome page Click English or Japanese at the bottom of the welcome page 3 Click Setting on the welcome page The authentication dialo...

Страница 30: ...urning off the power of the camera If the power is turned off immediately the changed setting may not be stored correctly Configuration of Administrator menu System Displays the System menu Configuring the System System Menu on page 32 Camera Displays the Camera menu for setting the camera image and audio Setting the Camera Image and Audio Camera Menu on page 36 Network Displays the Network menu f...

Страница 31: ...e camera in synchronization with alarm detection by the sensor input or the object detection function Outputting Audio Linked to Alarm Detection Voice alert Menu on page 60 Trigger Displays the Trigger menu for operations when you click the trigger button in the main viewer Setting the Operations from the Viewer Trigger Menu on page 61 Schedule Displays the Schedule menu for the Day Night function...

Страница 32: ...uded in the supplied CD ROM To learn how to use of the Custom Homepage Installer see page 82 To display your individual homepage perform the following operation 1 Select Custom 2 Type the path of the HTML file using up to 64 characters in the text box on the right of Path 3 In Selected memory select the memory in which the homepage is stored You can select Flash memory Memory Stick or ATA memory c...

Страница 33: ... is restored Level Select the transition level of camera operation by clicking the mouse button once This section is effective when PTZ mode is set to Step Pan Tilt Select the camera transition level from 1 to 10 by clicking the 8 direction arrow button for panning tilting Selecting 10 provides the maximum transition level Zoom Select the camera transition level from 1 to 10 by clicking or for zoo...

Страница 34: ...ter the time is adjusted using the time zone difference and set on the camera OK Cancel See Buttons common to every menu on page 30 Initialize Tab Reboot Reboots the camera Click Reboot and the message The Camera will be rebooted Are you sure appears Click OK to reboot the camera It takes about two minutes to start again Factory default Resets the camera to the factory settings Click Factory defau...

Страница 35: ...unction when no card is inserted into the PC card slot Delete custom homepage By pressing Delete you can delete the homepage recorded in the flash memory of the camera with Custom Homepage Installer page 82 Delete panorama image By pressing Delete you can delete the panorama image recorded in the camera with SNC panorama creator page 80 Delete voice alert file Click Delete to delete the audio file...

Страница 36: ...ted Manual The focus can be adjusted by using the Near Far and One Push Focus buttons of the control panel displayed from the main viewer Stabilizer Select the stabilizer to compensate for oscillation Select On to activate the stabilizer when the camera is affected by oscillation Notes The view angle of the camera is reduced by approximately 10 when Stabilizer is set to On The frame rate lowers ha...

Страница 37: ...The camera performs the gain adjustment and iris adjustment automatically In this case the shutter speed is fixed 1 60 sec for NTSC or 1 50 sec for PAL When this option is selected Slow shutter and Backlight compensation become active Shutter priority The camera performs the gain adjustment and iris adjustment automatically and you can select the shutter speed When this option is selected Shutter ...

Страница 38: ...uter They are not effective for the video output User preset You can save the present settings in the camera as custom settings or you can load the settings saved in the camera This function is useful when you temporarily change the settings for the image or reset them to the previous settings Save Click to save the present settings of the Picture tab Load Click to load the saved settings To use t...

Страница 39: ...ge and display the cropped image on the computer Cropping reduces the transmitting data size and thus the network load and a higher frame rate is achieved Select On to crop the image or Off Note Object detection page 65 operates for an image in the image size that is not cropped even if Cropping is set to On To crop an image 1 Set the Image size to 640 480 VGA Cropping becomes active 2 Set Croppin...

Страница 40: ...ancel See Buttons common to every menu on page 30 Streaming Tab Use this tab to set the items for the transmission by UDP or multicast Unicast streaming Specify the transmission port numbers of the video data and audio data to be used when UDP Unicast is selected with in the main viewer Video port number Specify the transmission port number of the MPEG4 video data It is initially set to 50000 Spec...

Страница 41: ...er OK Cancel See Buttons common to every menu on page 30 Configuring the Network Network Menu When you click Network in the Administrator menu the Network menu appears Use this menu to configure the network to connect the camera and the computer The Network menu consists of three tabs Network Wireless and Dynamic IP address notification Network Tab This section provides the menus for connecting th...

Страница 42: ...or in the Setup Program access the camera by typing the IP address of the camera on your web browser as follows Example when the HTTP port number is set to 8000 OK Cancel See Buttons common to every menu on page 30 Wireless Tab Setting of wireless connection Insert the specified wireless card into the PC card slot of the camera and set the items for connecting to the wireless network Before settin...

Страница 43: ...common to the setting in the Network tab Antenna Select one of the following antenna settings when you use the SNCA CFW1 wireless card optional or the SNCA AN1 wireless LAN antenna optional connected to the SNCA CFW1 Internal Select this when you perform communications using the antenna built in the SNCA CFW1 This setting is suitable for a short range and omnidirectional antenna External Select th...

Страница 44: ...mails performs authentication using the POP user account User name Password Type the user name and password of the user who owns the mail account using up to 64 characters This setting is necessary when the SMTP server that sends e mails performs authentication Recipient e mail address Type the recipient e mail address using up to 64 characters You can specify only one recipient e mail address Adm...

Страница 45: ...ddress of the interface whose IP address was acquired by DHCP in the text or parameter MODELNAME Use this tag to embed the camera s model name in the text or parameter SERIAL Use this tag to embed the camera s serial number in the text or parameter Setting the User User Menu When you click User in the Administrator menu the User menu appears Use this menu to set the user names and passwords of Adm...

Страница 46: ...n Tilt Preset position Light or View OK Cancel See Buttons common to every menu on page 30 Setting the Security Security Menu When you click Security in the Administrator menu the Security menu appears Use this menu to limit the computers that can access the camera Security function To activate the security function select On Default policy Select the basic policy of the limit from Allow and Deny ...

Страница 47: ... and zoom positions and set tours programmed action of the camera The Preset position menu consists of 2 tabs Position and Tour Position Tab Saving pan tilt zoom position You can set up to 16 camera positions pan tilt and zoom positions Home position setting Set the current camera position as the home position Set Click to save the current pan tilt and zoom positions as the home position To move t...

Страница 48: ...om Sensor input 2 Object detection OD Select a preset position to synchronize with the alarm from the object detection Click Detection and the Object detection menu is displayed to allow you to set the object detection function page 65 Note In the case where the synchronized preset position is specified the alarm event that happens when the camera moves to the preset position will be invalid Prese...

Страница 49: ...splayed Setting the Schedule Schedule Menu on page 63 Note You cannot set tours if the effective periods overlap each other Stay time Type a period of time during which the camera is to stay at each preset position between 1 and 3600 seconds Speed Select the speed of camera movement between 1 and 23 or Fastest from the drop down list The camera moves faster with a higher number setting The fastest...

Страница 50: ...fore SMTP authentication is required Note When you set Authentication to On be sure to select either or both SMTP or and POP before SMTP POP server name It is necessary when POP before SMTP is selected for Authentication Type the POP receiving mail server name using up to 64 characters or type the IP address of the POP server This setting is necessary when the SMTP server that sends e mails perfor...

Страница 51: ...cutive number 2 digits thus adding 14 digit number to the image file name Sequence number A consecutive number of 10 digits between 0000000001 and 4294967295 and two fixed digits 00 are added to the image file name Sequence number clear Click Clear to reset the Sequence number suffix to 1 Alarm Select the alarm to be linked with e mail notification Sensor input 1 The external sensor that is connec...

Страница 52: ...wo digits of the year 2 digits month 2 digits date 2 digits hour 2 digits minute 2 digits and second 2 digits and consecutive number 2 digits thus adding a 14 digit number to the image file name Sequence number A consecutive number of 10 digits between 0000000001 and 4294967295 and two fixed digits 00 are added to the image file name Sequence number clear Click Clear to reset the Sequence number s...

Страница 53: ...sing up to 64 characters or the IP address of the FTP server User name Type the user name for the FTP server using up to 64 characters Password Type the password for the FTP server using up to 64 characters Re type password To confirm the password type the same characters as you typed in the Password box Passive mode Set whether you use the passive mode of FTP server or not when connecting to the ...

Страница 54: ... in the Preset position menu an alarm event that happens when the camera moves to the preset position will be invalid Effective period Set the period during which the alarm detection is effective Always The alarm detection is always effective Schedule You can specify the period during which the alarm detection is effective Click Schedule and the menu for the effective period is displayed Setting t...

Страница 55: ...which the periodical sending is effective Click Schedule and the menu for the effective period is displayed Setting the Schedule Schedule Menu on page 63 OK Cancel See Buttons common to every menu on page 30 Recording Images in Memory Image memory Menu When you click Image memory in the Administrator menu the Image memory menu appears By using the image memory function you can record the image and...

Страница 56: ...ation is required when an e mail is sent On Select if authentication is required when an e mail is sent Select one of the authentication methods from the following and specify the POP server name User name and Password as required SMTP Select when SMTP authentication is required POP before SMTP Select when POP before SMTP authentication is required Note When you set Authentication to On be sure to...

Страница 57: ...allow you to set the object detection function page 65 Note In the case that the synchronized preset position is specified in Position at alarm in the Preset position menu the alarm event that happens when the camera moves to the preset position will be invalid Effective period Set the period during which alarm detection is effective Always The alarm detection is always effective Schedule You can ...

Страница 58: ... the menu for the effective period is displayed Setting the Schedule Schedule Menu on page 63 OK Cancel See Buttons common to every menu on page 30 Directory structure of image memory When the image memory function is used the images are recorded with the following directory structure A represents a directory created automatically The Date_No directory has a 11 digit name consisting of the last tw...

Страница 59: ...erver of this unit using the FTP client software installed in the computer Setting the Alarm Output Alarm output Menu When you click Alarm output in the Administrator menu the Alarm output menu appears You can perform setting in this menu to control the alarm output of the I O port on the rear of the camera linked to the alarm detection the timer and the Day Night function The Alarm output menu co...

Страница 60: ... period during which alarm detection is effective Click Schedule and the menu for the effective period is displayed Setting the Schedule Schedule Menu on page 63 OK Cancel See Buttons common to every menu on page 30 Outputting Audio Linked to Alarm Detection Voice alert Menu Click Voice alert in the Administrator menu to display the Voice alert menu Use this menu to set the voice alert function to...

Страница 61: ...Set the period during which the alarm detection is effective Always The alarm detection is always effective Schedule You can specify the period during which the alarm detection is effective Click Schedule and the menu for the effective period is displayed Setting the Schedule Schedule Menu on page 63 OK Cancel See Buttons common to every menu on page 30 Setting the Operations from the Viewer Trigg...

Страница 62: ...king When you click Image memory the Trigger Image memory menu is displayed You can set the necessary options here The setting options and setting procedures are the same as those of the Image memory menu page 55 Alarm output 1 2 Checking this box allows you to select Alarm output 1 or Alarm output 2 from the trigger drop down list in the main viewer You can control On short circuit or Off open by...

Страница 63: ...u click Schedule to set the Effective period in the following menus Day Night Schedule in the Day Night tab of the Camera menu Preset position Schedule in the Tour tab of the Preset position menu e Mail Schedule in the Alarm sending or Periodical sending tab of the e Mail SMTP menu FTP Schedule in the Alarm sending or Periodical sending tab of the FTP client menu Image memory Schedule in the Alarm...

Страница 64: ...ideo codec tab of the Camera menu Codec Only the currently available codec s are active Select the video codec to be used for the alarm buffer Note When Dual codec is selected in the Video codec tab of the Camera menu and if you select here a video codec different from the priority video codec specified for Dual codec the bit rate and frame rate for sending recording via the alarm buffer may be lo...

Страница 65: ...viously shot background image and the image being shot currently and outputs an alarm when the difference continues recognized for more than the specified period The Object detection menu consists of three tabs Common Unattended object setting and Configuration What is unattended object detection The unattended object detection function of this unit compares the reference background image with the...

Страница 66: ... red frames shown in the monitor display to indicate prospective unattended objects are not displayed on the image files that are sent or recorded linked to the unattended object detection function You can view an image in the main viewer during the setting of the object detection function only when MPEG4 is selected for Dual codec in the Video codec tab The unattended object detection may not wor...

Страница 67: ...bject Select when you want to perform moving object detection When this option is selected the moving object setting menu appears See Setting items for moving object detection on page 67 Unattended object Select when you want to perform unattended object detection When this option is selected the unattended object setting menu appears See Setting items for unattended object detection on page 69 Se...

Страница 68: ...n to confirm the setting The setting will be cancelled if you do not click the OK button To set the moving object detection function Set the moving object detection function as follows 1 Set the PTZ position Select Preset position for PTZ position when you activate moving object detection linked with a preset position Select Current position when you activate this function regardless of the camera...

Страница 69: ...ray Unattended object detection is not operating because it is in the process of acquiring the background image When unattended object detection starts it acquires the background image Unattended objects are not detected during this period Green Unattended object detection is operating because the background image has been acquired Window1 to Window4 check boxes When you check the check box the co...

Страница 70: ...e background image has been acquired Note When you acquire a background image use an image with as little motion as possible If you use an image with a lot of motion it will take a long time to complete acquiring of the background image 5 Check the Window 1 check box The Window 1 frame appears on the monitor display 6 Adjust the position and size of Window 1 Drag Window 1 to move it and change its...

Страница 71: ... Alarm interval You can repeat the alarm output in an interval of the preset time after an object has been regarded as an unattended object If you set Alarm interval to 5 minutes for example so that an alarm will be output every 5 minutes repeatedly after an unattended object is detected You can set the time between 1 and 6 hours Release time Set the period of time required when the object once re...

Страница 72: ...e port number corresponding to the TCP port Specify a port number 1024 to 65535 other than established port numbers VISCA Select when you control the camera with VISCA protocol As for the command list of VISCA protocol refer to the dealer of your camera or Sony professional products service counter nearby Notes When you execute serial control with VISCA protocol match the transmission setting with...

Страница 73: ...o disable Windows Firewall operate as follows 1 Open Windows Firewall from Control Panel With the category display you can find Windows Firewall in Security Center 2 Select Off and click OK Starting the Setup Program Select Program from the Start menu of Windows then select Program IP Setup Program and IP Setup Program in sequence The IP Setup Program starts Network tab appears The IP Setup Progra...

Страница 74: ...in two ways Manual current date time setting Set the current date and time on the Manual current date time setting boxes and click OK The setting boxes are for the year last two digits month date hour minutes and seconds from left to right PC current date time setting The date and time set on the computer is displayed in the PC current date time setting box Click OK on the right to set the camera ...

Страница 75: ...etup icon again 4 Install the SNC audio upload tool following the wizard displayed If the Software License Agreement is displayed read it carefully and accept the agreement to continue with the installation Connecting the Camera to the Computer 1 Connect a speaker to the 5 line output jack on the camera 2 Connect a microphone to the microphone input jack on the computer Note If the microphone inpu...

Страница 76: ...mission Sound adjustment and indicators Adjust the microphone input volume by moving the slider bar You can adjust the volume even during transmission Click to enable disable sound muting The microphone input volume is displayed at the Level The transmission rate is displayed in the Bitrate box Voice alert tab Use this menu to record the sound through the microphone connected to the computer and u...

Страница 77: ... Uploading the recorded audio file to the camera Tip Before operating create an audio file and set the camera for audio uploading Set the camera using the Setting tab 1 Click recording to start recording 2 Click stop to stop recording Recording will stop automatically in 30 seconds 3 Click upload to transmit the audio file to the camera Saving the recorded audio file to the computer 1 Click record...

Страница 78: ... SNC video player allows you to play video audio data recorded with the camera on your computer This section explains the setup and operations of the SNC video player Installing the SNC video player 1 Insert the supplied CD ROM disc into your computer CD ROM drive After a short time a window will open displaying the files on the CD ROM 2 Click the Setup icon of SNC video player The File Download d...

Страница 79: ... Audio Audio Codec Playing a video audio file Click start to start playing from the beginning of the selected file To freeze the movie temporarily click pause Click again to restart playing from the frozen point To stop playing click stop To restart playing from the beginning click start again Play stops when the file is played to the end Playing from a specified point Move the slider bar below th...

Страница 80: ...lly and accept the agreement to continue installation Using the SNC panorama creator The SNC panorama creator consists of the Main tab to create a panorama image and the Setting tab to prepare for connection to the camera When you start the SNC panorama creator the Main tab is displayed Main tab Viewer The created panorama image is displayed in the upper viewer Angle setting Set the view angle wit...

Страница 81: ...Tip The factory settings of both items are admin Camera address Type the IP address or host name of the camera to be connected Camera port No Type the port number of the camera to be connected When you use a proxy server for camera connection check the Use proxy check box and set the following items Proxy server address Type the IP address or host name of the proxy server Proxy server port No Type...

Страница 82: ...or When the camera is moved or when the layout around the camera is changed create the panorama image again Using the Custom Homepage Installer The supplied Custom Homepage Installer allows you to store the homepage that you have created in the camera and watch it Notes on creating the homepage When you are creating the homepage note the following points The file name should be typed using up to 2...

Страница 83: ...our network administrator When using an HTTP proxy server Select Use HTTP proxy server and type your settings in the Proxy server address and Proxy server port No boxes When using an FTP proxy server Select Use FTP proxy server and type your settings in the Proxy server address and Proxy server port No boxes Note If you cannot establish communications with the camera using the proxy server being u...

Страница 84: ...s using the following ARP commands Example 3 When the following line is displayed on the DOS window hold down Ctrl and press C The display stops You will normally receive a reply after about 5 repetitions of Request time out Note If you do not receive a reply check the following Did you enter the ARP commands within 5 minutes after it was turned on If not turn off the camera and restart the operat...

Страница 85: ...is used to describe information on the location of this camera Nothing is set at the factory 4 describesthecaseof mib 2 system sysContact 0 This field is used to describe the information on administrator of this camera Nothing is set at the factory 5 describes the case of mib 2 system sysName 0 This field is used to describe administration node of this camera Nothing is set at the factory 6 descri...

Страница 86: ...e 0 0 0 0 6 trap ID communityName IpAddressString Set the host you want to send traps to ID describes the setting identification number 1 to 8 communityName describes the community name to send traps to and IpAddressString describes the IP address of the host to send traps to Example To specify the destination of traps as the public community and the ID number 1 trap 1 public 192 168 0 101 7 delco...

Страница 87: ... Approx 440 000 Lens 26 Optical 12 Digital f 3 5 to 91 mm F1 6 to F3 8 Horizontal angle 2 2 to 54 2 Minimum object distance TELE end 1 500 mm 59 1 8 inches WIDE end 320 mm 12 5 8 inches Minimum illumination 1 lx F1 6 50 IRE Shutter speed 1 to 1 10 000 s Horizontal resolution SNC RX550N 470 TV WIDE end SNC RX550P 460 TV WIDE end Video S N 50 dB Mechanism Pan 360º endless rotation Maximum speed 300 ...

Страница 88: ...data Bit rate The rate at which data bits are transmitted Capture To display the audio and video digital data from the video equipment on a computer Codec Software hardware for coding decoding video and audio data Contrast The difference in tone between the lightest and darkest portions of the image Default gateway Device that can be used to access the other network DHCP server Abbreviation for Dy...

Страница 89: ...f the ISO International Organization for Standardization and ITU T Popularly used as image compression format on the Internet etc MAC address A network address that uniquely identifies each LAN card MPEG4 Abbreviation for Moving Picture Experts Group4 One of the MPEG standards for image compression format aiming to transmit images at a high compression rate with lower picture quality Multicast The...

Страница 90: ...Protocol A standard protocol used for the Internet connection Compared with the other protocol UDP TCP provides reliable communication but the communication speed is slower UDP Abbreviation for User Datagram Protocol A standard protocol used for the Internet connection Compared with the other protocol TCP UDP can transmit data faster but reliable communication is not guaranteed Unicast Transmissio...

Страница 91: ...8 Codec 64 Color 36 Common 36 50 53 55 66 Configuration 71 Contrast 38 contrast 38 control authority 32 Control panel 18 control panel 18 22 Control 18 Cropping 39 cropping 39 Current date time 33 Custom Homepage Installer 82 custom settings 38 D Date time 33 date and time 33 74 Date and time format 33 Date time 74 Date_No 58 Day Night 26 38 62 day night 26 Day Night mode 38 day night mode 38 dayl...

Страница 92: ...ion indicator 68 MPEG4 15 MPEG4 setting 39 multicast 40 Multicast address 41 multicast address 41 Multicast streaming 40 multicast streaming 40 N Name 48 Network 30 41 network 41 Network address Subnet 46 network bandwidth 40 network connection type 43 Network Menu 41 No 48 NTP server 34 NTP server name 34 O Object detection 31 48 60 object detection 65 Object detection Menu 65 Object size 68 69 O...

Страница 93: ...d tool 75 SNC panorama creator 80 SNC video player 78 SNMP 85 Software version 32 software version 32 special tags 45 Specifications 87 Speed 49 SSID 43 Stabilizer 36 stabilizer 36 Start time 63 Status lamp 69 Stay time 49 Stop bit 72 Streaming 40 Subject 44 50 Subnet mask 41 43 subnet mask 41 43 Suffix 51 52 54 57 58 suffix 51 52 54 57 58 System 30 32 system 32 System log 35 System Menu 32 T TCP ...

Страница 94: ...White balance 37 white balance 37 Window 67 69 Wireless 42 wireless cards 42 Z Zoom 33 zoom 18 22 zoom bar 23 Zoom mode 36 zoom mode 36 Sony Corporation ...

Отзывы: