background image

5-3

VPL-ES7

5-3

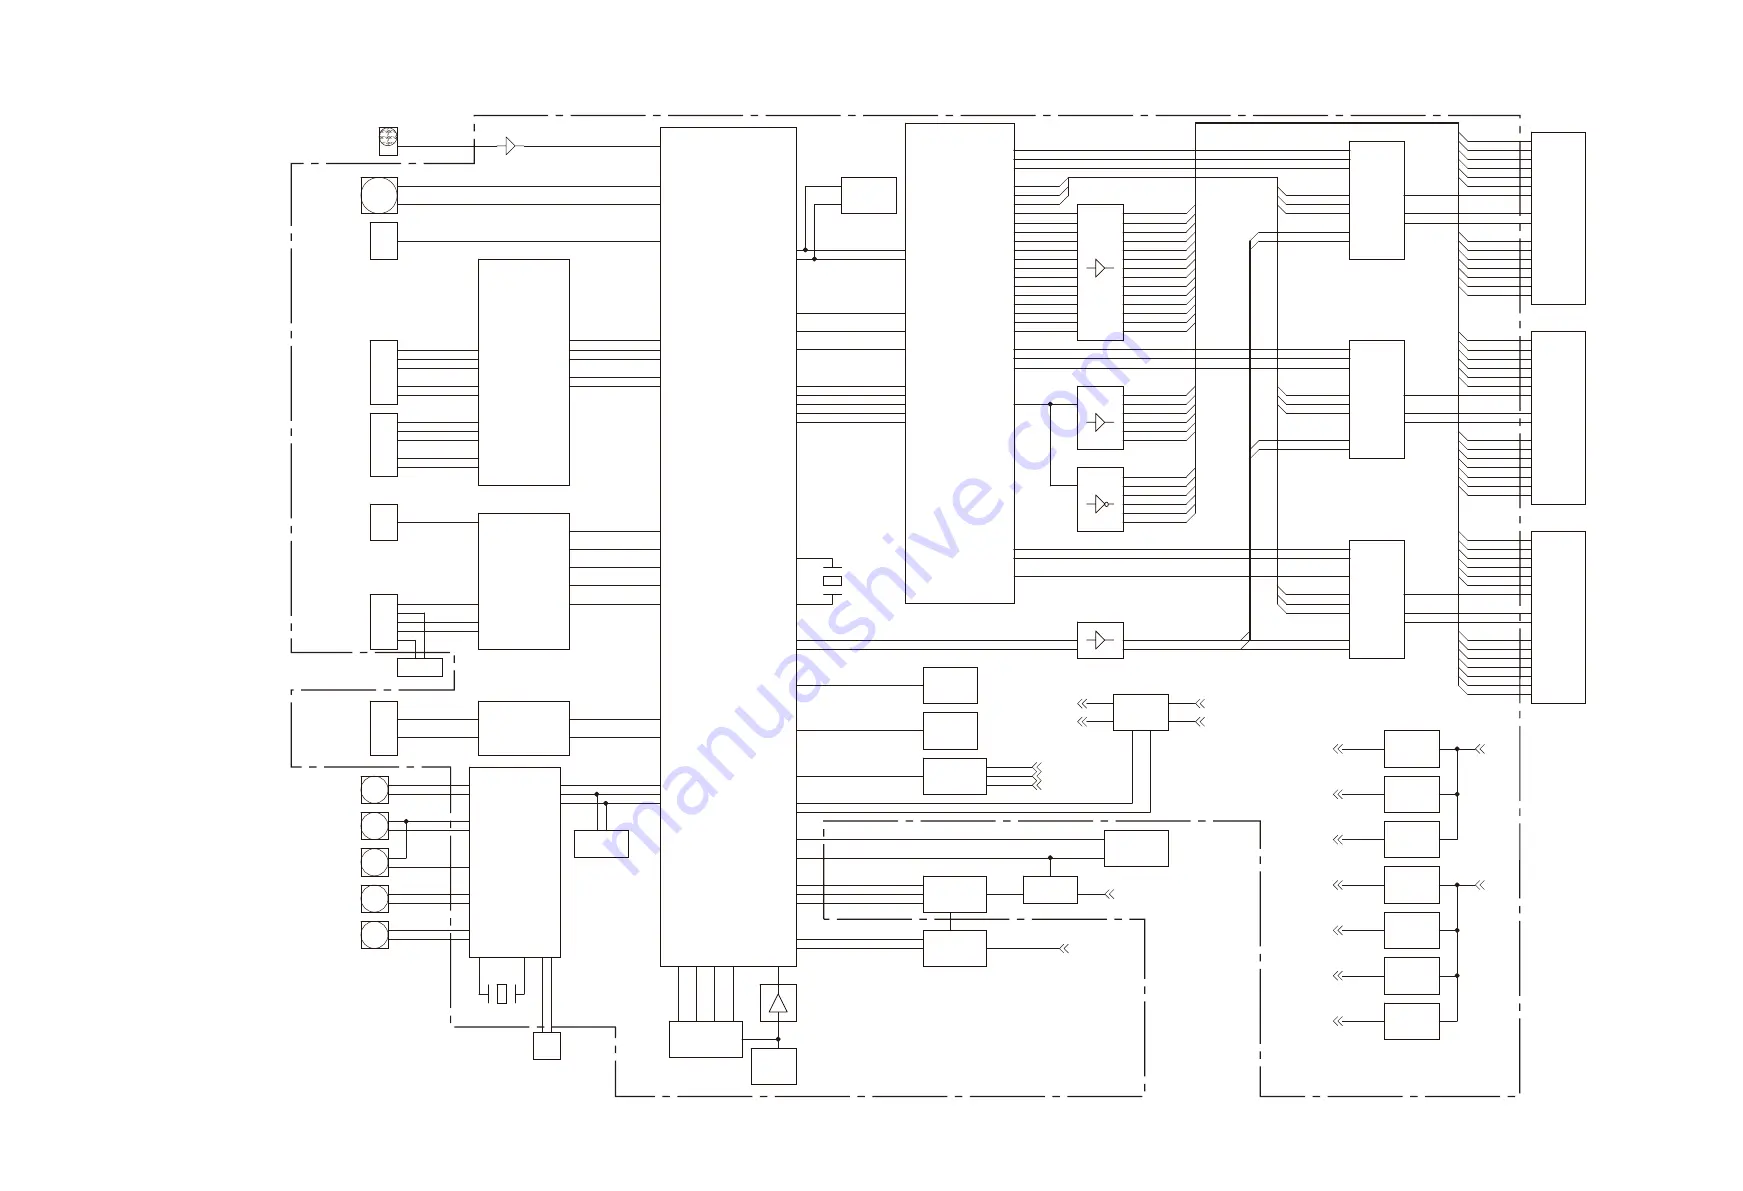
Overall (VPL-EX7)

Overall (VPL-EX7)

VPL-EX7

Overall 

(VPL-EX7)

GPSIG

HCK2_R

B_DCK1

R_DCK2

B_DCK1

HCK1_R

HCK

LCDPCG

LCDENB

VST

VD

HCK2_R

HST

H C K x

VCK

H C K x

CLK_B

FRP

G_DCK2

HST

PRG

R_DCK1

CLK_G

RPSIG

R_DCK4

VD

G_DCK1

R_DCK1

SCAN

H C K x

GSIG[12:1]

DWN

HCK1_G

VCK

HCK1_R

HCK2_G

HCK1_B

B_DCK4

LCDVCK

LCDXSCAN

PCG

HCK1_G

ENB

B_DCK4

G_DCK3

DWN

HCK

ENB

FRP

PRG

R_DCK2

PCG

LCDVST

RSIG[12:1]

VCK

HCK2_B

PCG

LCDSCAN

HCK

BSIG[12:1]

VD

B_DCK3

PRG

G_DCK4

VST

R_DCK4

R_DCK3

LCDHST

BPSIG

XSCAN

HST

LCDR1[11:0]

G_DCK1

R_DCK3

DWN

SCAN

VCK

PRG

B_DCK2

GVCOM

CLK_R

HST

HCK1_B

FRP

DWN

HCK2_G

HCK2_B

BVCOM

LCDG1[11:0]

RVCOM

ENB

SCAN

B_DCK3

VD

FRP

XSCAN

DCK[4:1]_R(G,B)

LCDDWN

ENB

PCG

B_DCK2

VST

VST

DR[9:0]

DG[9:0]

DB[9:0]

DCLK

DHS
DVS

SCL_7009

SDA_7009

SDA_7009

SCL_7009

SDA_7009

SDA_7009i

SCL_7009i

PC-RIN2
PC-GIN2
PC-BIN2

HSYNC2
VSYNC2

R_OUT
G_OUT
B_OUT

HSYNCO

VSYNCO

LUMA

CHROMA

CVBS

PC-RIN
PC-GIN
PC-BIN

H S Y N C

VSYNC

AUDIO_M

AUDIO_O-

AUDIO_O

AUDIO_MUT

AUDIO_VOL1

AUDIO_VOL2

TXD

RXD

TX.DL

RX.DL

FAN_SW

Fan4
FG4

Fan5
FG5

AUDIO_SW

IRR5

IRR

SCL

LED[4:1]

P15VP
P12V
P5V

PWR_ fail

POWER_ON

Dust_SW

ROMOEn

ROMWEn

A[0:21]

D[0:15]

Lamp_PWR
TXD
RXD

Door_SW

FG2

Fan2

FG3

Fan1
FG1

AUDIO_PWR

PG_XCLR_OUT
PG_PLLSTB_OUT

SCL_7009

PVCC_POWER_ON

G_DCK2

G_DCK3
G_DCK4

LCDB1[11:0]
LCDB2[11:0]

LCDG2[11:0]

LCDR2[11:0]

DVS

Lamp_EN

Lamp_SyncEN

SDA

SCL_DSD
SDA_DSD

P15VP
P12V
P5V

P5V

P5VC

P5V

P5V

P1P8V

P2P5V

P3P3V

P33V

P5VC

3.3V

P15VP

P15V

2.5V

1.8V

VST

EEPROM

Speaker

EEPROM

S-Video

Video

INPUT A

Monitor
Output

Audio
Input

Audio out

27 MHz

32.768 KHz

R

LCD

Driver

B

LCD

LCD

Timing

Generator

G

LCD

G

LCD

Driver

Video

Processor

&

Controller

RS232

Driver

Receiver

Fan Control

Analog RGB
Input/Output

Audio

Input/Output

&

volume

control

B

LCD

Driver

R

LCD

LED

Driver

Keypad

Input

Power

Fail DET

Dust SW

Door SW

Flash

memory 

Reset

IC

Power

Control

Power

Switch

Ballast

Lamp

Control

IR Receiver

+

2.5V

REG

+

3.3V

REG

+

3.3V

REG

+

1.8V

REG

+

3.3V

REG

+

1.8V

REG

+

2.5V

REG

RS-232
Remote
Control

Fan 5

Fan 4

Fan 3

Fan 1

Fan 2

Thermal
Sensor 2

U33

AT24C32CN

AT24C256N

U20

Содержание HDMI VPL-EX7

Страница 1: ...DATA PROJECTOR VPL ES7 VPL EX7 VPL EX7IN VPL EX70 REMOTE COMMANDER RM PJ6 SERVICE MANUAL 1st Edition Revised 2 ...

Страница 2: ...ment aux personnes compétentes en charge de l entretien Afin de réduire les risques de décharge électrique d incendie ou de blessure n effectuer que les réparations indiquées dans le mode d emploi à moins d être qualifié pour en effectuer d autres Pour toute réparation faire appel à une personne compétente uniquement 警告 万一 異常が起きた際に お客様が電源を切ることが できるように 設置の際には 機器近くの固定配線内 に専用遮断装置を設けるか 機器使用中に 容易に抜 き差し...

Страница 3: ...igen Region und des jeweiligen Landes befolgen FÖRSIKTIGHET Fara för explosion vid felaktigt placerat batteri Byt endast mot samma eller likvärdig typ av batteri enligt tillverkarens rekommendationer När du kasserar batteriet ska du följa rådande lagar för regionen eller landet PAS PÅ Fare for eksplosion hvis batteriet ikke udskiftes korrekt Udskift kun med et batteri af samme eller tilsvarende ty...

Страница 4: ......

Страница 5: ... Replaced 2 1 2 2 1 Save the Optical Data and Replacement 2 1 2 3 EEPROM Replacement 2 2 2 4 ADC Calibration 2 2 2 4 1 RGB Alignment Procedure 2 2 2 4 2 YUV Alignment Procedure 2 3 2 5 V COM Adjustment 2 4 2 6 White Balance Adjustment 2 6 2 6 1 HIGH Mode of PC 2 6 2 6 2 MIDDLE Mode of PC 2 6 2 6 3 LOW Mode of PC 2 7 2 6 4 HIGH Mode of VIDEO 2 7 2 6 5 MIDDLE Mode of VIDEO 2 8 2 6 6 LOW Mode of VIDE...

Страница 6: ......

Страница 7: ...1 1 VPL ES7 Section 1 Service Overview 1 1 Appearance Figure 1 2 Board Location Main Door detection switch Thermal sensor Door detection switch IR sensor Power Lamp power supply ...

Страница 8: ...oom adjust assembly Refer to section 1 3 8 Steps 9 to 14 Upon completion of the upper case assembly attachment check to see that the spacing in the top is equal to the spacing in the bottom Zoom adjust gear knob Press here strongly Remove the Upper case assembly in the direction of the arrow Caution Remove the upper case assembly from this corner When attaching the upper case assembly attach it wh...

Страница 9: ...Two screws K 3 x 12 Two screws K 3 x 12 Eight hexagon screws Rear case pack assembly VPL ES7 VPL EX7IN Four hexagon screws Rear case pack assembly Rear case pack assembly Two screws K 3 x 12 Eight hexagon screws VPL EX70 Rear case pack assembly 1 3 3 Main Board Two screws PWH 3 x 6 Three screws PWH 3 x 6 Shield Shield Main board Rear case pack assembly etc Remove the twelve connectors J17 J16 J26 ...

Страница 10: ...wer board Power board Lamp nozzle assembly Remove the fan in the direction of the arrow J1 Main board Refer to section 1 3 3 steps 2 to 6 Fan Lamp nozzle assembly Be careful that the harnesses must not override on top of this port or must not be pinched by this portion Check to see that the seven connectors are protruding from the MB bracket Caution When attaching the MB bracket bind the four harn...

Страница 11: ... 1 steps 2 to 4 Lamp door Caution Because the harness has the shape of flat cross section do not insert the harness into the harness clamp section with excessive force Find out the direction in which the harness can be inserted easily and then insert the harness Harness Harness clamp section Refer to section 1 3 4 steps 2 to 8 Screw PWH 3 x 6 Loosen two screws Lamp connector assembly Door detectio...

Страница 12: ...rew PAN M3 x 7 Fan Exhaust 80 25 AD0812HB HB CN1 Door detection switch board Lamp box assembly Caution When attaching the lamp box assembly insert the door detection switch harness into the groove of the lower case pack assembly Caution Two exhaust fans are the two different fans having the difference characteristics Be careful not to make mistake in choosing the desired fan by confirming the indi...

Страница 13: ...cus Zoom Adjust assembly as far as it can be rotated in the direction of clockwise direction Two dowels Lower case pack assembly Fix the Focus Zoom Adjust assembly tentatively with the screw Attach the other screw while fixing the gear position Tighten the screw finally that has been tightened tentatively Focus adjust gear Lens Focus Zoom gears Zoom adjust gear Lamp box assembly Refer to section 1...

Страница 14: ...h the hole of this sheet Caution When re assembling the machine route the respective harnesses and wires at the specified locations as shown Lamp power supply Door detection switch board Route the Lamp connector assembly between them Two tapping screws PAN M3 x 7 Remove the lamp power supply in the direction of the arrow Claw Door detection switch board Two harnesses Door detection switch board CN...

Страница 15: ...7512UB Fan 70 70 25 240MM AB07012UB Prism duct Harness Tapping screw PH W FL M3 x 35 NI D PT Thermal sensor board Refer to section 1 3 6 steps 5 to 9 and refer to section 1 3 7 steps 1 2 4 to 6 Refer to section 1 3 8 steps 2 to 8 Lamp box assembly Lamp nozzle assembly Focus Zoom adjust assembly Optical unit assembly Dowel Prism duct Prism duct Dowel ...

Страница 16: ... 5 Indicator The error status of the this units are indicated by the type of flashing of indicator The top cover has the ON STANDBY indicator and the LAMP COVER indicator Various error contents are indicated by the type of flashing of indicator For details of the types of indicator flashing and the error statuses refer to the list shown below ON STANDBY Indicator Red flashing LAMP COVER Indicator ...

Страница 17: ... signals input to Input A and Input B are output The signal of the channel that is selected with the input toggle switch is output No output is made if Video or S Video is selected Monitor output block Audio 1 The signal input to the audio input is output This output is variable with the volume control If a cable is connected to this connector the output from the built in speaker stops Video proce...

Страница 18: ...tandard ballast is driven in synchronization with the frequency 1 5 times higher than that of the input signal When the lamp mode is high the ballast is driven in synchronization with the input signal RS232C block This is used to connect the PW 190 via the RS232C driver receiver IC Because the number of serial ports is limited on the PW 190 the RS232C and network cannot be used at the same time Th...

Страница 19: ...ing the fuse not only turn off the POWER switch but also disconnect the AC power cord that is connected to the AC IN connector This unit is equipped with fuses The fuses blow if an excessive current flows due to abnormality inside the equipment If fuses blow turn off the main power of the equipment once and inspect inside of the equipment and remove the cause of excessive current After that replac...

Страница 20: ...ns A of the connector to lock 1 9 Lead free Solder Boards requiring use of lead free solder are printed with a lead free mark LF indicating the solder contains no lead Caution Some printed circuit boards may not come printed with the lead free mark due to their particular size LEAD FREE MARK m Be sure to use the lead free solder for the printed circuit board printed with the lead free mark The lea...

Страница 21: ...nter Enter key 3 Service mode menu will appear on the screen 2 2 Adjustment of Main Board When it is Replaced 2 2 1 Save the Optical Data and Replacement 1 Try to read the optical data from the faulty unit using the Emie Service tool If succeeded in reading replacement of the EEPROM is not necessary but the V COM Adjustment should be performed Refer to 2 5 V COM Adjustment 2 If the optical data co...

Страница 22: ...3 can be used for the adjust ment Use the signal shown in Fig 2 to run APA Then input the signal shown in Fig 3 Fig 1 Fig 2 Fig 3 2 3 EEPROM Replacement EEPROM of the main board contains the following alignment data System EEPROM 32 kbits U33 V com setting Color temperature RGB gain and offset for PC YUV gain and offset for YPbPr OSD setting Gamma EEPROM 256 kbits U48 ES7 U20 EX7 EX7IN EX70 3D gam...

Страница 23: ... Calibrate RGB Offset RGB Gain YUV Offset YUV Gain R Offset G Offset B Offset R Gain G Gain B Gain or or 138 88 122 62 55 60 147 68 144 71 27 69 ADC calibration 138 88 122 52 55 60 EX7 EX7IN EX70 RGB Calibrate YUV Calibrate RGB Offset RGB Gain YUV Offset YUV Gain R Offset G Offset B Offset R Gain G Gain B Gain or or 119 128 102 67 65 57 129 109 108 81 71 63 P4 ADC calibration 129 109 108 81 71 63 ...

Страница 24: ...key until it is positioned at Vcom R Normal 5 Adjust the V com R Normal value until flicker is reduced to minimal by key 6 Change the input signal to the XGA G single color 30 single line ON OFF signal 7 Move the cursor key until it is positioned at Vcom G Normal 8 Adjust the V com G Normal value until flicker is reduced to minimal by key 9 Change the input signal to the XGA B single color 30 sing...

Страница 25: ...single color 80 flat field signal 7 Move the cursor key until it is positioned at Vcom R Normal 8 Adjust the V com R Normal value until flicker is reduced to minimal by key 9 Change the input signal to the XGA B single color 80 flat field signal 10 Move the cursor key until it is positioned at Vcom B Normal 11 Adjust the V com B Normal value until flicker is reduced to minimal by key 12 Reverse th...

Страница 26: ...or White Balance 3 page EX7 EX7IN EX70 5 Adjust the PC Mid Gain R and PC Mid Gain B until the target chromaticity x y is obtained 6 Repeat steps 2 to 5 until the chromaticity x 0 002 y 0 002 with reference to the target chromaticity x y is obtained PC Hi Gain R PC Hi Gain G PC Hi Gain B PC Hi Bias R PC Hi Bias G PC Hi Bias B PC Lo Gain R PC Lo Gain G PC Lo Gain B PC Lo Bias R PC Lo Bias G PC Lo Bi...

Страница 27: ... target chromaticity x y is obtained 6 Repeat steps 2 to 5 until the chromaticity x 0 002 y 0 002 with reference to the target chromaticity x y is obtained PC Hi Gain R PC Hi Gain G PC Hi Gain B PC Hi Bias R PC Hi Bias G PC Hi Bias B PC Lo Gain R PC Lo Gain G PC Lo Gain B PC Lo Bias R PC Lo Bias G PC Lo Bias B 112 83 128 0 0 0 128 78 93 0 0 0 P1 2 CXD9809 page2 ES7 White Balance 1 PC Hi Gain R PC ...

Страница 28: ...y is obtained 6 Repeat steps 2 to 5 until the chromaticity x 0 002 y 0 002 with reference to the target chromaticity x y is obtained PC Mid Gain R PC Mid Gain G PC Mid Gain B PC Mid Bias R PC Mid Bias G PC Mid Bias B Video Mid Gain R Video Mid Gain G Video Mid Gain B Video Mid Bias R Video Mid Bias G Video Mid Bias B 125 100 126 0 0 0 127 100 122 0 0 0 P1 4 CXD9809 page4 ES7 White Balance 3 PC Mid...

Страница 29: ...he cursor to DELUT SW 3 Operate the key and set the 3D Gamma setting to ON How to Enter the Factory Mode 1 Power on the projector 2 Push the switches on the remote controller or controller panel as below Enter Enter PIC MUTING key 3 Factory mode menu will appear on the screen n In the factory mode do not enter any items except the specified one because the data cannot be returned back to the origi...

Страница 30: ...0 0 0 0 0 0 0 0 0 0 0 or P6 Error Count Lamp can t be Light on Fan operation Abnormal Thermal Sensor Abnormal Temperature Abnormal Fan Controller Abnormal Power level Abnormal Power Off Abnormal Door switch open ES7 Lamp error Fan 1 error Fan 2 error Fan 3 error Fan 4 error Sensor 1 open error Sensor 2 open error Sensor 1 short error Sensor 2 short error Temperature 1 error Temperature 2 error Fan...

Страница 31: ...3 No 23 No 50 No 50 No 55 No 55 No 56 No 56 No 60 No 60 No 61 No 61 No 63 No 63 Smart APA Computer only Smart APA Computer only Common Memory Volume Volume Auto Input Search Auto Input Search Input A Signal Sel 2 Input A Signal Sel 2 Color System 2 Video S Video Only Color System 2 Video S Video Only Power Saving Power Saving IR Receiver IR Receiver Panel Key Lock Panel Key Lock Status Status Lang...

Страница 32: ...ored in the internal ROM are written in the NVM non volatile memo ry When the POWER is turned ON all the status memory data and other memory data that are required for the present picture are selected from each memory block and expanded in the internal RAM When any adjustment is performed at this moment the adjustment data user mode items are written in the NVM automatically triggered by the memor...

Страница 33: ... 50 50 50 50 50 50 50 Sharpness 60 30 50 50 30 50 60 30 40 40 30 40 DDE Film Film Film Film Film Film Film Film Film Film Film Film Gamma Mode Color Temp High Low High Low Low High High Low High Low Low High Volume 30 Adjust Signal Dot Phase 31 H Size Shift Aspect refer to Aspect Default Smart APA On Auto Input Search Off Input A Signal Sel 4 Auto Color System 4 Auto Power Saving Mode Off Panel Ke...

Страница 34: ...60 58 50 Hue Sharpness 60 30 40 40 30 40 DDE Film Film Film Film Film Film Gamma Mode Graphics Graphics Graphics Graphics Graphics Graphics Color Temp High Low High Low Low High High Low High Low Low Volume Adjust Signal Dot Phase H Size Shift Aspect Smart APA Auto Input Search Input A Signal Sel Color System Power Saving Mode Panel Key Lock Lamp Timer Reset CC Display Status Language Menu Positio...

Страница 35: ...20 50p 21 640x350 VGA mode1 Full1 22 VGA VESA 85Hz 23 640x400 NEC PC98 Full1 24 VGA mode 2 25 VGA VESA 85Hz 26 640x480 VGA mode 3 Full1 27 Macintosh 13 28 VGA VESA 72Hz 29 VGA VESA 75Hz IBM M3 30 VGA VESA 85Hz 31 800x600 SVGA VESA 56Hz Full1 32 SVGA VESA 60Hz 33 SVGA VESA 72Hz 34 SVGA VESA 75Hz 35 SVGA VESA 85Hz 36 832x624 Macintosh 16 Full1 37 1024x768 XGA VESA 60Hz Full1 38 XGA VESA 70Hz 39 XGA ...

Страница 36: ...d Bias R Video Mid Bias G Video Mid Bias B White Balance3 CXD9809 ES7 CXD3548 EX7 EX7IN EX70 page3 128 90 115 128 75 105 512 360 460 0 0 0 512 300 420 0 0 0 512 320 480 0 0 0 512 280 400 0 0 0 Set ES7 EX7 EX7IN EX70 Vcom R Normal Vcom G Normal Vcom B Normal Vcom R Flip Vcom G Flip Vcom B Flip EDID Write Protect ROM Version ADC Calibration RGB Calibrate YUV Calibrate RGB Offset 164 222 164 RGB Gain...

Страница 37: ... color or One of the 3 color is missing Color is normal Check the R G B LCD connectors Change the main board Change the main board or the optical unit Run the ADC calibration Yes No No All white screen only ES7 EX7 EX7IN All black screen only EX70 Check the R G B LCD connectors Change the main board Change the optical unit Yes Nothing is projected Check the power board Connect the harness securely...

Страница 38: ...flash 4 times The ON STANDBY red LED indicator flash 6 times The LAMP COVER LED indicator flash 3 times Check the lamp cover and filter cover Change the lamp 1 Check the fan rotation 2 Clean the filter Check the fan rotation Change the power board Change the main board 1 2 The projector illuminates No Yes No No No Yes No Yes No Yes Yes ...

Страница 39: ...ard with the harness normally The harness between the lamp and ballast is normal F602 on the power board blows out The lamp is broken Change the ballast Change F602 No Connect the harness securely Connect the harness securely Yes Change the lamp Change the main board Yes Change the ballast ...

Страница 40: ...n The IR remote control does not function The screen brightness is normal Screen bright is normal Run the ADC calibration No Check the IR sensor board and harness No problem The set is normal Check another device and cable Adjust the white balance Yes Yes Adjust the RGB V com Clean the lens and the panel to remove dust Change the lamp ...

Страница 41: ...Standardization of Parts Some repair parts supplied by Sony differ from those used for the unit These are because of parts common ality and improvement 3 Stock of Parts Parts marked with o at SP Supply Code column of the spare parts list may not be stocked Therefore the delivery date will be delayed 4 Harness Harnesses with no part number are not registered as spare parts Section 4 Spare Parts ...

Страница 42: ...loded Views VPL EX7 VPL ES7 VPL EX7IN 3 16 44 3 3 11 46 46 15 42 35 21 51 40 3 3 56 47 46 28 3 4 12 36 29 41 32 23 24 34 25 54 18 3 1 19 3 43 VPL EX70 42 35 43 42 35 43 42 35 52 43 2 14 13 38 27 17 3 33 26 45 45 39 3 3 20 3 31 55 ...

Страница 43: ... M3 2 3H NI 28 1 487 368 11 s BALLAST EUC200DW C01 29 9 885 118 29 s CAP LENS PC E08X 31 4 140 316 01 s ASSY UPPER CASE 32 4 140 317 01 s LAMP DOOR 33 4 140 318 01 s ASSY LAMP BOX 34 4 140 319 01 s PACK ASSY LOWER CASE 35 4 140 320 01 s PACK ASSY REAR CASE VPL EX70 4 140 321 01 s PACK ASSY REAR CASE VPL EX7 4 141 652 01 s PACK ASSY REAR CASE VPL ES7 4 150 976 01 s PACK ASSY REAR CASE VPL EX7IN 36 ...

Страница 44: ...SS ASSY VPL ES7 1pc 1 487 177 11 s REMOTE RM PJ6 1pc 1 832 428 11 s CABLE VGA 1pc 9 885 118 30 s BAG CARRY E08 SONY 1pc 4 135 544 01 s CD ROM MANUAL For SY 1pc 4 135 539 01 s QUICK REFERENCE MANUAL For SY JAPANESE ENGLISH FRENCH SPANISH GERMAN ITALIAN SIMPLIFIED CHINESE 1pc 4 135 541 81 s OPERATING INSTRUCTIONS For CN SIMPLIFIED CHINESE 1pc 4 150 509 01 s MANUAL INSTRUCTION For IN ENGLISH 1pc 1 83...

Страница 45: ...N2 PC GIN2 PC BIN2 HSYNC2 VSYNC2 R_OUT G_OUT B_OUT HSYNCO VSYNCO LUMA CHROMA CVBS PC RIN PC GIN PC BIN HSYNC VSYNC AUDIO_O_ AUDIO_O AUDIO_MUT AUDIO_VOL1 AUDIO_VOL2 TXD RXD AUDIO_M AUDIO_O I2C_SW FAN_SW FG1 FG2 Fan3 FG3 Fan4 FG4 Fan5 FG5 Fan2 SDA IRR5 IRR SCL LED 4 1 P15VP P12V P5V PWR_fail POWER_ON LCD_SCL LCD_SDA Dust_SW ROMOEn ROMWEn A 0 21 D 0 15 RXD TXD Lamp EN Lamp PWR Door_SW P15VP P12V P5V ...

Страница 46: ... N C VSYNC AUDIO_O AUDIO_O AUDIO_MUT AUDIO_VOL1 AUDIO_VOL2 TXD RXD AUDIO TX DL RX DL AUDIO_O FAN_SW Fan4 FG4 Fan5 FG5 AUDIO_SW IRR5 IRR SCL LED 4 1 P15VP P12V P5V PWR_fail POWER_ON Dust_SW ROMOEn ROMWEn A 0 21 D 0 15 Lamp_PWR Lamp_EN TXD RXD Door_SW FG2 Fan2 FG3 Fan1 FG1 AUDIO_PWR PG_XCLR_OUT PG_PLLSTB_OUT SCL_7009 PVCC_POWER_ON G_DCK2 G_DCK3 G_DCK4 LCDB1 11 0 LCDB2 11 0 LCDG2 11 0 LCDR2 11 0 DVS ...

Страница 47: ...DIO_M AUDIO_O AUDIO_O AUDIO_MUT AUDIO_VOL1 AUDIO_VOL2 TXD RXD TX DL RX DL AUDIO_O FAN_SW Fan4 FG4 Fan5 FG5 AUDIO_SW IRR5 IRR SCL LED 4 1 P15VP P12V P5V PWR_fail POWER_ON Dust_SW ROMOEn ROMWEn A 0 21 D 0 15 Lamp_PWR TXD RXD Door_SW FG2 Fan2 FG3 Fan1 FG1 AUDIO_PWR PG_XCLR_OUT PG_PLLSTB_OUT SCL_7009 PVCC_POWER_ON G_DCK2 G_DCK3 G_DCK4 LCDB1 11 0 LCDB2 11 0 LCDG2 11 0 LCDR2 11 0 DVS Lamp_EN Lamp_SyncEN...

Страница 48: ... BIN2 HSYNC2 VSYNC2 R_OUT G_OUT B_OUT HSYNCO VSYNCO PC RIN PC GIN PC BIN H S Y N C VSYNC TXD RXD TX DL RX DL FAN_SW Fan4 FG4 Fan5 FG5 IRR5 IRR SCL LED 4 1 P15VP P12V P5V PWR_fail POWER_ON Dust_SW ROMOEn ROMWEn A 0 21 D 0 15 Lamp_PWR Lamp_EN TXD RXD Door_SW FG2 Fan2 FG3 Fan1 FG1 PG_XCLR_OUT PG_PLLSTB_OUT SCL_7009 PVCC_POWER_ON G_DCK2 G_DCK3 G_DCK4 LCDB1 11 0 LCDB2 11 0 LCDG2 11 0 LCDR2 11 0 DVS Lam...

Страница 49: ...D FAN2 FAN3 FAN1 FRONT BOTTOM FAN5 REAR BOTTOM FAN4 REAR TOP CN701 J17 SPEAKER J11 RS232C CONNECTOR J12 J22 J6 J1 J20 J19 J14 J21 J16 J23 J24 J25 J2 INPUT INPUT A J3 OUTPUT MONITOR J4 VIDEO J5 S VIDEO INPUT INPUT CN1 CN1 J18 J1 THERMAL SENSOR BOARD DETECTION SWITCH BOARD LAMP DOOR DETECTION SWITCH BOARD DUST DOOR LCD R IR SENSOR BOARD MAIN BOARD LCD G LCD B INPUT J9 AUDIO OUTPUT J10 AUDIO ...

Страница 50: ... BOTTOM FAN5 REAR BOTTOM FAN4 REAR TOP CN701 J17 SPEAKER J11 J18 J6 J1 J20 J21 J14 J19 J16 J22 J23 J24 J1 INPUT INPUT B J2 INPUT INPUT A J3 OUTPUT MONITOR J14 VIDEO J5 S VIDEO INPUT INPUT J7 RS 232C REMOTE CN1 CN1 J26 J1 THERMAL SENSOR BOARD DETECTION SWITCH BOARD LAMP DOOR DETECTION SWITCH BOARD DUST DOOR LCD R IR SENSOR BOARD MAIN BOARD LCD G LCD B INPUT J9 AUDIO A B OUTPUT J10 AUDIO ...

Страница 51: ...AN1 FRONT BOTTOM FAN5 REAR BOTTOM FAN4 REAR TOP CN701 J17 SPEAKER J11 J18 J6 J1 J20 J21 J14 J19 J16 J22 J23 J24 J2 INPUT INPUT A J3 OUTPUT MONITOR J14 VIDEO J5 S VIDEO INPUT INPUT J7 RS 232C REMOTE CN1 CN1 J26 J1 THERMAL SENSOR BOARD DETECTION SWITCH BOARD LAMP DOOR DETECTION SWITCH BOARD DUST DOOR LCD R IR SENSOR BOARD MAIN BOARD LCD G LCD B INPUT J9 AUDIO OUTPUT J10 AUDIO ...

Страница 52: ...LLAST UNIT POWER BOARD FAN2 FAN3 FAN1 FRONT BOTTOM FAN5 REAR BOTTOM FAN4 REAR TOP CN701 J17 J18 J6 J1 J20 J21 J14 J19 J16 J22 J23 J24 J1 INPUT INPUT B J2 INPUT INPUT A J3 OUTPUT MONITOR J7 RS 232C REMOTE CN1 CN1 J26 J1 THERMAL SENSOR BOARD DETECTION SWITCH BOARD LAMP DOOR DETECTION SWITCH BOARD DUST DOOR LCD R IR SENSOR BOARD MAIN BOARD LCD G LCD B ...

Страница 53: ...commercial leakage tester such as the Simpson 229 or RCA WT 540A Follow the manufacturers instructions to use these instruments 2 A battery operated AC milliammeter The Data Precision 245 digital multimeter is suitable for this job 3 Measuring the voltage drop across a resistor by means of a VOM or battery operated AC voltmeter The limit indication is 5 25 V so analog meters must have an accurate ...

Страница 54: ...Sony Corporation VPL ES7 SY VPL ES7 CN VPL EX7 SY VPL EX7 CN VPL EX7IN IN VPL EX70 SY VPL EX70 CN E 9 883 673 03 Printed in Japan 2009 6 16 2009 ...

Отзывы: