background image

15

GB

Getting Star

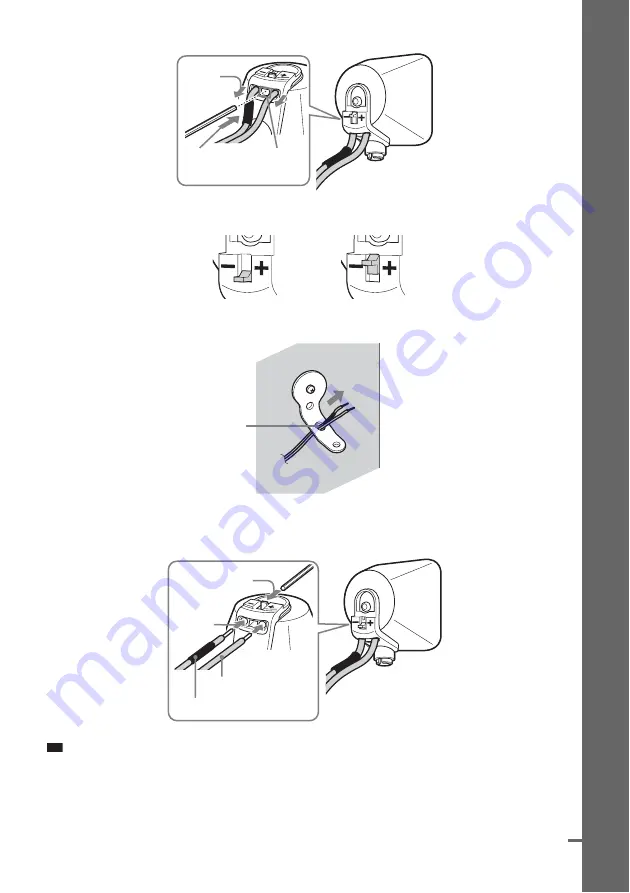
ted

4

Push 

A

 with the supplied wrench (1), and then remove the speaker cords (2).

5

Thread the speaker cords through hole 

3

.

6

Reconnect the detached speaker cords, matching 

3

/

#

 to the appropriate speaker 

terminals (1), and then push the lever down completely (2).

Tip

• If it is difficult to push the lever down, use the wrench (supplied).

(1)

When the lever is down, the 
speaker cords are locked.

When the lever is up, the 
speaker cords can be removed.

(2)

A

3

#

3

(1)

(2)

continued

Содержание DAV IS50 - Bravia Theater Home System

Страница 1: ...Sony Corporation Printed in Malaysia 1 http www sony net 3 299 548 41 1 2008 Sony Corporation DVD Home Theatre System Operating Instructions ...

Страница 2: ... customers in Singapore Precautions On power sources AC power cord must be changed only at a qualified service shop The unit is not disconnected from the AC power source mains as long as it is connected to the wall outlet mains even if the unit itself has been turned off Install this system so that the AC power cord mains lead can be unplugged from the wall socket immediately in the event of troub...

Страница 3: ...d wirelessly S AIR receiver not supplied You can enjoy system sound in another room The S AIR receiver can be purchased as an option the S AIR product lineup differs depending on the area Notes or instructions for the surround amplifier or S AIR receiver in this operating instructions refer only to when the surround amplifier or S AIR receiver is used For details on the S AIR function see Using an...

Страница 4: ...Menu 42 Changing the Sound 43 Selecting ORIGINAL or PLAY LIST on a DVD VR 44 Viewing Information About the Disc 45 Changing the Angles 47 Displaying the Subtitles 48 Adjusting the Delay Between the Picture and Sound 48 A V SYNC Playing MP3 Files JPEG Image Files 49 Playing MP3 Files and JPEG Image Files as a Slide Show with Sound 52 Enjoying DivX Videos 53 Playing a VIDEO CD with PBC Functions Ver...

Страница 5: ...ing the Appropriate Settings Automatically 81 AUTO CALIBRATION Using the Setup Display 83 Setting the Display or Sound Track Language 84 LANGUAGE SETUP Settings for the Display 84 VIDEO SETUP Settings for the HDMI 86 HDMI SETUP Settings for the Audio 88 AUDIO SETUP Other Settings 89 SYSTEM SETUP Settings for the Speakers 90 SPEAKER SETUP Returning to the Default Settings 92 Additional Information ...

Страница 6: ...d 2 0 discs Super VCD CD R CD RW CD ROM in video CD format or Super VCD format CD Audio CD CD R CD RW in audio CD format DATA CD CD R CD RW CD ROM in DATA CD format containing MP3 files1 JPEG image files2 and DivX video files3 4 and conforming to ISO 96605 Level 1 Level 2 or Joliet extended format DATA DVD DVD ROM DVD R DVD RW DVD R DVD RW in DATA DVD format containing MP3 files1 JPEG image files2...

Страница 7: ...DVD RW DVD RW DVD R DVD VIDEO and the CD logos are trademarks Example of discs that the system cannot play The system cannot play the following discs CD ROM CD R CD RW other than those recorded in the formats listed on page 6 CD ROM recorded in PHOTO CD format Data part of CD Extra CD Graphics disc DVD Audio Data DVD that does not contain MP3 files JPEG image files or DivX video files DVD RAM Supe...

Страница 8: ...es not conform to the Compact Disc CD standard playback on this product is not guaranteed About Multi Session CD This system can play a Multi Session CD when an MP3 file is contained in the first session Any subsequent MP3 files recorded in later sessions can also be played back This system can play a Multi Session CD when a JPEG image file is contained in the first session Any subsequent JPEG ima...

Страница 9: ...anufactured under license from Dolby Laboratories Dolby Pro Logic and the double D symbol are trademarks of Dolby Laboratories Manufactured under license under U S Patent s 5 451 942 5 956 674 5 974 380 5 978 762 6 487 535 other U S and worldwide patents issued pending DTS and DTS Digital Surround are registered trademarks and the DTS logos and Symbol are trademarks of DTS Inc 1996 2007 DTS Inc Al...

Страница 10: ...3 and ends on the batteries to the markings inside the compartment To use the remote point it at the remote sensor on the control unit Note Do not leave the remote in an extremely hot or humid place Do not use a new battery with an old one Do not drop any foreign object into the remote casing particularly when replacing the batteries Do not expose the remote sensor to direct sunlight or lighting a...

Страница 11: ...this case use a commercially available wire clamper or a commercially available tape etc to secure the speaker cord Using the subwoofer efficiently To reinforce the bass sound place the subwoofer possible close to a wall Note If the subwoofer is to be placed ahead of the front speaker the distance should be less than 0 5 m Step 1 Positioning the Speakers 1 1 1 1 1 1 1 A A A A B D C 1 1 1 1 1 1 1 1...

Страница 12: ...o adjust the setting of the distance from the listening position Do not place objects on the top of the subwoofer where the speaker unit is installed Do not place the subwoofer under a desk or in a cabinet etc Do not place the subwoofer back of the obstruction such as TV etc Middle range sound will fall 3 3 TV etc ...

Страница 13: ...ve pad scouring powder or solvent such as alcohol or benzine Image distortion on the TV screen may occur depending on the location of the subwoofer In this case place the subwoofer away from the TV Tip When you change the position of the speakers Sony recommends that you change the settings For details see Calibrating the Appropriate Settings Automatically page 81 Note on handling the subwoofer Do...

Страница 14: ...on a vertical and flat wall where reinforcement is applied Sony is not responsible for accident or damage caused by improper installation insufficient wall strength or improper screw installation natural calamity etc 1 Prepare screws not supplied that are suitable for the holes of the bracket 2 Secure the bracket to the wall using hole 1 Tip To prevent the speaker from rotating use the hole 2 too ...

Страница 15: ... 3 6 Reconnect the detached speaker cords matching 3 to the appropriate speaker terminals 1 and then push the lever down completely 2 Tip If it is difficult to push the lever down use the wrench supplied 1 When the lever is down the speaker cords are locked When the lever is up the speaker cords can be removed 2 A 3 3 1 2 continued ...

Страница 16: ...16GB Getting Started 7 Reattach the rear cap using the wrench supplied 8 Secure the speaker to the bracket with the screw in Step 3 using hole 4 4 ...

Страница 17: ...system To prevent this be sure to follow these precautions when connecting the speakers Make sure the bare wire of each speaker cord does not touch another speaker terminal or the bare wire of another speaker cord such as shown below Note Be sure to match the speaker cords to the appropriate speaker terminals 3 to and to If the cords are reversed the sound will lack bass and may be distorted Do no...

Страница 18: ... sound is not distorted Step 2 Connecting the System CENTER SUR L SUR R FRONT L FRONT R SYSTEM CONTROL ONLY FOR HCD IS50 SPEAKER ONLY FOR SS IS15 5 AM loop antenna aerial Rear of the subwoofer 6 AC power cord mains lead 5 FM wire antenna aerial 2 Front speaker L 2 Center speaker 2 Surround speaker R 2 Surround speaker L 2 Front speaker R 1 Plug Bottom of the subwoofer Front of the control unit 3 T...

Страница 19: ...of the plug Note Before connecting the control unit place the subwoofer on a stable work surface that is larger than the subwoofer Be sure to place a soft cloth on the work surface to avoid damaging the surface of the subwoofer SYSTEM CONTROL ONLY FOR HCD IS50 SPEAKER ONLY FOR SS IS15 CENTER SUR L SUR R FRONT L FRONT R DMPORT Rear of the subwoofer SYSTEM CONTROL cord Rear of the control unit Botto...

Страница 20: ...d SYSTEM CONTROL ONLY FOR HCD IS50 SPEAKER ONLY FOR SS IS15 CENTER SUR L SUR R FRONT L FRONT R Rear of the subwoofer Speaker cords Bottom of the subwoofer Center speaker Front speaker R Front speaker L Speaker cords Surround speaker L Surround speaker R Red Green White Gray Blue EZW T100 slot For details see Using an S AIR Product page 67 CAUTION Please do not remove the screws before installing t...

Страница 21: ...ital cord B If your TV accepts progressive format signals use this connection and set the output signal of the system to progressive format page 30 HDMI High Definition Multimedia Interface If your TV has the HDMI jack use this connection and select the type of output signal page 29 DMPORT PB CB PR CR Rear of the control unit To the VIDEO IN jack of the TV To the digital optical output jack of the...

Страница 22: ...em PAL or NTSC Asian Oceanian and Middle Eastern models only Depending on the TV to be connected you may be required to select either PAL or NTSC for the color system The initial setting of the system for Oceanian and Middle Eastern models is PAL The initial setting of the system for Asian models is NTSC 1 Press FUNCTION repeatedly until DVD appears in the front panel display 2 Press SYSTEM MENU 3...

Страница 23: ...e DIGITAL MEDIA PORT adapter to from the control unit while the system is turned on Tip You can assign a digital sound input corresponding with the function TV and SAT CABLE For details see DIGITAL IN page 88 Wireless system option By using an S AIR product not supplied you can enjoy wireless performance by transmission from the system For details see Using an S AIR Product page 67 or refer to the...

Страница 24: ...ents as follows Select the component on the TV For details refer to the operating instructions of the TV If the TV does not have multiple audio video inputs a switcher will be necessary to receive the sound from more than two components Control unit Signal flow VCR digital satellite receiver or PlayStation etc TV VCR digital satellite receiver or PlayStation etc ...

Страница 25: ...orizontal as possible Tip Adjust the direction of the AM loop antenna aerial for best AM broadcast sound If you have poor FM reception use a 75 ohm coaxial cable not supplied to connect the control unit to an outdoor FM antenna aerial as shown below DMPORT A B Rear of the control unit AM loop antenna aerial supplied FM wire antenna aerial supplied Note Cord A or cord B can be connected to either t...

Страница 26: ...er cord mains lead of the subwoofer to a wall outlet mains connect all the speakers to the subwoofer page 20 Note After connecting the AC power cord mains lead wait about 20 seconds before turning on the power by pressing 1 Rear of the subwoofer AC power cord mains lead To a wall outlet mains ...

Страница 27: ...he TV screen 5 Press X x to select a language The system displays the menu and subtitles in the selected language 6 Press The Setup Display for selecting the aspect ratio of the TV to be connected appears 7 Press X x to select the setting that matches your TV type x If you have a wide screen TV or a 4 3 standard TV with a wide screen mode 16 9 page 84 x If you have a 4 3 standard TV 4 3 LETTER BOX...

Страница 28: ...lug the calibration microphone and press C c to select YES Note The environment of the room in which the system is installed may affect measurements If measurement fails follow the message then retry AUTO CALIBRATION 13Press Quick Setup is finished All connections and setup operations are complete To quit the Quick Setup Press DISPLAY in any Step Tip If you cancel AUTO CALIBRATION perform the spea...

Страница 29: ...structions supplied with the TV projector etc 1 Press FUNCTION repeatedly until DVD appears in the front panel display 2 Press DISPLAY while the system is in stop mode The Control Menu display appears on the TV screen 3 Press X x to select SETUP then press The options for SETUP appear 4 Press X x to select CUSTOM then press The Setup Display appears 5 Press X x to select HDMI SETUP then press The ...

Страница 30: ...6 Press X x to select PROGRESSIVE COMPONENT OUT then press 7 Press X x to select the desired setting then press OFF The system does not output progressive signals Select this setting when your TV does not accept progressive signals or your TV is connected to jacks other than the COMPONENT VIDEO OUT jacks ON The system outputs progressive signals Select this setting when your TV accepts progressive...

Страница 31: ...N VOLUME x MUTING X Z Soft touch buttons Note Soft touch buttons function by touching lightly Do not press them strongly Do not place objects on the top of the control unit Doing so may activate the soft touch buttons or deactivate the buttons of the control unit Tip Soft touch buttons function when they are lit up You can select the way of displaying the soft touch buttons located on the top of t...

Страница 32: ...nt panel display 5 Press H on the remote or touch N soft touch button on the control unit The system starts playback continuous play 6 Adjust the VOLUME on the remote or touch the VOLUME soft touch button on the control unit The volume level appears on the TV screen and in the front panel display Depending on the system status the volume level may not appear on the TV screen Note When you set the ...

Страница 33: ... track or scene1 Go back to the preceding chapter track or scene1 twice in a second When you press once you can go to the beginning of the current chapter track or scene Turn off the sound temporarily MUTING To cancel muting press it again or VOLUME to adjust the sound volume Stop play and remove the desired disc Z Locate a point quickly by playing a disc in fast forward or fast reverse Scan 1 2 M...

Страница 34: ...ame appears in the front panel display Each time you press FUNCTION the mode of the system changes in the following sequence DVD t FM t AM t TV t SAT CABLE t DMPORT t DVD t Tip You can assign a digital sound input corresponding with the function TV and SAT CABLE For details see DIGITAL IN page 88 Note When you use both the TV AUDIO IN jacks analog connection and TV DIGITAL IN OPTICAL jack digital ...

Страница 35: ...ut level on the control unit 1 Press FUNCTION repeatedly until TV appears in the front panel display 2 Press SYSTEM MENU 3 Press X x repeatedly until ATTENUATE appears in the front panel display then press or c 4 Press X x to select a setting ATT ON You can attenuates the input level The output level is changed ATT OFF Normal input level 5 Press The setting is made 6 Press SYSTEM MENU The system m...

Страница 36: ... panel display When you want to output the TV sound or stereo sound of a 2 channel source from all speakers select PLII MOVIE or PLII MUSIC decoding mode For details see page 56 4 Press The setting is made 5 Press SYSTEM MENU The system menu turns off Note Depending on your TV you may need to turn off your TV s speaker to enjoy surround sound of the system Enjoying Sound from all Speakers X x c SY...

Страница 37: ... the numeric buttons to select the desired title chapter track index scene etc If you make a mistake Cancel the number by pressing CLEAR then select another number 5 Press The system starts playback from the selected number Tip When the Control Menu display is turned off you can search for a chapter DVD VIDEO DVD R DVD RW track VIDEO CD CD or file DATA CD DATA DVD DivX video file by pressing the n...

Страница 38: ... system remembers the resume playback point for the current disc Resume Play does not work during Program Play and Shuffle Play This function may not work properly with some discs Tip To play from the beginning of the disc press x twice then press H To enjoy a disc that is played before by resume playback Multi disc Resume DVD VIDEO VIDEO CD only This system recalls the point where you stopped the...

Страница 39: ... displayed in the selected order 7 Press H to start Program Play Program Play starts When the program ends you can restart the same program again by pressing H To return to normal play Press CLEAR while the display for the program setting is not displayed on the TV screen or select OFF in step 3 To play the same program again select ON in step 3 and press Creating Your Own Program Program Play PRO...

Страница 40: ... Play are also canceled You can play the contents on a disc in random order Subsequent Shuffle Play may produce a different playing order Note Same song may be played repeatedly when you are playing MP3 files 1 Press DISPLAY during playback The Control Menu display appears on the TV screen 2 Press X x to select SHUFFLE then press The options for SHUFFLE appear 3 Press X x to select the item to be ...

Страница 41: ...back The Control Menu display appears on the TV screen 2 Press X x to select REPEAT then press The options for REPEAT appear 3 Press X x to select the item to be repeated x DVD VIDEO DVD VR OFF Off DISC You can repeat all of the titles on the disc TITLE You can repeat the current title on a disc CHAPTER You can repeat the current chapter x VIDEO CD CD OFF Off DISC You can repeats all of the tracks...

Страница 42: ...ote A DVD is divided into a lot of sections which make up a picture or music feature These sections are called titles When you play a DVD which contains several titles you can select the title you want using DVD TOP MENU When you play a DVD that allows you to select items such as the language for the subtitles and the language for the sound select these items using DVD MENU 1 Press DVD TOP MENU or...

Страница 43: ...a disc are displayed Example 1 MAIN main sound 1 SUB sub sound 1 MAIN SUB main and sub sound 2 MAIN 2 SUB 2 MAIN SUB Note 2 MAIN 2 SUB and 2 MAIN SUB do not appear when one audio stream is recorded on the disc x VIDEO CD CD DATA CD MP3 file DATA DVD MP3 file STEREO The standard stereo sound 1 L The sound of the left channel monaural 2 R The sound of the right channel monaural x DATA CD DivX video ...

Страница 44: ...while the system is in stop mode The Control Menu display appears on the TV screen 2 Press X x to select ORIGINAL PLAY LIST then press The options for ORIGINAL PLAY LIST appear 3 Press X x to select a setting PLAY LIST You can play the titles created from ORIGINAL for editing ORIGINAL You can play the titles originally recorded 4 Press 1 ENGLISH DOLBY DIGITAL 3 2 1 LFE C L R LS RS Surround L R Fro...

Страница 45: ...rsion 2 2 2 3 tag information display has priority when both ID3 version 1 0 1 1 and version 2 2 2 3 tags are used for a single MP3 file x DATA CD DivX video file DATA DVD DivX video file 1 Playing time of the current file 2 Current file name 3 Current album and file number Note The system can only display the first level of the DVD CD text such as the disc name or title If a file name of the MP3 ...

Страница 46: ...only when text is recorded in the disc You cannot change the text If the disc does not contain text NO TEXT appears To check DATA CD DATA DVD MP3 file DivX video file text By pressing DISPLAY while playing MP3 files or DivX video files on a DATA CD DATA DVD you can display the name of the folder MP3 file DivX video file and the audio bit rate the amount of data per second of the current audio on y...

Страница 47: ...fined by the Japan Electronics and Information Technology Industries Association JEITA Tip Date information is MM DD YYYY MM Month DD Day YYYY Year Date information differs depending on the area If various angles multi angles for a scene are recorded on a DVD VIDEO you can change the viewing angle Press ANGLE during playback to select the desired angle Note Depending on the DVD VIDEO you may not b...

Страница 48: ...DivX video file has an AVI or DivX extension and contains subtitle information within the same file When the sound does not match the pictures on the TV screen you can adjust the delay between the picture and sound 1 Press SYSTEM MENU 2 Press X x repeatedly until A V SYNC appears in the front panel display then press or c 3 Press X x to select a setting LONG adjusts the difference between picture ...

Страница 49: ...mping to other folder The system may not play certain types of JPEG image files e g a JPEG image file that is less than 8 width 8 height Selecting an MP3 file or folder 1 Load a DATA CD or DATA DVD 2 Press DVD MENU The folders recorded on the DATA CD or DATA DVD appear on the TV screen When a folder is being played its title is shaded 3 Press X x to select a folder x To play MP3 files in a folder ...

Страница 50: ... a DATA CD or DATA DVD 2 Press DVD MENU The folder recorded on the DATA CD or DATA DVD appear on the TV screen When a folder is being played its title is shaded 3 Press X x to select a folder x To play JPEG image files in a folder Press H to start playing the selected folder x To select a JPEG image file by displaying the subscreens Press PICTURE NAVI Images of JPEG image files in the folder appea...

Страница 51: ...V screen you can rotate the JPEG image file by 90 degrees Press X x while viewing a JPEG image file Press CLEAR to return to normal view Note You cannot rotate the JPEG image file when you set JPEG RESOLUTION in HDMI SETUP to 1920 1080i HD or 1920 1080i HD page 87 To stop playback Press x Displaying the list of MP3 files JPEG image files DivX video files 1 Press DISPLAY during playback The Control...

Страница 52: ...CTURE NAVI does not work when you set MODE MUSIC IMAGE to MUSIC If you play large MP3 file and JPEG image file at the same time the sound may skip Sony recommends that you set the MP3 bit rate to 128 kbps or lower when creating the file If the sound still skips then reduce the size of the JPEG file Specifying the slide show duration of JPEG image files 1 Press DISPLAY twice The Control Menu displa...

Страница 53: ...X Certified product You can play a DATA CD or DATA DVD that contains DivX video files A DATA CD or DATA DVD that the system can play Playback of a DATA CD CD ROM CD R CD RW or DATA DVD DVD ROM DVD R DVD RW DVD R DVD RW on this system is subject to certain conditions With a DATA CD DATA DVD that contains DivX video files in addition to MP3 audio tracks or JPEG image files the system plays only the ...

Страница 54: ...n 3 hours Depending on the DivX video file the picture may pause or be unclear In which case it is recommended that you create the file at a lower bit rate If the sound is still noisy MP3 is the recommended audio format Note however this system does not conform to WMA Windows Media Audio format for playing DivX files Because of the compression technology used for DivX video files it may take some ...

Страница 55: ...r file is played With PBC Playback Control functions you can enjoy simple interactive operations search functions and other such operations PBC playback allows you to play a VIDEO CD interactively by following the menu on the TV screen 1 Start playing a VIDEO CD with PBC functions The menu for your selection appears on the TV screen 2 Select the item number you want using the numeric buttons 3 Pre...

Страница 56: ...ll vary A F D MULTI AUTO FORMAT DIRECT MULTI 2 channel source Sound that is recorded in 2 channel front left and right channel is also assigned to the surround left and right channel This mode outputs sound from the front left and right speakers surround left and right speakers and subwoofer The center speaker does not output any sound Multi channel source Depending on the source speakers that out...

Страница 57: ... 69 sound from the S AIR receiver may skip Tip The system memorizes the last decoding mode selected for each function mode Whenever you select a function such as DVD or TUNER the decoding mode that was last applied to function is automatically applied again For example if you listen to DVD with Dolby Pro Logic II MOVIE as the decoding mode then change to another function and then return to DVD Dol...

Страница 58: ...I DIR The system reproduces the stereo effect everywhere surrounding by satellite speakers Note Depending on the disc or source when you select AUTO the beginning of the sound may be cut off as the system selects the optimum mode automatically To avoid cutting the sound select other than AUTO When changing the sound mode while using the S AIR receiver not supplied page 69 sound from the S AIR rece...

Страница 59: ... MIDDLE adjusts the middle level 6 0 6 0 dB 0 5 dB increments TREBLE adjusts the treble level 6 0 6 0 dB 0 5 dB increments 2 Press X x to adjust The adjusted value appears in the front panel display 3 Press Note Depending on the sound mode the sound effect may be less noticeable Adjustment of MIDDLE is not available when you connect headphones to the surround amplifier Adjusting the Bass Middle an...

Страница 60: ...pears in the front panel display and the station is stored 8 Repeat steps 2 to 7 to store other stations 9 Press SYSTEM MENU The system menu turns off To change the preset number Select the desired preset number by pressing PRESET page 61 then perform the procedure from step 3 To change the AM tuning interval The AM tuning interval can be set to either 10 kHz or 9 kHz 1 Press FUNCTION repeatedly u...

Страница 61: ...hold TUNING The automatic tuning stops automatically when the system receives the radio station To stop the automatic tuning manually press TUNING or x To listen to radio stations when you know the frequencies Use direct tuning in step 2 1 Press D TUNING 2 Press the numeric buttons to select the frequency number you want to listen to For example to input 98 0MHz press the numeric buttons in the fo...

Страница 62: ...You can input letters numbers and other symbols for a radio station If you make a mistake Press C c repeatedly until the character to be changed flashes then press X x to select the desired character To erase the character press C c repeatedly until the character to be erased flashes then press CLEAR 7 Press COMPLETE appears in the front panel display and the station name is stored 8 Press SYSTEM ...

Страница 63: ...ork if you connect a component other than Sony even if the component is compatible with the Control for HDMI function Preparing for the Control for HDMI function Control for HDMI Easy Setting The system is compatible with the Control for HDMI Easy Setting function If the TV is compatible with the Control for HDMI Easy Setting function you can set the system s CONTROL FOR HDMI function automaticall...

Страница 64: ...peaker automatically by pressing THEATRE Watching DVD by a single button press One Touch Play By only pressing ONE TOUCH PLAY the TV turns on the TV is set for DVD input mode and the system starts playing a disc automatically The One Touch Play also works when You insert the disc and B appears in the front panel display You press DVD TOP MENU DVD MENU and B appears in the front panel display You s...

Страница 65: ...d is output from the system speakers automatically You can control the system s volume by the remote of the TV If you turn the system off or set the function of the system to other than TV TV sound is output from the TV speakers You can also operate the System Audio Control function from the TV menu For details refer to the operating instructions of the TV Note If the TV is turned on before turnin...

Страница 66: ...case place the Bluetooth transmitter as far as possible from the system or move the Bluetooth Wireless Audio Adapter closer to the Bluetooth transmitter When you use the system and the Wireless Network Audio Adapter such as TDM NC1 not supplied at the same time place the Wireless Network Audio Adapter as far as possible from the system Playing the connected component on the system 1 Press FUNCTION...

Страница 67: ...tter transceiver To make use of the S AIR function you need to insert the wireless transmitter not supplied into the S AIR main unit and the wireless transceiver not supplied into the S AIR sub unit Note When you insert the wireless transmitter transceiver make sure that the AC power cord mains lead is not connected to a wall outlet mains Do not touch the terminals of the wireless transmitter tran...

Страница 68: ... For the S AIR receiver not supplied Simply by matching the ID of the S AIR main unit and the S AIR sub unit you can establish sound transmission You can use multiple S AIR main unit by setting a different ID for each component To set the ID of the S AIR main unit 1 Press 1 on the S AIR main unit The system turns on 2 Press FUNCTION repeatedly until DVD appears in the front panel display 3 Press D...

Страница 69: ...the S AIR main unit for enjoying the system s sound in another room For details of the S AIR receiver refer to the operating instructions of the S AIR receiver 1 Set the ID of the S AIR receiver to that of the S AIR main unit To set the ID of the S AIR main unit see To set the ID of the S AIR main unit page 68 To set the ID of the S AIR receiver refer to the operating instructions of the S AIR rec...

Страница 70: ...lights up when sound transmission between the S AIR main unit and S AIR receiver is established in the front panel display When the wireless transmitter is not inserted in the S AIR main unit you cannot set S AIR STBY S AIR STBY is set to OFF automatically when the wireless transmitter is removed from the S AIR main unit When you turn the system off while S AIR STBY is set to ON you cannot use any...

Страница 71: ... on the TV screen 5 Press X x to select SETUP then press The options for SETUP appear 6 Press X x to select CUSTOM then press The Setup Display appears 7 Press X x to select AUDIO SETUP then press The options for AUDIO SETUP appear 8 Press X x to select S AIR SETUP t then press Note When the wireless transmitter is not inserted in the S AIR main unit S AIR SETUP cannot be selected 9 Press X x to s...

Страница 72: ...reless LAN or Bluetooth the transmission of S AIR products or other wireless systems may be unstable In this case the transmission may be improved by changing the following RF CHANGE setting 1 Press SYSTEM MENU 2 Press X x repeatedly until RF CHANGE appears in the front panel display then press or c 3 Press X x to select the desired setting AUTO Normally select this The system change RF CHANGE to ...

Страница 73: ... number is listed try entering them one at a time until you find the code that works with your TV TV Other Operations Controlling the TV with the Supplied Remote Manufacturer Code number SONY 501 default AIWA 501 AKAI 503 DAEWOO 503 506 515 544 FISHER 508 545 GENERAL ELECTRIC GE 503 509 510 544 GOLDSTAR LG 503 515 517 544 568 GRUNDIG 533 HITACHI 503 514 515 517 544 557 571 ITT 521 522 JVC 516 LOEW...

Страница 74: ...emote for 10 seconds Manufacturer Code number SONY 821 HAMLIN REGAL 836 837 838 839 840 JERROLD GI MOTOROLA 806 807 808 809 810 811 812 813 814 JERROLD 830 831 OAK 841 842 843 PANASONIC 816 826 832 833 834 835 PIONEER 828 829 SCIENTIFIC ATLANTA 815 816 817 844 TOCOM PHILIPS 830 831 ZENITH 826 827 By pressing You can TV 1 Turn the TV on or off THEATRE Enjoy optimal image suited for movies TV VOL Ad...

Страница 75: ...mode of the TV or other components to Dolby Digital Press AUDIO repeatedly until the desired signal appears in the front panel display MAIN Sound of the main language will be output SUB Sound of the sub language will be output MAIN SUB Mixed sound of both the main and sub languages will be output DIGITAL Switch to digital mode Display the information Access Text Coloured buttons Select the options...

Страница 76: ... music You can preset the time in 10 minutes decrements Press SLEEP Each time you press SLEEP the minute display the remaining time changes in the front panel display as follows When you set the sleep timer SLEEP lights up in the front panel display To check the remaining time Press SLEEP once To change the remaining time Press SLEEP repeatedly to select the desired time To cancel the sleep timer ...

Страница 77: ...dly until INFO MODE appears in the front panel display then press or c 3 Press X x to select a setting STANDARD displays information fully such as the kind of disc track number repeat mode information radio frequency etc for the selected function For details of the displayed information see Front Panel Display page 110 SIMPLE displays the selected function name only 4 Press The setting is made 5 P...

Страница 78: ...touch buttons touch them once and light them up The soft touch buttons turn off if you do not touch them for about 10 seconds 4 Press The setting is made 5 Press SYSTEM MENU The system menu turns off Note When the soft touch buttons turn off in SIMPLE mode first touch the soft touch button area so that the soft touch buttons light up then operate the system with them Tip Even if SIMPLE mode is set...

Страница 79: ...ROL t then press x If you have not entered a password The display for registering a new password appears Enter a 4 digit password using the numeric buttons then press The display for confirming the password appears x When you have already registered a password The display for entering the password appears 7 Enter or re enter your 4 digit password using the numeric buttons then press The display fo...

Страница 80: ...word enter 199703 using the numeric buttons then press The display will ask you to enter a new 4 digit password After you enter a new 4 digit password replace the disc in the control unit and press H When the display for entering your password appears on the TV screen enter your new password Changing the password 1 Press FUNCTION repeatedly until DVD appears in the front panel display 2 Press DISP...

Страница 81: ...ct CUSTOM then press The Setup Display appears 5 Press X x to select AUDIO SETUP then press The options for AUDIO SETUP appear 6 Press X x to select AUTO CALIBRATION then press The options for AUTO CALIBRATION appear 7 Connect the calibration microphone supplied to the ECM AC2 jack on the rear of the control unit Set up the calibration microphone at the ear level using the tripod etc not supplied ...

Страница 82: ...s to the surround amplifier not supplied do not disconnect the calibration microphone Tip You can check the distance between the listening position and each speaker See page 90 About error messages for the auto calibration If the following message appears during AUTO CALIBRATION check Symptoms and remedies and retry the auto calibration Error message Symptoms and remedies Check calibration mic con...

Страница 83: ...setup item then press LANGUAGE SETUP page 84 VIDEO SETUP page 84 HDMI SETUP page 86 AUDIO SETUP page 88 SYSTEM SETUP page 89 SPEAKER SETUP page 90 Example VIDEO SETUP 6 Press X x to select an item then press The options for the selected item appear Example TV TYPE 7 Press X x to select a setting then press The setting is selected and setup is complete Example 4 3 LETTER BOX Using the Setup Display...

Страница 84: ...may not be selected automatically Tip If you select OTHERS t in MENU AUDIO and SUBTITLE select and enter a language code from Language Code List page 107 using the numeric buttons Select settings according to the TV to be connected x TV TYPE You can select the aspect ratio of the connected TV Setting the Display or Sound Track Language LANGUAGE SETUP LANGUAGE SETUP MENU OSD AUDIO ENGLISH ENGLISH O...

Страница 85: ... in VIDEO SETUP to 16 9 x COLOR SYSTEM VIDEO CD Asian Oceanian and Middle Eastern models only You can select the color system when you play a VIDEO CD Note You cannot change the color system of the disc itself You can change the color system of this system according to the connected TV page 21 x BLACK LEVEL Latin American models only You can select the black level setup level for the video signals...

Страница 86: ...n HDMI cable For details see Using the Control for HDMI Function for BRAVIA Sync page 63 OFF You can set the black level of the output signal to the standard level ON You can raise the standard black level Use this when the picture becomes too black AUTO The picture including subjects that move dynamically is output with no jitter FRAME The picture including subjects that do not move dynamically i...

Страница 87: ...ONE DEC MODE and sound mode are not applied to the sound that is output from the TV When you set the function to other than DVD the system does not output the sound from the HDMI OUT jack even if you set AUDIO HDMI to ON x JPEG RESOLUTION You can select the resolution of JPEG image files output from the HDMI OUT jack Note JPEG RESOLUTION is effective only when you set TV TYPE in VIDEO SETUP to 16 ...

Страница 88: ... DRC works only for Dolby Digital x TRACK SELECTION DVD VIDEO only You can give the sound track which contains the highest number of channels priority when you play a DVD VIDEO on which multiple audio formats PCM DTS Dolby Digital or MPEG audio are recorded Settings for the Audio AUDIO SETUP ID You can set the ID of the S AIR main unit PAIRING You can pair the system and S AIR sub unit such as sur...

Страница 89: ...RESUME DVD VIDEO VIDEO CD only You can set the MULTI DISC RESUME function to on or off x RESET You can return the SETUP settings other than PARENTAL CONTROL to the default settings For details see Returning the SETUP settings to the default page 93 Other Settings SYSTEM SETUP ON The screen saver image appears when you leave the system in pause or stop mode for about 15 minutes or when you play bac...

Страница 90: ...tion to the speakers You can set the parameters from 0 0 to 7 0 meters for the center speaker 1 When you perform the Quick Setup page 27 the default settings are changed 2 This item appears when you set CENTER to YES in the CONNECTION setting Settings for the Speakers SPEAKER SETUP FRONT YES CENTER YES Normally select this NONE Select this if no center speaker is used SURROUND YES Normally select ...

Страница 91: ...and subwoofer Be sure to set TEST TONE to ON for easy adjustment 5 This item appears when you set CENTER to YES in the CONNECTION setting x LEVEL SURROUND You can adjust the sound level of the surround speakers Be sure to set TEST TONE to ON for easy adjustment 6 This item appears when you set SURROUND to YES in the CONNECTION setting x TEST TONE The speakers will emit a test tone to adjust LEVEL ...

Страница 92: ...he speakers at one time press VOLUME To return to the default setting when changing a setting select the item then press CLEAR Note that only the CONNECTION setting does not return to the default setting Returning the system parameters such as preset stations to the default settings 1 Turn off the power 2 Press and hold 1 on the control unit about 5 seconds MEMORY CLR and PUSH POWER appear alterna...

Страница 93: ...elect SYSTEM SETUP then press The options for SYSTEM SETUP appear 6 Press X x to select RESET then press 7 Press C c to select YES You can also quit the process and return to the Control Menu display by selecting NO here 8 Press Do not press 1 while resetting the system as it takes a few seconds to complete Note When you turn the system on after resetting and no disc is in the control unit the gui...

Страница 94: ...occur the system may not operate properly In this case remove the disc and leave the system turned on for about half an hour until the moisture evaporates When you move the system take out any disc If you don t the disc may be damaged If anything falls into the cabinet unplug the subwoofer and have it checked by qualified personnel before operating it any further On adjusting volume Do not turn up...

Страница 95: ... not use the system and the other wireless systems at the same time The transmission distance differs depending on the usage environment Find a location where transmission between the S AIR main unit and S AIR sub unit is most effective and install the S AIR main unit and S AIR sub unit there On handling discs To keep the disc clean handle the disc by its edge Do not touch the surface Do not stick...

Страница 96: ...er cord mains lead is connected securely Press 1 after STANDBY disappear from the front panel display After connecting the AC power cord mains lead wait about 20 seconds before turning on the power by pressing 1 If PROTECTOR and PUSH POWER appear alternately in the front panel display Press 1 to turn off the system and check the following items after STANDBY disappears Are the 3 and speaker cords ...

Страница 97: ...o that you can see the on screen displays Change the type of video signal output from the HDMI OUT jack and switch the TV s input back to HDMI If the picture still does not appear repeat the steps and try other options Picture noise appears The disc is dirty or flawed If the picture output from your system goes through your VCR to get to your TV the copy protection signal applied to some DVD progr...

Страница 98: ...d at least 3 meters away from your TV set or a fluorescent light Move your TV away from the audio components The plugs and jacks are dirty Wipe them with a cloth slightly moistened with alcohol Clean the disc The sound loses stereo effect when you play a VIDEO CD a CD or an MP3 file Set AUDIO to STEREO by pressing AUDIO page 43 Make sure the control unit is connected properly The surround effect i...

Страница 99: ...batteries in the remote are weak A disc does not play There is no disc inserted The disc is upside down Insert the disc with the playback side facing down The system cannot play CD ROMs etc page 7 The region code on the DVD does not match the system Moisture has condensed inside the control unit and may cause damage to the lenses Remove the disc and leave the control unit turned on for about half ...

Страница 100: ...lected Press CLEAR to cancel these functions before playing a disc Resume Play has been selected During stop press x on the control unit or the remote and then start playback page 38 The title DVD or PBC menu automatically appears on the TV screen The system starts playing the disc automatically The DVD features an auto playback function Playback stops automatically Some discs may contain an auto ...

Страница 101: ...connection page 21 Set the CONTROL FOR HDMI setting in HDMI SETUP to ON pages 64 86 Make sure that the connected component is compatible with the Control for HDMI function Check that the AC power cord mains lead of the connected component is connected securely Check the connected component s setting for the Control for HDMI function Refer to the operating instructions supplied with the component I...

Страница 102: ... it more than 8 m away from this S AIR main unit Confirm the ID of the S AIR main unit and S AIR sub unit page 68 Confirm the pairing setting page 70 Install the S AIR main unit and S AIR sub unit closer together Avoid use of equipment that generates electromagnetic energy such as a microwave oven Install the S AIR main unit and S AIR sub unit away from other wireless products Stop using another w...

Страница 103: ...ly normal system operation will not be possible Turn off the system and then turn on the system again to operate Self diagnosis Function When letters numbers appear in the display First 3 characters of the service number Cause and or corrective action C 13 The disc is dirty Clean the disc with a soft cloth page 95 The disc is a format that the system cannot play C 31 The disc is not inserted corre...

Страница 104: ...t at 10 kHz 531 kHz 1 710 kHz with the interval set at 9 kHz Middle Eastern models 531 kHz 1 602 kHz with the interval set at 9 kHz Oceanian models 531 kHz 1 710 kHz with the interval set at 9 kHz 530 kHz 1 710 kHz with the interval set at 10 kHz Other models 531 kHz 1 602 kHz with the interval set at 9 kHz 530 kHz 1 610 kHz with the interval set at 10 kHz Antenna aerial AM loop antenna aerial Int...

Страница 105: ...ubwoofer channel for deep bass is independently provided This format is also called 5 1 with the subwoofer channel designed as the 0 1 channel since it functions only when a deep bass effect is needed All six channels in this format are recorded separately for superior channel separation Furthermore since all the signals are processed digitally less signal degradation occurs Dolby Pro Logic II Dol...

Страница 106: ...mes per second Parental Control A DVD function to limit playback of the disc by users of a predetermined age according to the limitation level in each country The limitation varies from disc to disc when it is activated playback is completely prohibited violent scenes are skipped or replaced with other scenes etc Progressive format Sequential scanning In contrast to the Interlace format the progre...

Страница 107: ...1347 Maori 1349 Macedonian 1350 Malayalam 1352 Mongolian 1353 Moldavian 1356 Marathi 1357 Malay 1358 Maltese 1363 Burmese 1365 Nauru 1369 Nepali 1376 Dutch 1379 Norwegian 1393 Occitan 1403 Afan Oromo 1408 Oriya 1417 Punjabi 1428 Polish 1435 Pashto Pushto 1436 Portuguese 1463 Quechua 1481 Rhaeto Romance 1482 Kirundi 1483 Romanian 1489 Russian 1491 Kinyarwanda 1495 Sanskrit 1498 Sindhi 1501 Sangho 1...

Страница 108: ...e pages indicated in parentheses Control unit front panel A Soft touch buttons N x FUNCTION VOLUME 31 B Remote sensor 10 C Front panel display 110 D 1 on standby 27 92 E Disc slot 32 F Z eject 33 Index to Parts and Controls FUNCTION VOLUME ...

Страница 109: ...N R L jacks 21 B ECM AC2 jack 81 C SAT CABLE DIGITAL IN COAXIAL jack 23 D HDMI OUT jack 21 E TV DIGITAL IN OPTICAL jack 21 F VIDEO OUT VIDEO jack 21 G VIDEO OUT COMPONENT jacks 21 H Ventilation slots I DMPORT jack 23 J AM terminals 25 K FM 75Ω COAXIAL jack 25 DMPORT ...

Страница 110: ... Except for JPEG I Lights up when the colour system is set to NTSC J Lights up when the HDMI OUT jack is correctly connected to HDCP high bandwidth digital content protection compliant device with HDMI or DVI digital visual interface input 21 K Current repeat mode 41 L Lights up when the system outputs progressive signals DVD function only 85 M Lights up when a disc is loaded DVD function only N D...

Страница 111: ...ots B SYSTEM CONTROL jack 19 C SPEAKER jacks 20 D EZW T100 slot 20 CAUTION Please do not remove the screws before installing the EZW T100 SYSTEM CONTROL ONLY FOR HCD IS50 SPEAKER ONLY FOR SS IS15 CENTER SUR L SUR R FRONT L FRONT R 4 Bottom of the subwoofer ...

Страница 112: ...e TV operation buttons when the remote is in TV mode The remote is in TV mode when TV button ws is lights up ALPHABETICAL ORDER BUTTON DESCRIPTIONS A O P Z ANALOG4 5 ANGLE 9 AUDIO3 wj CLEAR wl D TUNING 0 DIGITAL4 6 DIMMER 5 DISPLAY 3 DVD MENU qa DVD TOP MENU wh ENTER 8 FUNCTION 4 MENU HOME4 qf MUTING4 wa NIGHT ea ONE TOUCH PLAY eg PICTURE NAVI wk PRESET qg PROG 3 4 ql REPEAT 6 SLEEP ed SOUND MODE ...

Страница 113: ...s 1 t 2 t t 1 t 1 Control Menu display 1 2 Control Menu display 2 appears for certain disc only 3 Control Menu display off Note The Control Menu Display appears only during the DVD function Control Menu display The Control Menu display 1 and 2 will show different items depending on the disc type For details about each item see the pages in parentheses Guide to the Control Menu Display DISPLAY cont...

Страница 114: ...d CHAPTER page 37 INDEX page 37 You can select the chapter or index to be played TRACK page 37 You can select the track to be played ORIGINAL PLAY LIST page 44 You can select the type of titles DVD RW DVD R to be played the ORIGINAL one or an edited PLAY LIST TIME page 37 You can check the elapsed time and the remaining playback time Input the time code for picture and music searching PROGRAM page...

Страница 115: ...image files SETUP page 83 CUSTOM In addition to the Quick Setup setting you can adjust various other settings QUICK page 27 You can make the basic adjustments Use Quick Setup to select the desired language of the on screen display the aspect ratio of the TV and select yes or no to start the Auto Calibration FOLDER page 37 You can select the folder to be played FILE page 37 You can select the JPEG ...

Страница 116: ... DTS 106 DUAL MONO 75 DVD s menu 42 E EFFECT 53 F FM Mode 61 Front panel 108 Front panel display 77 110 H HDMI high definition multimedia interface 106 HDMI SETUP 86 HDMI YCBCR RGB HDMI 87 I ILLUMINATION MODE 78 INFORMATION MODE 77 Installing the speakers on a wall 14 Instant advance 33 Instant replay 33 Interlace format 106 INTERVAL 52 J JPEG image file 49 JPEG RESOLUTION 87 L Language Code List ...

Страница 117: ...BY 70 SCREEN SAVER 89 SETUP 83 93 Shuffle Play 40 SLEEP 76 Slide Show 52 Slow motion Play 33 Soft touch button 31 Sound Mode 58 SPEAKER SETUP 90 SUBTITLE 84 Subwoofer 111 SYSTEM MENU 35 36 56 57 60 61 62 70 72 77 78 SYSTEM SETUP 89 T TEST TONE 91 TRACK SELECTION 88 TREBLE 59 Troubleshooting 96 TV connection 21 TV TYPE 84 U Unpacking 10 V VIDEO SETUP 84 VOLUME LIMIT 87 ...

Страница 118: ......

Страница 119: ......

Отзывы: