


GRW
Installation
9
SolutionAirGroup.com
|
GRW - Manual
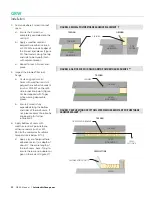
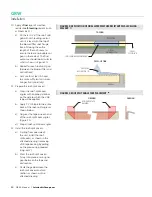
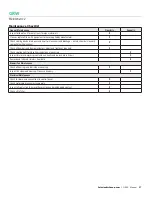
1/4” X 2” WIDE
EMSEAL
ACOUSTIC SEALANT
PLEASE ENSURE
THIS PIECE OF
EMSEAL IS IN
TIGHT CONTACT
WITH CURB
FIGURE 8: EMSEAL PATTERN BOTTOM CORNER DETAIL
Roof-Curb Preparation:
8. Prior to lifting, prepare the roof-curb.
a) With the roof-curb in place, check that the curb is
square and the dimensions/orientation match the
provided curb drawing(s).
b) Ensure the upper flange of the roof-curb is dry and
free of dust/debris.
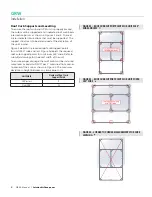
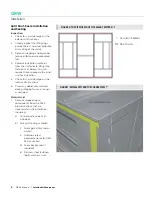
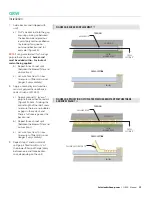
9. Apply a generous (~1/2” wide) bead of acoustic sealant,
centered on the top flange of the curb as illustrated in
Figure 6.
a) Ensure no gaps/breaks in the sealant bead(s).
b) Sealant is only necessary on the parts of the curb
which come in contact with the unit. Duct supports
and cross-members (if present) do not require
sealant as illustrated in Figure 6.
10. Proceed with installation of the unit sections.
Coil-Section Installation:
11. Lift the coil section into place, ensuring that orientation
and placement on the roof-curb match the provided curb
drawing(s).
Blower-Section:
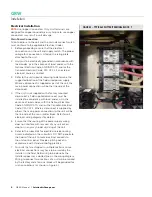
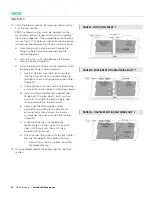
12. Apply supplied Emseal (sealing strips) to the coil-
section on the blower-side, as indicated on the
drawing (see Figure 7 and Figure 8 and submittal
drawings).
a) Ensure no overlapping Emseal sections.
13. Clean the coil-section receiver-flange on the blower-side,
then apply a generous amount of acoustic sealant (see
Figure 9).
Содержание GRW
Страница 29: ...GRW Notes 27 SolutionAirGroup com GRW Manual ...


