Skookum SK720 Скачать руководство пользователя страница 6

©2010 Skookum Robotics, Ltd    

11 


Helicopter Airframe Setup 

WARNING: 

Good  mechanical  setup  is  critical  to  the  gyro  performing 

correctly. Please read this section fully.


CAUTION: The gyro should not be used in addition to a flybar as the results 
could  be  unpredictable.  It  is  intended  for  use  where  the  swashplate  alone 
drives blade pitch.


CAUTION:  Do  not  connect  the  swashplate  or  tail  servos  to  the  gyro  until 
after the  SK720  has  been  configured  for your  servos. Your  servos  could  be 
damaged  by  an  incorrect  configuration.  See  Section  10  of  this  manual  for 
information about how to configure the SK720.


Main Rotor Blades: 

Normal  symmetrical  rotor  blades  are  recommended.


Flat-bottomed  rotor  blades 

may  be  used  but  they  have  a  nose-down  moment  about  their  pitch  axis  and  so 
require  powerful  swash  plate  servos.  The  ideal  rotor  blades  will  be  torsionally 
stiff  but  a  bit  flexible  spanwise.  Rotor  blades  must  also  be  balanced  both 
spanwise and chordwise. Heavier blades will make it easier to tune the helicopter.


Servos: 

The  best  performance  will  be  achieved  if  the  servo’s  full  normal  range  of 
movement is used. You will need fast (and ideally digital) servos for good “3D” 
performance.  Stronger,  faster  servos  will  let  you  use  higher  damping  gains  (see 
Section 19.1)  which  is important  for  maneuvers  such as piro-flips and tic-tocks. 

Be  aware  that  the  current  draw  on  your  cyclic  servos  will  be  higher  than 
with a flybar. 

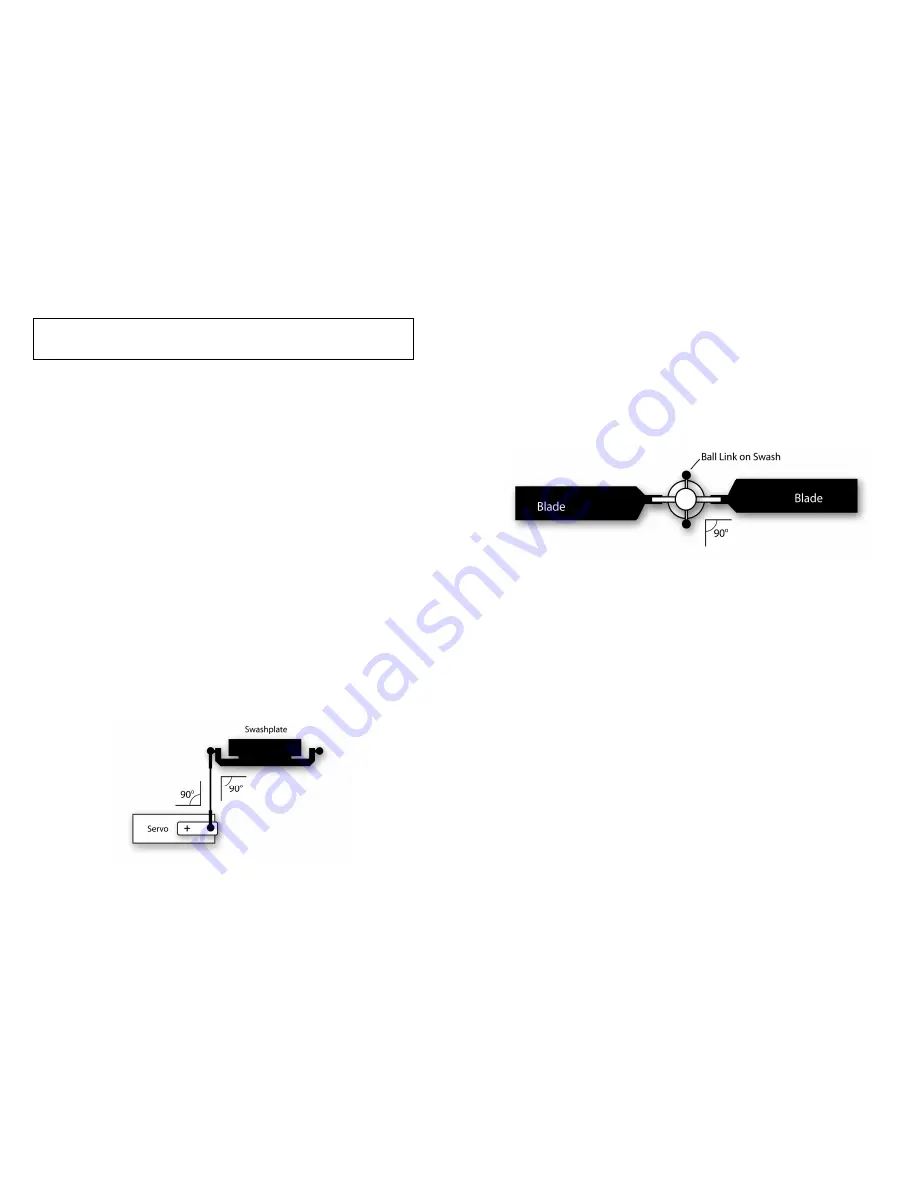
Try  to  have  90-degree  angles  between  the  servo  arms,  linkages,  swashplate  and 
blade grip arms at zero degrees pitch ('mid stick') to ensure even movement.  The 
gyro’s USB setup interface will allow fine-tuning of servo centers to achieve this. 


©2010 Skookum Robotics, Ltd    

12 


Rotorhead: 

Removing the flybar while retaining normal servo arm length will likely give too 
much  blade  pitch  action  when  setting  up  a  rotorhead  mechanism  originally 
designed for helicopters with a flybar. Either servo travel or servo arm length will 
also  need  to  be  reduced  to  allow  normal  gains  and  good  performance.  (See 
Section 12 of this  manual  for a detailed description of  how  to check  for correct 
cyclic and collective pitch setup.) 

Some  kind of anti-rotation or “follower”  mechanism  will be needed to  keep the 
top of the swashplate from rotating relative to the blade grips. If the swashplate is 
not  held  so  the  linkage  to  the  blade  grips  is  at  90  degrees  to  the  blades  (for  2-
bladed rotors), the phase angle will need to be adjusted. See the diagram below: 


For initial flights, the phase angle should be adjusted so that when the blades are 
lined up with the helicopter’s tail boom, they do not move with elevator input but 
do  move  with  aileron  input  (for  2-bladed  rotors).  This  can  be  set  either 
mechanically or through the setup software. 

It is important that the linkages and swash have minimal backlash and the lowest 
friction  possible.  The  stiffness  of  the  rubber  rotorhead  dampers  also  affects 
SK720  gyro  tuning  and  flight  performance.  Performance  will  be  better  with  the 
teeter  damping  stiffer  than  normal,  but  excessive  stiffness  can  cause  vibration 
that is hard on the airframe, gyros and servos. 

Tail: 

It is important that you minimize tail rotor vibration. Tail rotor vibrations affect 
the helicopter’s elevator control because the axis of rotation of the tail rotor disk 
is aligned with the elevator axis.  Also, if you have a belt-driven tail, be sure that 
your  tail  boom  is  electrically  grounded  to  the  heli’s  frame  or  motor  case  to 
prevent static electricity buildup. 

Balance: 

The  gyro  will  perform  best  when  the  helicopter’s  centre  of  gravity  (CG)  is 
located  directly  under  the  mainshaft  or  very  slightly  forward  (i.e.  very  slightly 
nose  heavy).  This  is  especially  important  for  maneuvers  that  use  fast  collective 
pitch changes combined with yaw (i.e. piros). 

Содержание SK720

Страница 1: ...ety 6 5 Setup Overview 7 6 Mounting the Gyro 9 7 Helicopter Airframe Setup 11 8 Connections 13 9 Modes Indicators and Power Up 16 10 Installing the Windows Setup Software 17 11 Gyro Setup Using the US...

Страница 2: ...s well as mCCPM swashplates Works with 2 3 4 or 5 blades because phase is adjustable Swash Ring anti binding algorithm Expansion port for future accessories such as GPS Optional 20 amp external power...

Страница 3: ...on how to install the SK720 s Windows setup software See Section 11 of this user s manual for a detailed description of how to set up your new SK720 gyro 2010 Skookum Robotics Ltd 6 4 Safety An R C h...

Страница 4: ...lp of the initial configuration wizard Also see Steps 2 and 3 in Chapter 11 of this manual 6 Check for correct sensor readings with the help of the initial configuration wizard Also see Chapter 11 Ste...

Страница 5: ...unit Ideally use a cable sleeve because this maintains a neat appearance while allowing the cables to move relative to one another 2010 Skookum Robotics Ltd 10 We strongly recommend using the Skookum...

Страница 6: ...uch blade pitch action when setting up a rotorhead mechanism originally designed for helicopters with a flybar Either servo travel or servo arm length will also need to be reduced to allow normal gain...

Страница 7: ...k up using a battery or BEC In satellite receivers mode the SK720 also outputs the throttle channel on port IO A T as well as up to three additional auxiliary outputs for such things as a governor lan...

Страница 8: ...in this mode the indicator LED will slowly flash green In Flight mode the LED Indicator will show solid red while the SK720 initializes and will turn solid green once the SK720 is ready to fly The SK7...

Страница 9: ...gram Installation Options Screen There are six check boxes available and all but the SK720 Digital Flybar GUI checkbox can be selected on or off It is recommended that you install all of the available...

Страница 10: ...tware will automatically detect the gyro The Connected indicator in the setup software should turn green and the gyro s serial number and firmware revision should also be displayed See Figure 10 4 bel...

Страница 11: ...t Follow these steps carefully and complete the pre flight check outlined in Section 13 of this manual before flying your helicopter WARNING Do not use any of the Default Scale or Basic_3D setup files...

Страница 12: ...e Rudder yaw axis but slowly rotate the helicopter to the right The Gyro Rate for Rudder should be positive and show green If not select Flip Rudder Axis on the Control Figure 11 2 Setting Gyro Mounti...

Страница 13: ...prevents unwanted interaction at max and min collective Increase the servo travels instead if you need more motion Step 6 Tail Setup Figure 11 5 Offline Setup Values Tail Servo Tab Click the Tail Ser...

Страница 14: ...elected The endpoint on the channel will set the gain for that function 50 is a safe starting point for both5 By default for the tail Bank 1 is Heading Hold mode and Bank 2 is Rate Mode 5 For users of...

Страница 15: ...l Phasing 3 Now try full nose up elevator control with aileron centered Measure the pitch of the blade that extends over the nose 2010 Skookum Robotics Ltd 30 4 The blade should not change pitch if th...

Страница 16: ...Ltd 32 14 Flight with the SK720 Gyro In flight mode the swashplate will not respond to the controls directly Its action will be similar to a heading hold tail gyro After it has been static for a few s...

Страница 17: ...from any orientation including upside down But SK720 will not automatically adjust the collective You will need to manually adjust the collective during a recovery and the helicopter may loose signif...

Страница 18: ...uning banks For each of those banks fly the helicopter as you normally would for at least four flights Use the SK720 setup software to disable self tuning once the gains stop changing significantly 7...

Страница 19: ...steps If the nose goes down increase the Elevator value by 1 or 2 steps If the helicopter banked the right or left you may also have to adjust tail drag compensation for Aileron If it banked right dec...

Страница 20: ...white and gray progress bar may also be used to control playback You can jump forward or backwards in the playback sequence by clicking on the progress bar with your mouse Figure 18 2 on the followin...

Страница 21: ...again Reset Log Counter When flight logging is enabled see the Control Tab section below selecting this option causes the log index number to be reset to zero Thereafter log file names will be LOG0 BI...

Страница 22: ...ns in your helicopter See Section 10 Step 3 for details on how to use these options 2010 Skookum Robotics Ltd 44 Swashplate Tab The Swashplate tab is found in the Offline Setup Values region of the ma...

Страница 23: ...evenly to the maximum rate of the centre servo 2010 Skookum Robotics Ltd 46 Servo Speed Take this value from your servo manufacturer s specifications Units are in seconds per 60 degrees of motion Thi...

Страница 24: ...wind gusts This feature gives the heli a locked in feel Slop free linkages rigid rotor head mechanics stronger servos and stiff blades allow higher gains here When hiller gain is too high the heli wil...

Страница 25: ...The response of the tail blades to the error in rate of motion This is the tail s primary gain Hold Gain The response of the tail blades to accumulated tail position error This allows the gyro to trim...

Страница 26: ...or tilts at one particular rpm Vibration effects on the gyro Make sure it is mounted on good damping tape and doesn t contact the frame Also check for tail rotor vibration Can not set Hiller very hig...

Страница 27: ...ibration is getting into the unit Make sure its case isn t contacting the heli s frame and the wires leading to it are a bit loose For larger helicopters you may want to use a separate power bus to al...

Страница 28: ...pdate process may fail if you do making the unit into a paperweight Your SK720 would then need to be returned to Skookum Robotics for servicing 2010 Skookum Robotics Ltd 56 Appendix C Warranty and Tec...

Отзывы: