


©2010 Skookum Robotics, Ltd
29
12 How to Check Cyclic Pitch & Phasing
NOTE: The gyro must be put into setup mode before the cyclic throws,
phasing and swash motion can be checked for correctness. Place the gyro
into setup mode by connecting it to an SK-LCD Terminal or to a computer
using a USB cable. A slowly flashing green LED on the SK720 indicates that
the gyro is in setup mode.
The goal of mechanical and gyro swashplate setup is to retain your normal
collective blade pitch range while setting a
cyclic range of about ±10 degrees.
This is important.
(Cyclic pitch is the blade’s pitch due to aileron or elevator
input.)
The rotor blades must also have the correct
phasing.
This means that aileron and
elevator control inputs change each blade’s pitch at the correct time. However,
the phase angle will not need adjusting for most mechanical setups.
While in setup mode, control stick motions are sent directly to the swashplate and
tail rotor as if stability gains were zero (i.e. the gyro only does its mixing
function). The gyro’s gains will have no effect in this mode.
To check the cyclic range and phasing:
1)
Set collective pitch to zero.
2)
Align a blade along the fuselage, pointing over the nose of the helicopter as
in Figure 12.1 below:
Figure 12.1 – Cyclic Aileron (Roll) Phasing
3)
Now try full nose-up elevator control with aileron centered. Measure the
pitch of the blade that extends over the nose.
©2010 Skookum Robotics, Ltd
30
4)
The blade should not change pitch if the mechanical setup is ideal. If it does
then you will need to adjust the phase angle, either mechanically at the
swashplate or using the gyro’s USB interface. If the pitch becomes negative
adjust the phasing clockwise (+), if positive then adjust it anti-clockwise (-).
Note:
this will give you normal phasing (90 degree lead); multi-bladed rotors
may fly better with some positive phase trim.
5)
Try full right aileron control with elevator control centered. The blade’s pitch
should be about -10 degrees.
6)
Try full left aileron control with elevator control centered. The blade’s pitch
should be about +10 degrees.
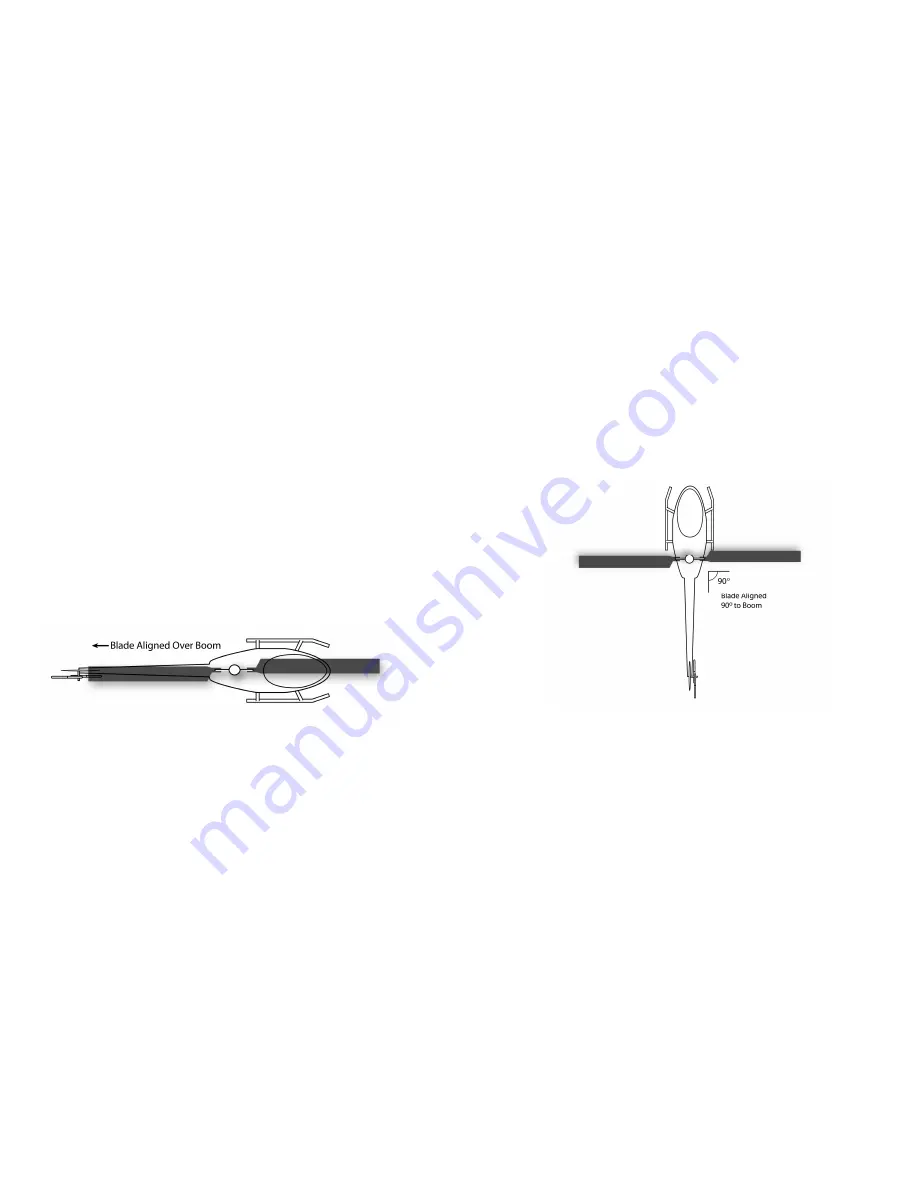
7)
Next align a blade at 90 degrees to the fuselage, pointing over the right side
of the helicopter as in Figure 12.2 below:
Figure 12.2 – Cyclic Elevator (Pitch) Phasing
8)
Try full nose-up elevator control with aileron control centered. Measure the
pitch of the blade that extends over the right side of the helicopter. It should
be about -10 degrees.
9)
Try full left nose-down elevator control with aileron control centered. The
blade’s pitch should be about +10 degrees.
CAUTION: If the cyclic blade pitch range changes, the gyro’s cyclic gains
will need to be changed as well.
For example, increasing cyclic pitch range
by 10% is the same as increasing the stability gains by 10%.


