Sismo SC-MB Скачать руководство пользователя страница 7

Flight Simulators Solutions  

www.sismo-soluciones.com


SC 

1.7 

SC-MB Ethernet Configuration  

User Manual 

SC-MAN-SCE-E-17-0003 

7 / 23 

User Manual - SC-MB Configuration - Rev1.7.docx


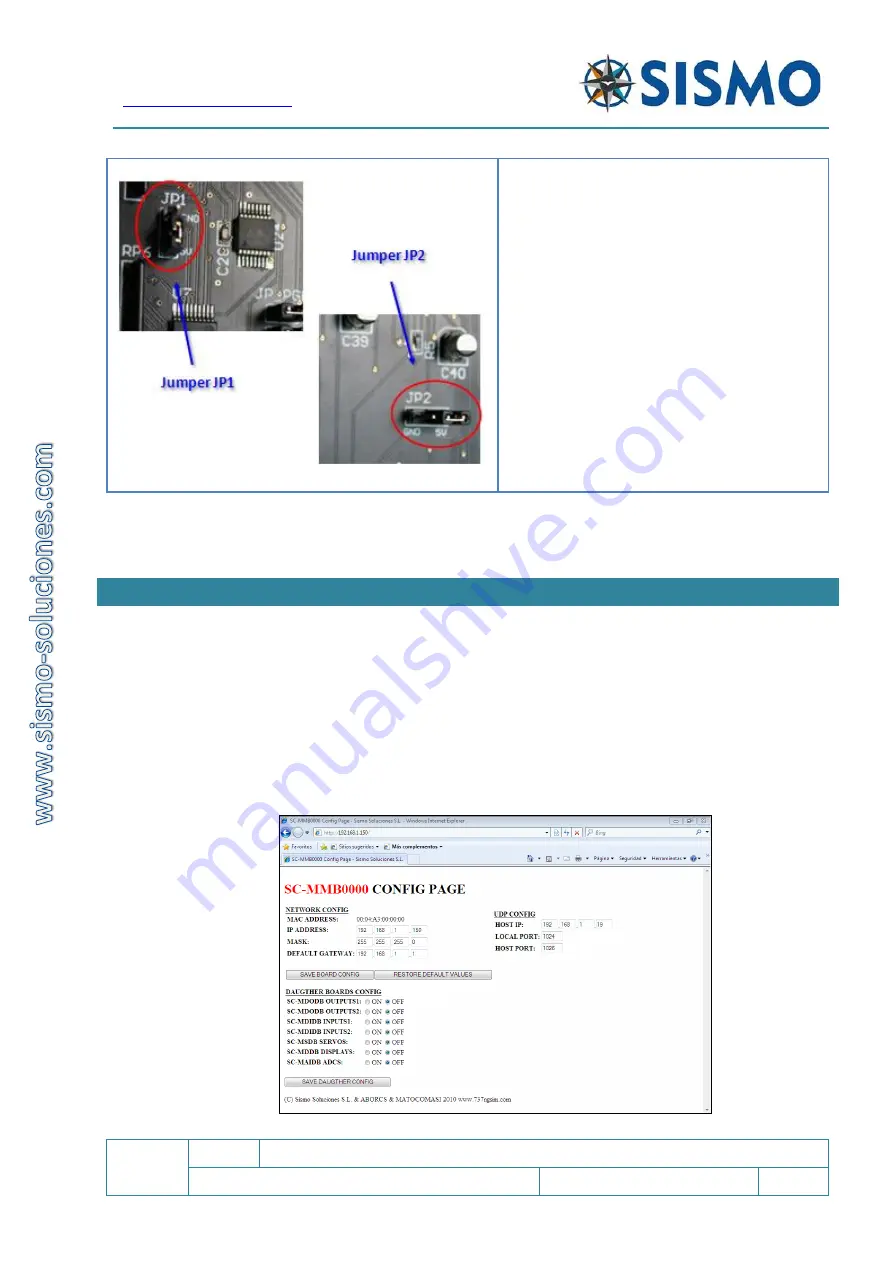
Similarly,  if  the  JP1  jumper  is  removed,  the 
inputs of the Board would be disabled. The JP1 
jumper provides the possibility of selecting the 
desired logic for the Inputs, that is to say, if we 
change  the  cover  of  the  jumper  from  the  1-2 
pins to the 2-3 pins, the logic will be reversed in 
one  way  or  another,  as  is  convenient  for  the 
user. This type of jumper can be located on the 
Mother  Board  and  on  the  Input  Daughter 
Boards.    

The  JP2  jumper,  is  only  found  on  the  Mother 
Board.  It  must  always  be  placed  between the 
central pin and +5V. 

The advice now is to visually inspect that the jumpers are located in the correct place to ensure the optimum 
performance of the Board. 

5


SOFTWARE CONFIGURATION FOR ADVANCED USERS 


In the following section, we will briefly describe the steps for the software configuration for users who have 
some knowledge of Ethernet systems. If you are a beginner, head to section 6.  

1.


Set a static IP address. 
Go  to  Networks>properties>Internet  protocol  IPv4>properties.  Define  an  IP  address,  for  example 

192.168.1

.101 this is your control computer IP. Leave the automatic Subnet Mask value. In the third 

box you must write an IP with the same Network ID: 

192.168.1

.1.  

2.


Type  the  IP  address  SC-MB  into  your  usual  internet  browser  (192.168.1.150  BY  DEFAULT).  The 
CONFIG PAGE will appear. 


Содержание SC-MB

Страница 1: ...SC MB Ethernet Configuration User Manual SC MAN SCE E 17 0003 Rev 1 7 2005 2021 Sismo Soluciones All rights reserved...

Страница 2: ...ms 3 2 Related documentation 4 3 Purpose of this document 4 4 Installation and Hardware Configuration 4 4 1 Previous requirements 4 4 2 Hardware Configuration 5 5 Software Configuration for Advanced U...

Страница 3: ...Windows FSUIPC Flight Simulator Universal Inter Process Communication For controlling asynchronous input output operations in flight simulation UDP A protocol within the TCP IP protocol suite DHCP Dyn...

Страница 4: ...his manual you will find all the information you need to have your Simcard working and configured on SC Pascal 4 INSTALLATION AND HARDWARE CONFIGURATION 4 1 PREVIOUS REQUIREMENTS The SimCard Motherboa...

Страница 5: ...TION Once you have connected the SC MB to the control computer by means of a crossed cable or a HUB device proceed to supply current to the Ethernet SC MB Mother Board Optional Note It is recommended...

Страница 6: ...and outer is GND COM For safety also check with a multimeter that the voltage in the terminals of the scheme is 5V CC In the SC MB Simcards family There are 4 types of JUMPERS Each one has a specific...

Страница 7: ...Mother Board It must always be placed between the central pin and 5V The advice now is to visually inspect that the jumpers are located in the correct place to ensure the optimum performance of the B...

Страница 8: ...divided into Network ID first three fields and Host ID last field In a LAN every device must have the same Network ID and a different Host ID The default Network ID we use in all of our SC MBs is 192...

Страница 9: ...an additional SimCard to make the Fire Suppression Panel functional This Information is important for the initial configuration The IPv4 address has four fields The first three fields of the IP addre...

Страница 10: ...s a Network ID of 192 168 1 by default the first step for the configuration is to check that the IP address of the control computer also has a Network ID of 192 168 1 6 1 1 How to find the IP address...

Страница 11: ...time again this is because the SC MB has a Network ID of 192 168 1 by default We have used Windows 10 for this example 1 Go to Start Control Panel Network and Sharing Centre Change adapter settings 2...

Страница 12: ...s IP addresses as well as give a new IP address to the Mother Board with the Network ID that the user has used in the network 6 2 CONFIGURATION OF THE MOTHERBOARD The next step is to make sure that th...

Страница 13: ...ct native configuration with ProSim and OrbitXP Note1 the new assigned Host ID in the IP address of the Mother Board must not be repeated in any other hardware or equipment of the network otherwise it...

Страница 14: ...te the HOST PORT indicated in the CONFIG PAGE in and the port where SC Pascal listens which is indicated in Listen UDP Port must be the same In this example the HOST PORT was changed to 1036 but the d...

Страница 15: ...Mother Board The CONFIG PAGE allows the activation of a total of 2 Inputs Daughters Boards 2 of Outputs 1 of Displays 1 of Servos and 1 ADC pots These are considered sufficient to manage most systems...

Страница 16: ...r to change it back later 3 Then we can access the CONFIG PAGE of the SC MB Enter the IP address for the SC MB in your browser E g http 192 168 1 150 4 Only now are we able to change the default IP of...

Страница 17: ...to connect to the local network In the case of having four elements to the Network two SC MB and two computers each of these must be connected via an Ethernet cable to a SWITCH HUB or ROUTER with a pr...

Страница 18: ...of the board see jumpers section above however in this manual we concern ourselves exclusively with the necessary requirements to control the board with the SC Pascal editor compiler and this solution...

Страница 19: ...screen will appear In the left part you will see the serial number of the Motherboard in blue and all the Daughters Boards Below which you have activated on the CONFIG PAGE This is only an example th...

Страница 20: ...e you can also check the 5 analogical inputs or pots Tick the box ACTIVATE ADCn They are organized in rows of eight because that is the number of functional pins available the other two in a 10 pin co...

Страница 21: ...hter Boards marking the icon ACTIVATE Servo n n id of the servo Another icon called ACTIVATE ALL SERV is used to activate the 16 servos of the Board 9 FAQS Next Steps The next step would be to search...

Страница 22: ...the User Manual SimCard Features for more information The names you give to these cards is important By using one single 10 wire ribbon cable to connect all of the daughter boards the two Input board...

Страница 23: ...may be some conflict and we do not provide the service of custom scripts We have an extensive library of technical information about our electronic boards and also every module of our 737NG and 737MAX...

Отзывы: