background image

SD

owner’s manual

20

The first name in electronic drums.

9993 Simmons SD1500 Drum Set Manual.indd  11_22_13  0913AM

Advanced Operations

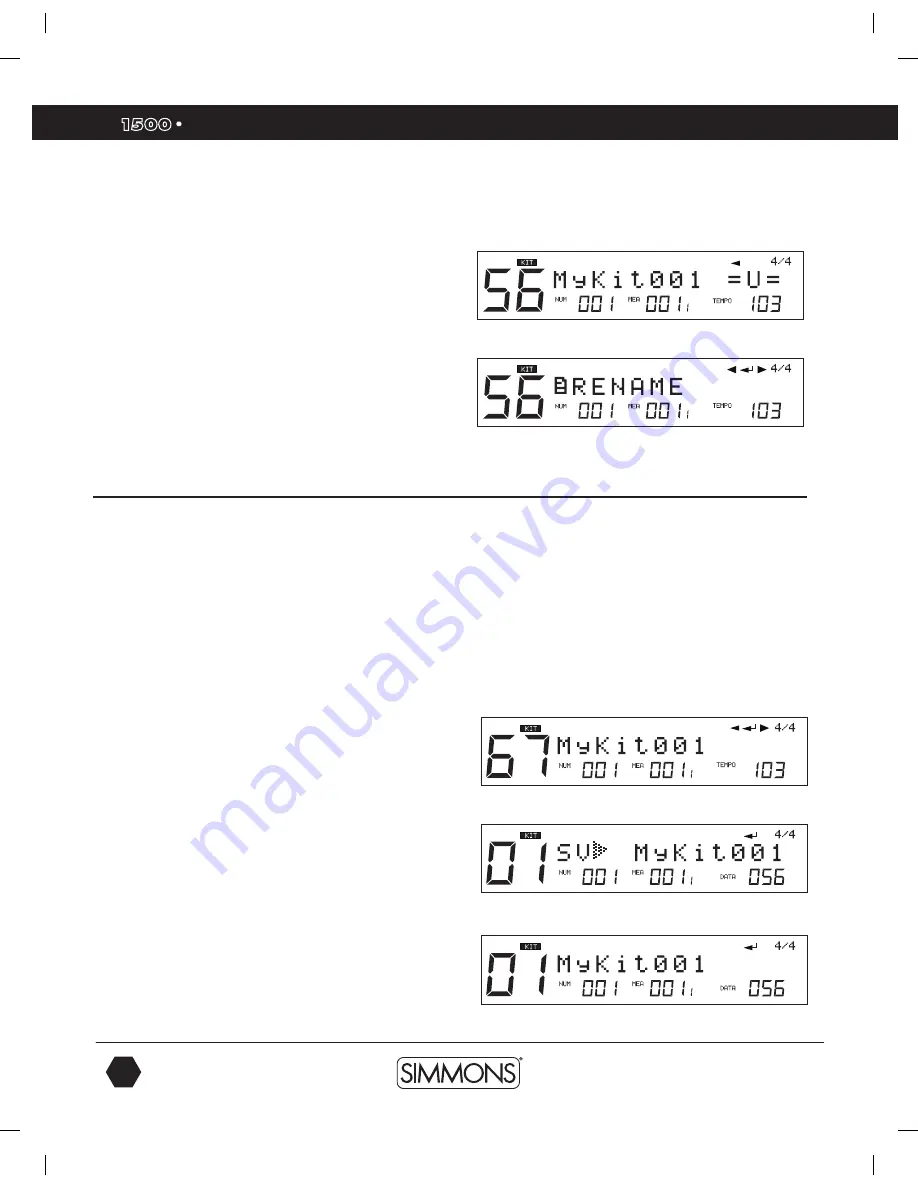
3. Press  the 

[saVe/enTer]

 button to enter the rename function. 

example: renaming a Kit

1. Press 

[PaGe +]

 to move the cursor to the right.

2. Press 

[PaGe –] 

to move the cursor to the left.

3. Press 

[+]

 to change the character to the next highest value. 

4. Press 

[–] 

to change the character to the next lowest value.

5. Press 

[saVe/enTer]

 to save the changed name. 

To save the name, you will need to save the kit as well. 

6. Press the 

[saVe/enTer]

 button to save it.

saving a Kit 

You can save or modify user Kits in the internal memory of the 

module or on a SD Card.

Saving preset and user Kits

1. Select a Kit.

2. Press  the 

[saVe/enTer]

 button. The LCD will indicate “Sav 

MyKit001 “ This will be for selecting a place to save current 

preset (MyKit001 is the default location).

3. Press  the 

[saVe/enTer]

 button. You will come to the renaming 

function. Use the steps from the Renaming a Kit to rename the kit 
if you want.

4. Press  the 

[saVe/enTer]

 button to save the kit. You will see 

“SAVE OK” on the screen temporarily and then you will see the 

current kit name on the screen.

9993 Simmons SD1500 Drum Set Manual.indd   20

4/25/14   10:56 AM

Содержание SD1500

Страница 1: ...SD SD owner s manual The first name in electronic drums www simmonsdrums net SD eleCTronIC Drum KIT www SimmonsDrums net 9993 Simmons SD1500 Drum Set Manual indd 1 4 25 14 10 55 AM ...

Страница 2: ...injury from tip over Figure1 13 Unplug this apparatus during lightning storms or when unused for a long periods of time 14 Refer all servicing to qualified service personnel Servicing is required when the apparatus has been damaged in any way such as power supply cord or plug is damaged liquid has been spilled or objects have fallen into the apparatus the apparatus has been exposed to rain or mois...

Страница 3: ...e unit turn the SD1500 and all related devices OFF prior to connecting or disconnecting cables Handling and Transport Never apply excessive force to controls connectors and other parts Unplug cables by gripping the plug firmly Do not pull on the cable Disconnect all cables before moving the module Physical shocks caused by dropping bumping or placing heavy objects on the module can result in scrat...

Страница 4: ...SD owner s manual 4 The first name in electronic drums 9993 Simmons SD1500 Drum Set Manual indd 11_22_13 0913AM SD ASSEMBLED KIT SD SD 9993 Simmons SD1500 Drum Set Manual indd 4 4 25 14 10 56 AM ...

Страница 5: ...cord 15 Advanced Operations Editing a Kit 16 Sound Organization 16 Editing the Pad Sound 16 Pad Patterns 18 Exchanging the Kit Order 19 Renaming a Kit 20 Saving a Kit 20 Mixer 21 Editing Songs 23 Song Part Settings 24 Erasing Parts in a Song 26 Saving a Song 27 Muting Song Parts 27 Recording a New Song 28 Regular Song Recording 28 Utility Mode 31 Trigger Setup 31 Effects Settings 33 MIDI Settings ...

Страница 6: ...ty MIDI USB with computer SD Card Save Load Kits Operating System Updates External Connections Headphone Output Master Stereo Outputs 1 4 TS Unbalanced 1 8 TRS Aux Input MIDI IN and Out Jacks USB Connection Sequencer Preset Songs 165 User Songs 90 Song parts Up to 7 parts drums percussion and parts 1 5 Play Modes One Shot Loop Tap and Hit Tempo 30 280 BPM Click Metronome Click Voice Time Signature...

Страница 7: ...the bottom of the sound module See illustration below The voice of the hi hat pad is controlled by the hi hat pedal Plug into the Hi Hat pedal the plug that is labelled Hi Hat Control Similar to a real drum kit the hi hat pad functions as an open hi hat when the pedal is released When the pedal is pressed down it functions as a closed hi hat See Appendix for Pad Triggers Name and MIDI chart SD SD ...

Страница 8: ...ereo playback connect both L MONO and R jacks 2 The volume from the module is adjusted with the MASTER knob Headphones You can connect a standard pair of headphones the SD1500 sound module to listen to your electronic drum set without disturbing others Connect the headphones to the headphone jack located on the front panel of the drum module Adjust the volume to a comfortable level to avoid damagi...

Страница 9: ...at offer greater versatility and control than is available with isolated instruments Whether you interface with computers sequencers expanders or other controllers your musical horizons will be greatly enhanced USB SD CARD 9V 500mA AUX IN L MONO R OUTPUT USB SD CARD 9V 500mA AUX IN L MONO R OUTPUT MP3 PLAYER TOM 4 CRASH 2 MIDI OUT MIDI IN USB SD CARD 9V 500mA AUX IN L MONO R OUTPUT MIDI OUT IN MID...

Страница 10: ... Tempo Buttons Adjusts the current tempo of a Song or Click Pressing both the and buttons simultaneously will reset the tempo to the original Song tempo 10 Part mute Button Used to Mute parts in a song 11 record Button Used to enter the Record mode 12 Play stop Button Starts or Stops the playback of a Song 13 menu Button Used to enter a Modes Menu to set parameters Holding the Menu button while pr...

Страница 11: ...t Used for connecting the SD1500 module to a computer 4 Aux Input Stereo 1 8 Jack To connect output from CD or MP3 players to the module 5 Outputs Stereo audio outputs to connect to external audio sources Unbalanced 1 4 Side Panel 1 Tom Pad Trigger Input Used to add an additional tom pad to the drum set 2 Crash Pad Trigger Input Used to add an additional cymbal pad to the drum set USB SD CARD 9V 5...

Страница 12: ...ed field are highlighted 3 Mode Icon Displays the current mode that the module is in ie Kit Song Demo Utility Click Mix and Card 4 Current Kit Index Shows 100 increment values 5 Song Number Measure Beat and Tempo Also indicates the current voice or song index in the menu pages 6 Indicates the Page Save Enter is Valid 7 Current Time Signature Bottom Panel 1 Multi Pin Connection Jack For Pad Trigger...

Страница 13: ...e module Menu screens Each mode has two menus that allow you to select various functions within the modes 1 Press MENU button to enter current menu within the current mode Kit Song or Utility mode 2 Press the Page buttons to move between menu selections 3 Press the EXIT button to Exit from the current sub menu back to the top level menu You can also press the corresponding buttons such as KIT or S...

Страница 14: ...f the Mode buttons KIT SONG or UTILITY to exit the Demo Mode Selecting a Kit Entering KIT Mode 1 Press the KIT button The LCD displays the current Kit number and Kit name 2 Press the buttons or use the VALUE DIAL to select the Kit Selecting a Song 1 Press the SONG button and the SONG screen appears with Song Number Song Name Beat and Measure The bottom of the LCD display will show the Number Measu...

Страница 15: ...rum parts 1 Press REC and PART MUTE buttons simultaneously to enter recording If this is a current Song the part you will be recording to is the drum part The song will be using SYNC mode which means you will hear the Click count but the sequencer will not start recording until you start playing Once you start playing you will see Recording on the screen and the REC and PLAY STOP button will be li...

Страница 16: ...o the pad 6 Press the buttons or the VALUE DIAL to change the sound Sound Organization When searching for sounds within the SD1500 sound module you will need to be aware of how the sounds are organized GRP refers to a Pad Voice Group which contains 12 common voices sounds such as Kick1 Snare1 Tom1 Ride1 Crash1 HiHat and Percusn You can change the Voice Group with the or Value Dial Editing the Pad ...

Страница 17: ...s are only used with the hi hat Trigger input To set the Hi Hat group and volume use the steps below 1 Press the Kit button 2 Press the Menu button 3 Press the SAVE ENTER button 4 Press the front panel Hi Hat button 5 Press the Page button to select a Hi Hat Combi group 10 6 Press the Page button to set the Hi Hat trigger volume NOTE After selecting the Hi Hat Combi Group you can adjust the parame...

Страница 18: ...2 Press the buttons or turn the VALUE DIAL to change the assignment For this example choose PercLoop 3 Press the Page button and you will come to the Song assignment For Example Bonz Beat Press the buttons or turn the VALUE DIAL to change the assignment Choose 3 4 Feel 4 To get to the other parameters press the buttons or VALUE DIAL to move to the other pages that affect the Pad Pattern mode See t...

Страница 19: ...election sets the restart trigger and time if TAP is selected Hit Tap Retrig menu will display invalid MIDI Note You may want to know the MIDI Note that a specific pad trigger is transmitting through the MIDI OUT Port For each pad trigger s default MIDI Note see Table on page 47 If current MIDI Note parameter has been selected by another trigger the LCD will display to suggest that you should adju...

Страница 20: ... the kit as well 6 Press the SAVE ENTER button to save it Saving a Kit You can save or modify user Kits in the internal memory of the module or on a SD Card Saving Preset and User Kits 1 Select a Kit 2 Press the SAVE ENTER button The LCD will indicate Sav MyKit001 This will be for selecting a place to save current preset MyKit001 is the default location 3 Press the SAVE ENTER button You will come ...

Страница 21: ...er Kit Accompaniment Click and Card MIDI the MIDI files on the card can be balanced together in the drum module mixer menu Master Kit Volume 1 Press the MIXER button to enter the mixer menu 2 Press the PAGE button to select the volume you want to adjust KitVol SongVol or ClickVol Then press the buttons or VALUE DIAL to adjust the volume for the part Inner Volumes 1 On the menu page for the Kit Vol...

Страница 22: ...rcusion volume 0 32 Part1Vol Current Song Part 1 volume 0 32 Part2Vol Current Song Part 2 volume 0 32 Part3Vol Current Song Part 3 volume 0 32 Part4Vol Current Song Part 4 volume 0 32 Part5Vol Current Song Part 5 volume 0 32 ClickVol Click volume 0 32 CardVol Card MIDI volume 0 32 Song Mode The SD1500 sound module comes with built in songs which split between Preset Internal and User internal and ...

Страница 23: ...n 4 Press PAGE or to move between parameters for the Song 5 Press the buttons to move between the Pages for the settings of the song Tempo Time Sig Mode Pre Count Kit Link Tap Sync See the definitions below NOTE The parameters of Pre Count Kit Link Tap Sync are global settings and cannot be saved to a user song Time Signature Time Sig For the preset songs this parameter shows the current song s de...

Страница 24: ...hanged according to the kit selection of the drum part of the current song During playback of a Song this function will be become effective when switched from OFF to ON If you want to change to another kit for your performance enter the Kit mode to select a new kit If it is set to OFF the kit selection won t be changed with the songs Tap Sync This is an auxiliary function available when TAP and HI...

Страница 25: ...1 111 include GM KIT Volume Part Volume 0 32 Reverb Part Reverb 0 32 Changing Parts 1 5 settings These setting are slightly different that the Drum and Percussion part settings 1 Select the Song part by pressing the buttons 2 Press the SAVE ENTER button to enter the screen of part settings 3 Press the PAGE buttons to select the parameter you want to edit 4 Press buttons or the VALUE DIAL to adjust...

Страница 26: ...Song This function is only available for User Songs You cannot erase a part on a Preset Song If you want to modify a Preset Song first save it to a User memory location 1 From the Song Mode press the MENU button 2 Press the Page button to select the Part screen PART DRUM usually comes up first 3 Press the Page button to go to the erase screen 4 Press the buttons or VALUE DIAL to select the part yo...

Страница 27: ...ngs to a SD Card the SD1500 sound module will save it to an internal memory location at the same time if the SD card fails to write the file to the card You will see No Card or Card Error if this occurs Muting Song Parts Muting the Drum Part of a Song 1 While a Song is playing press and hold the MENU button then press the PART MUTE button to enter the Mute function The first part drums should now ...

Страница 28: ...ck Record are listed earlier in the manual in the Quick Start Operations Regular Song Recording This method is the more typical way to create a Song when recording a part with the drum pads This method will allow you to quantize and edit parts 1 Choose a Blank USER Song 2 Press the RECORD button You will see the REC button blinking The screen will show the Drum part Push the button to select the P...

Страница 29: ...x section for the corresponding MIDI program changes 3 Press the RECORD button It will start blinking to indicate that the module is ready to start recording 4 Press PLAY STOP button to start recording You will hear a 1 bar 4 beat count in before recording will start 5 When you have finished you re playing press the PLAY STOP button Press the PLAY STOP button to hear the playback of the part you j...

Страница 30: ...ors in your playing by moving the notes recorded that were recorded to the closest beat note value within the song To adjust the amount of quantizing that will be done 1 Select the quantize screen with the Page buttons 2 Use the buttons or VALUE DIAL to select the amount of quantizing off 1 8 1 8t triplet 1 16 1 16t 1 32 1 32t 1 64 Synchronous Start This will start the sequencer recording once a n...

Страница 31: ...gger setup for the pads effects MIDI setup and saving global settings Utility Mode The Utility mode is for the main functions of the module such as trigger setup for the pads effects MIDI setup and saving global settings Trigger Setup You can set the parameters of each drum and cymbal pad in the Trigger menu While editing the settings you can select each trigger by hitting the corresponding trigge...

Страница 32: ... result in altered waveforms which may also cause inadvertent sounding This occurs in particular at the decaying edge of the waveform Retrigger Cancel detects such distortion in and prevents retriggering from occurring Although setting this to a high value prevents retriggering it then becomes easy for sounds to be omitted when the drums played fast roll etc Set this to the lowest value possible w...

Страница 33: ... low middle band 12dB 12db EQH Mid EQ high middle band 12dB 12db EQHigh EQ high band 12dB 12db To change the assignment for the Reverb 1 Press the Utility Button 2 Press the Page buttons to select EFFECT 3 Press SAVE ENTER You will see the Reverb screen 4 Press the Page button 5 Press the buttons or VALUE DIAL to select the Reverb type To change the settings for the Master 4 Band EQ 1 From the Rev...

Страница 34: ...efault setting is ON NOTE If you are experiencing difficulties with communicating with the module from your computer change the GM Mode to OFF To get to the MIDI settings 1 Press the Utility button 2 Press the Page buttons until you get to MIDI SET on the display 3 Press SAVE ENTER You will see LOCAL on the display 4 Press the PAGE buttons to get to the other parameters 4 Press EXIT to leave this ...

Страница 35: ... is selected you can press the SAVE ENTER button to enter the folder NOTE If there are no folders or supported files in current directory No File would be shown on the display and you can use the EXIT button to return to the last directory you were browsing Muting a Channel Part on an SD Card MIDI File When browsing the SD card press and hold the MENU button then press PART MUTE to select the sett...

Страница 36: ...ser song memory slot which is not empty it will ask you to confirm the over write operation You can use SAVE ENTER to confirm or use EXIT to go back to the last step and change your selection 4 If you confirm the selection the MIDI file would be loaded to the selected user song memory slot and you will see Song Loaded Advanced Operations NOTE Only MIDI files smaller than 32 Kbytes can be loaded Th...

Страница 37: ... are no supportable files in the folder a No File would be shown Looping Files From the CARD MENU selection press the PAGE buttons and select LOOP This will loop the play back for all the MIDI files in the current folder The playback would loop the current file only Advanced Operations Formatting the SD Card 1 Select Format in card menu press SAVE ENTER 2 Press SAVE ENTER to confirm the operation ...

Страница 38: ...ported Save All One convenient feature of the SD1500 is the ability to save and backup all your settings in the module to a SD card See the list below for all the settings that can be saved to SD card Saving your Global Setup 1 Be sure that your SD Card is inserted in the SD card slot on the back of the module and valid 2 Press the UTILITY button 3 Press the Page buttons to enter Save Global page ...

Страница 39: ... 58 LowEndKick 59 Short Low 60 HammerKick 61 WhamKick 62 RamKick Voices 63 JazzDynKick 64 DynKick1 65 DynKick2 66 DynKick3 67 VariKick 68 DynoKick 69 AtomicKick 70 BodyKick 71 DynGateKick 72 BigAKick 73 DynBoomKick 74 ClickBoom 75 CrunchKick 76 GuitarKick 77 LayerKick 78 GtarBiteKick 79 DistGTRKick 80 DiveBombKick 81 RiseKick 82 MuteKick 83 HybridKick 84 CrunchKick2 85 ThickKick 86 RockKick 87 Dyn...

Страница 40: ... 179 DynTom4 180 DynTom5 181 80 sGateTom1 182 80 sGateTom2 183 80 sGateTom3 184 ClassicRkTm1 185 ClassicRkTm2 186 ClassicRkTm3 Voices 187 FunkRockTm1 188 FunkRockTm2 189 FunkRockTm3 190 CollectorTm1 191 CollectorTm2 192 CollectorTm3 193 RecordingTm1 194 RecordingTm2 195 RecordingTm3 196 MetalTom1 197 MetalTom2 198 MetalTom3 199 StadiumTom1 200 StadiumTom2 201 StadiumTom3 202 VintageTom1 203 Vintag...

Страница 41: ...Snare2 303 HipHopSnare 304 lectroSnare2 305 CompressSNR 306 SquashSNR 307 ClapSnare2 308 SmashSnare 309 SmackSnare2 310 IndustralSNR Voices 311 HouseSnare 312 REzSnare 313 JungleSnare2 314 08ShortSnare 315 MetalSnare2 316 ThudSnare 317 ThrashSnare 318 SmackitSnare 319 ElecSmakSNR 320 HipHopSnare2 321 HipHopSnare3 322 08Crash 323 08HiHat1 324 08HiHat2 325 08HiHat3 326 LoFiHiHat1 327 LoFiHiHat2 328 ...

Страница 42: ...24 Seven 425 Eight 426 Nine 427 Ten 428 Eleven 429 Twelve 430 Baya1 431 Baya2 432 Baya3 433 Baya4 434 Baya5 Voices 435 Castanets1 436 Castanets2 437 Cowbell1 438 Cowbell2 439 Cowbell3 440 Cowbell4 441 Cxxeke 442 Djembe1 443 Djembe2 444 DrumStick1 445 DrumStick2 446 Dumbek1 447 Dumbek2 448 Dumbek3 449 Dumbek4 450 Dumbek5 451 Dumbek6 452 Dumbek7 453 Dumbek8 454 Dumbek9 455 FingerCymbal 456 FingerSna...

Страница 43: ...gae 30 32 R nBClassic 31 33 90 sRock 32 34 Rock N Roll 33 35 ModernMetal 34 36 WarmReggae 35 37 ElectricFunk 36 38 80 sRock 37 Style Program Change 39 08Machine 38 40 09Machine 39 41 HardRock 40 42 Jamaican 41 43 SurfsUp 42 44 Techno 43 45 World Perc 44 46 Hip Hop 45 47 Africa 46 48 Scratch IT 47 49 House 48 50 Latin Perc 49 51 Brass Snare 50 52 Simmons Orig 51 53 Shredder 52 54 Tablathon 53 55 Or...

Страница 44: ...ck 42 Funky Thang Funk 43 Hey Mon Reggae 44 FunkyFeel Funk 45 Groove Me Funk 46 Funky 80 s Funk 47 Bossa Beat Latin 48 R NB Groove RnB 49 Modern Jazz Jazz 50 Reggae Up Reggae 51 WorldGroove World 52 Brasilia Latin 53 Island Gruv Reggae 54 Jazz Waltz Jazz 55 Swingin it Jazz 56 DubStepper Techno 57 Jazziness Jazz 58 Jacuzzi Beat HipHop 59 HipHopR nB HipHop 60 FunkyTime Funk Song List appendix Style ...

Страница 45: ...19 Rock 9 Kit 120 Jazz 1 Kit Style Genre 121 Funk 2 Kit 122 Rock 10 Kit 123 Blues 1 Kit 124 Rock 11 Kit 125 Blues 2 Kit 126 Rock 12 Kit 127 Funk 3 Kit 128 Country Kit 129 Rock 13 Kit 130 Funk 4 Kit 131 Rock 14 Kit 132 Rock 15 Kit 133 Jazz 2 Kit 134 Techno 1 Kit 135 Rock 16 Kit 136 Rock 17 Kit 137 R NB 1 Kit 138 Jazz 3 Kit 139 Funk 5 Kit 140 Rock 18 Kit 141 Reggae 1 Kit 142 R NB 2 Kit 143 Rock 19 K...

Страница 46: ... R 39 TOM4 Stick 60 Pad Trigger Name MIDI Note 7 12 RIDE 51 13 RIDE R 59 14 RIDE Bell 53 8 15 CRASH 1 49 16 CRASH 1 R 55 9 17 CRASH 2 57 18 CRASH 2 R 52 10 19 HIHAT 46 CTRL 25 P HIHAT 44 26 Splash 21 Pad MIDI Note Assignments Demo List Demo Songs 1 Drum Solos 2 Song Demos ascii Character List 0 1 2 3 4 6 6 7 8 9 A B C D E F G H I J K L M N O P Q R S T U V W X Y Z a b c d e f g h i j k l m n o p q ...

Страница 47: ...47 The first name in electronic drums apendix MIDI Implementation Chart MIDI Implementation Chart 〇 〇 〇 〇 〇 〇 〇 〇 〇 〇 〇 〇 〇 〇 〇 〇 〇 〇 〇 〇 〇 〇 〇 〇 〇 〇 〇 〇 〇 〇 〇 〇 9993 Simmons SD1500 Drum Set Manual indd 47 4 25 14 10 56 AM ...

Страница 48: ...ode Selecting p 13 Mute Part Mute Button Location p 10 Muting the Drum Part p 15 Muting Song Parts p 27 Outputs p 8 Pads Sensitivity p 31 Settings p 31 Pad Patterns p 18 Pad Selection Button Location p 10 Pages Button Location p 10 Part Mute Button Location p 10 Play Stop Button Location p 10 Power Switch Location p 10 Quantize p 30 Quick Record p 15 Record Button Location p 10 Recording a Song p ...

Отзывы: