Sima SFX-9 Скачать руководство пользователя страница 9

SFX-9 Video Mixer 


      Controls and Functions 

9


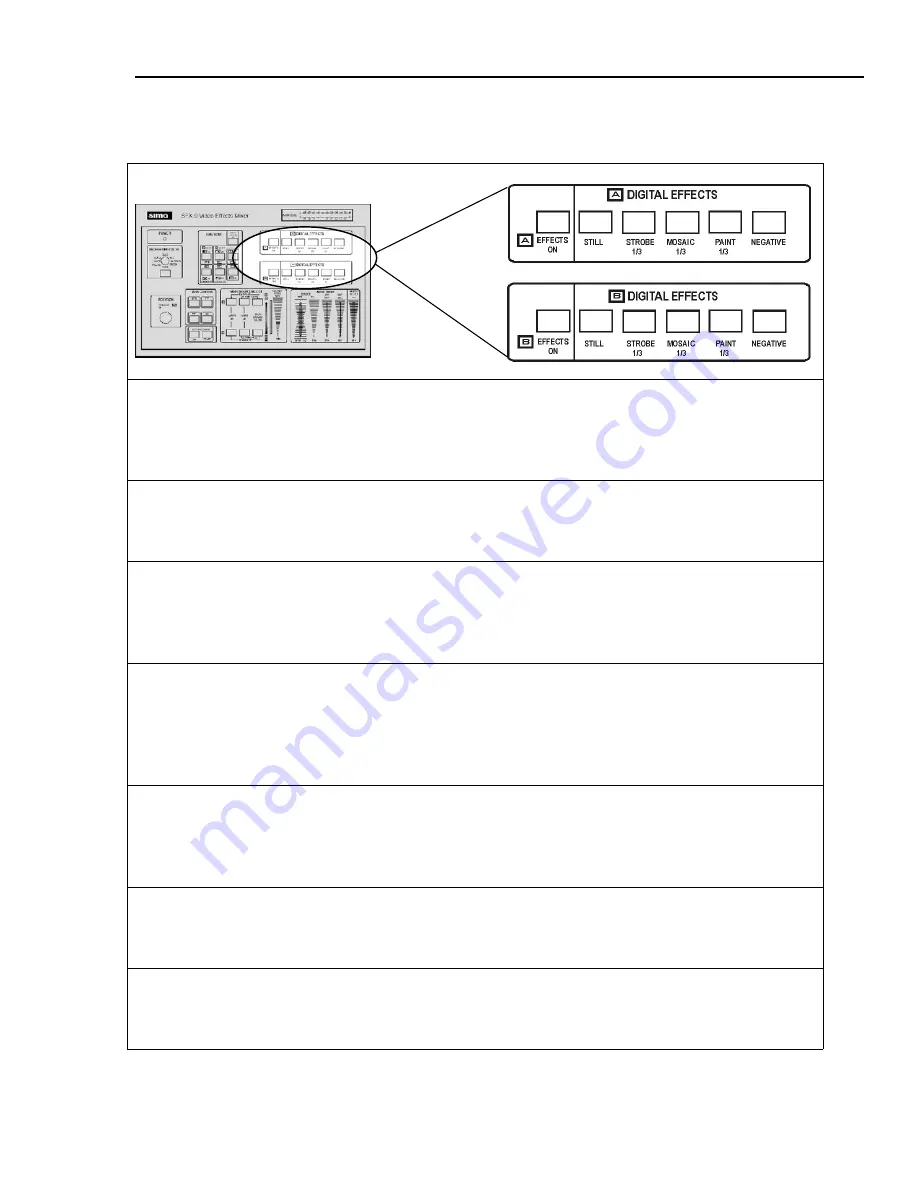
Section 3 - Digital Effects (Source A & B) 


EFFECTS ON (A and B) 

– This off/on button allows you to activate digital effects for 

either source A or B or both. Press once to turn on, press a second time to turn off. The red 
LED indicates that the effects are activated for the given source. Note: This button must be 
ON for any of the effects below to work. 

STILL 

- The STILL effect freezes the picture on the screen, but allows the audio track to 

continue. Press once to select STILL, press a second time to turn off. The red LED is on when 
the STILL effect is selected. 

STROBE

 - The STROBE button creates video stop-action effects. Three STROBE speeds 

are available. Press once to turn on STROBE at high speed, press a second time to set to a 
medium speed and press a third time to set to a low speed. Press a fourth time to turn off. The 
red LED is on when the STROBE effect is selected. 

MOSAIC

 - The MOSAIC button breaks up the video image up into a pattern of squares 

rendering the selected image area un-recognizable. (Commonly used in news and police 
shows to disguise identities.) There are three sizes of MOSAIC squares available. Each time 
you press the button, the effect shifts to the next size. Press a fourth time to turn off. The red 
LED is on when the MOSAIC effect is selected. 

PAINT

 - The PAINT effect (sometimes called POSTERIZATION) merges shades of colors 

and creates an abstract type of picture. Three levels of intensity are available. Press the button 
three times to select the three different PAINT effects. Press a fourth time to turn the PAINT 
effect off. The red LED is on when the PAINT effect is selected 

NEGATIVE

  - The NEGATIVE effect creates a negative image of the video selected. Press 

once to select NEGATIVE and press a second time to turn off. The red LED is on when the 
NEGATIVE effect is selected. 

Note: 

These effects can be combined. STILL or STROBE can be used with MOSAIC, 

PAINT and NEGATIVE. Select several effects at once and apply when desired by pressing 
the EFFECTS ON button. 


Содержание SFX-9

Страница 1: ...User s Manual for SFX 9 Video Effects Mixer by...

Страница 2: ...5 Oakmont PA 15139 800 345 7462 www simacorp com PN 21661 2002 by Sima Products Corp All rights reserved No part of this publication may be reproduced or transmitted in any form or by any means witho...

Страница 3: ...urce A B 9 Section 4 Mode Control 10 Section 5 Functions 11 Section 6 Joystick Control 12 Section 7 Background Color 12 Section 8 Audio Mixer 13 Section 9 Audio Level 14 Basic Operation 15 To Try a Ty...

Страница 4: ...fy and Resolve Radio TV Interference Problems This booklet is available from the U S Government Printing Office Washington D C 20402 Stock No 004 000 00345 4 Warnings and Safety information Safety Che...

Страница 5: ...1 Digital Effects keys 2 Audio mixer controls 3 Source Selection keys 4 Mode Control keys 5 Joystick position control 6 Background color selection control 7 Power Indicator Light 8 Wipe Mode Keys 9 A...

Страница 6: ...ce 4 9 Video Monitor Output Source 3 10 Video Monitor Output Source 4 11 Aux L audio input 12 Aux R audio input 13 Audio R L Output 14 Audio R L Output 15 Composite Video Output 16 Composite Video Out...

Страница 7: ...Functions 7 Typical Hook up Section 1 Power Indicator POWER INDICATOR The POWER INDICATOR light shows at a glance that power to the SFX 9 is turned on The power switch is located on the back panel Se...

Страница 8: ...rce A Source A Video 2 Background Color Source B Source B To toggle between S video and composite video inputs within a single source try this sequence Use only buttons in Source A for this example 1...

Страница 9: ...OSAIC The MOSAIC button breaks up the video image up into a pattern of squares rendering the selected image area un recognizable Commonly used in news and police shows to disguise identities There are...

Страница 10: ...issolve from one source to another smoothly and gradually using the A B slide control The KEY button allows you to replace one source with another by keying on a pre selected color Blue key or brightn...

Страница 11: ...e color coding on the buttons in the MODE CONTROL box WIPE Purple PIP Green MIX Yellow KEY Aqua AUTO WIPE Blue For example when the WIPE button is selected in the MODE CONTROL box the FUNCTION buttons...

Страница 12: ...nction as needed to achieve the desired results Section 7 Background Color BACKGROUND COLOR The BACKGROUND COLOR control allows you to select one of 8 colors to use in wipes and edits keying on colors...

Страница 13: ...ttom When left at center both tracks are mixed evenly SOURCE MAX MIN This slide controls the audio level of the source selected with the SOURCE slide If the SOURCE slide is set at the top Input 1 then...

Страница 14: ...play allows you to visually monitor the audio level produced by the audio output controls located on the Audio Mixer control box This displays the mixed audio signal that is being output by the SFX 9...

Страница 15: ...ight Step 3 Select any video input to be Source B by pushing the appropriate button s Background color is selected as Source B in the example at right Move the slide control between the A and B positi...

Страница 16: ...le at right Move the slide control between the A and B positions to view the two source images Source Selection Step 4 Press the MIX button yellow in the MODE CONTROL panel TIP MODE controls determine...

Страница 17: ...ow options are color coded in green PIP windows can have a colored border or no border There are three sizes of PIP windows to select PIP Selection Step 5 Move the slide control from Source A to Sourc...

Страница 18: ...effect you want Key Blue Screen tips You can create a blue screen by applying a blue background to a flat wall It is recommended to use a roll of heavy photographic background paper Pantone 293 that...

Страница 19: ...A position before proceeding Wipe Selection Step 5 Press the ON button blue in the AUTO FADE WIPE section of the MODE CONTROL panel TIP Once pressed the ON button changes the function of the Video So...

Страница 20: ...tton in the DIGITAL EFFECTS Source A control panel The red LED light will indicate the MOSAIC effect is selected You can control effects for Source B by following the same steps using the buttons for...

Страница 21: ...io tracks from Input 1 and Input 2 Move the slide from top to bottom to dissolve from Input 1 to Input 2 Step 2 The Max Min slide controls the overall volume level output of the mix between Inputs 1 a...

Страница 22: ...r each input Video Output 1 0Vp p 75 composite signal Pin Jacks Headphone Output x 1 Headphone 8 1 8 phone jack Time base correction Dual time base correctors Video Effects dual channel Still Strobe M...

Страница 23: ...s product If your manual includes this page then the worldwide compatibility feature is fully functioning The unit defaults to the NTSC USA setting Press the following key combination simultaneously f...

Страница 24: ...0 DAY LIMITED WARRANTY Sima Products Corporation warrants that if the accompanying product proves to be defective to the original purchaser in material or workmanship within 90 days from the original...

Отзывы: