.
FUSELAGE CONSTRUCTION
NOTE:
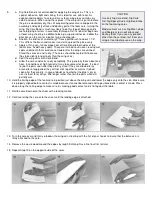
Vertical or side mounting may be used,
but the tank position should be changed
accordingly to keep it in the same
relationship to the motor's needle valve
hole.
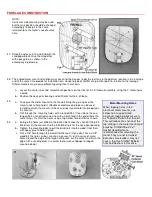
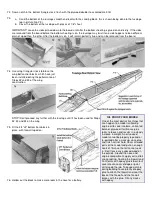
47. Smooth and even F-IA and F-IB with the
sandpaper block. Glue them together
with epoxy glue, as shown in the
accompanying drawing.
48.
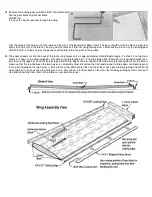
The angled motor mount installation was chosen for the Kougar to get the fuel tank in the optimum location in the fuselage
and at the same time provide for installation of a standard type of muffler at a practical point in relation to the fuselage.
Different motors may require different spacing than that shown.
a.
Layout the center lines and motor mount positions on the front of the F-l firewall assembly, using the F-l drawing as
a guide.
b.
Position the nose gear bearing and drill holes for the 4-40 bolts.
49.
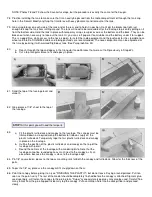
a.
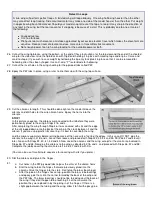
Tack glue the motor mounts to the firewall. Bring the glue up over the
mount ends to help hold it. (Double coated masking tape can be used
instead to attach the mounts.) Check and see if your motor fits properly on
the mounts.
b.
Drill through the mounting holes with a long drill bit. (If you do not have a
long drill bit, a length of music wire with a notch filed in the end will do the
same thing.) Or--start the holes using a tap holder for a drill bit as shown.
Motor Mounting Notes
When tapping holes in the
aluminum motor mounts, use
kerosene or a specialized
aluminum tapping lubricant such
as Tapmatic Fluid, rather than oil.
This will reduce the chance of the
tap sticking in the motor mount and
breaking. SIGSHI09 6-32 xl"
Socket Head Bolts are
recommended for mounting the
motor. They are not furnished
because some builders may not
have a tap. Use SIGSH159 bolts,
nuts and washers in this case.
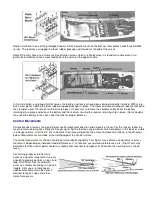
50.
a.
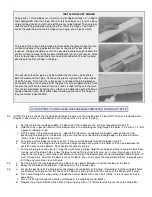
Enlarge the holes just drilled in the back side to take the shank of the 6-32
blind nuts on the mounts and the 4-40 blind nuts for the nose gear bearing.
b.
Tighten the mounting bolts to pull the blind nuts into the wood. Coat them
with epoxy glue to hold in place.
c. Drill a 7/8" hole through the firewall for the tank. (If you don't have a 7/8"
wood bit, the hole can be cut out on a jig saw. Or, drill a series of small
holes around the edge of the large hole, punch out the center and finish the
edge with a sanding drum in a motor tool or with sandpaper wrapped
around a dowel.


