


.
4.
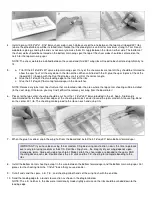
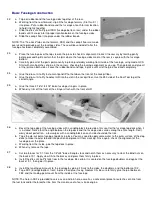
Install a pre-cut 3/32"x3"x1-3/16" balsa shear web in each rib bay except the one between the two most inboard W-1 ribs
(where the dihedral brace will be installed later). Notice that the wood grain is vertical for maximum strength. Trial fit each
web before gluing, sanding the ends as necessary to make them fit snugly between the ribs on either side. The bottom of
the shear webs should be centered on the bottom main wing spar; the top of the shear webs should be centered on the
notch for the top main wing spar.
NOTE: The shear web to be installed between the second and third W-1 wing ribs will need to be shortened significantly to
fit.
5.
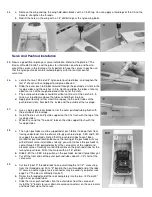
a. Trial fit the 3/16"x3/8"x30" spruce top main wing spar. If any of the shear webs are too tall, they should be trimmed to
allow the spar to sit all the way down in the rib notches. When satisfied with the fit, glue the spar in place. Check the
inboard W-1 rib again with the Dual Tool to be sure it is still at the correct angle.
b. Glue the 5/16"sq.x30" balsa leading edge to the front of the ribs.
c. Glue the 3/16"sq.x30" balsa top forward spar in the rib notches.
NOTE: Remove any pins from tbe structure that are located under the area where the top center sheeting will be installed
(in the next step). Otherwise, you may find it difficulf to remove your wing from the board later!
6.
Pieces for the top center sheeting should be cut from the 1/16"x3"x30" balsa provided in the kit. Again, Sig-Bond is
recommended for the front and rear edges of the sheeting to make it easier to sand the joints smooth. Also use Sig-Bond
on the center W-1 rib. The sheeting can be glued to the ribs on each end using CA.
7.
When the glue has dried, unpin the wing half from the board and install the 3/16"sq.x30" balsa bottom forward spar.
IMPORTANT: If you have been using thin or medium CA glue during construction, now is the time to go back
over every joint using medium or thick CA. Don't be stingy here - the integrity of your wing depends upon
strong glue joints. Glue each side of each joint. Make certain the shear webs are bonded to the spars AND
the wing ribs on each side. Double check the L.E. stick and the T.E. sheeting for complete bonding to the
ribs.
8.
Install the bottom center sheeting except in the area between the bottom forward spar and the bottom main wing spar. Cut
pieces for the sheeting from the 1/16"x3" balsa that you used earlier.
9.
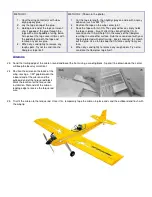
Cut oft and sand the spars, L.E., T.E., and sheeting at both ends of the wing flush with the end ribs.
10.
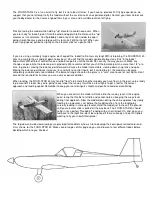
Sand the leading edge to a round crosssection as shown in the diagram below.
NOTE: The L.E. notches in the ribs were intentionally made slightly oversize so the ribs could be sanded down to the
leading edge.
Содержание Four-Star 40 SIGRC44
Страница 1: ......