


.
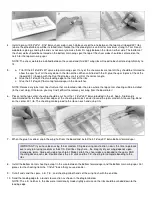
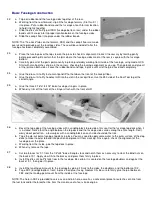
63. The ailerons are hinged exactly like the tail surfaces, but the torque rods must be glued as well. Start by cutting the slots in
the wing and the ailerons (four per aileron) and install EASY HINGES halfway into the ailerons.
64.
a. Slide a small piece of wax paper between the torque rods and the wing. Working with one aileron at a time, apply
Kwik-Set epoxy to the slot and hole in the aileron leading edge and slide it onto the torque rod, working the EASY
HINGES into the wing slots at the same time. Try not to get any epoxy on the brass tubing! Before the glue sets, be
sure to deflect the aileron back and forth to set the proper hinge gap.
b. Once the epoxy has dried, remove the wax paper and apply thin CA to the hinges as you did earlier.
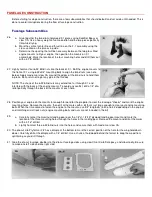
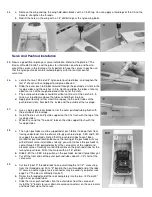
FINAL ASSEMBLY
65.
a. Temporarily position the stabilizer on the stab support at the back of the fuselage. Again refer to the General
Alignment Diagram on page 20 of "The Basics of Radio Control". When satisfied with the alignment, draw cut lines
on the bottom of the stabilizer at the fuselage sides. Remove the stabilizer and cut away the covering on the bottom
where it will be glued to the fuselage using a sharp knife.
b. Glue the stabilizer to the fuselage using Kwik-Set epoxy. Recheck its alignment and adjust as necessary before the
glue dries.
66.
a. Cut away a 3/16" wide strip of
material from the center of the
stabilizer where the fin is to be
glued. Epoxy the fin to the top of
the stabilizer, using a triangle to
check its alignment as it dries.
Make certain that the back edge
of the fin is lined-up with the
back edge of the fuselage sides.
b. Hinge the rudder to the fin and
fuselage using three EASY
HINGES.
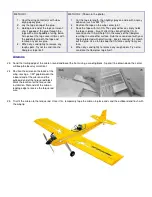
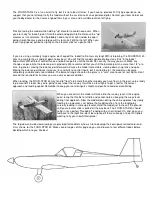
67.
(OPTIONAL) Although the fin attachment method in the previous step has
proven to be more than adequate on our test models, some modelers may
want some extra strength in that area, particularly if they fly on a rough field
where models have a tendency to flip over on their back. Then again, there
are some of us who tend to flip our models over even on smooth fields! The
optional fin braces shown in the photo aren't exactly pretty, but they do add a
tremendous amount of strength to the area and are recommended for any
Four-Star 40 pilot who is more concerned with day-to-day hardknocks flying
than with looks.
The fin braces can be cut from the 1/2" triangle stock provided in the kit and
shaped as shown in the picture. Cover the outside face of the braces, and cut
away the covering material on the fin and stabilizer before gluing the braces in place on each side of the fin.
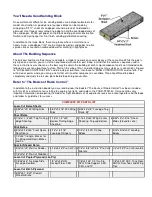
Содержание Four-Star 40 SIGRC44
Страница 1: ......