Siemens CLINITEK Status Скачать руководство пользователя страница 92

5-36

5

 Instrument Set Up


If the printer paper roll needs

replacing, 

Print 

will be disabled and

you will be able to select 

Help 

to

view instructions on replacing the
printer paper (if you require further
instruction see page 1 5, Loading the
Printer Paper or Label Roll).

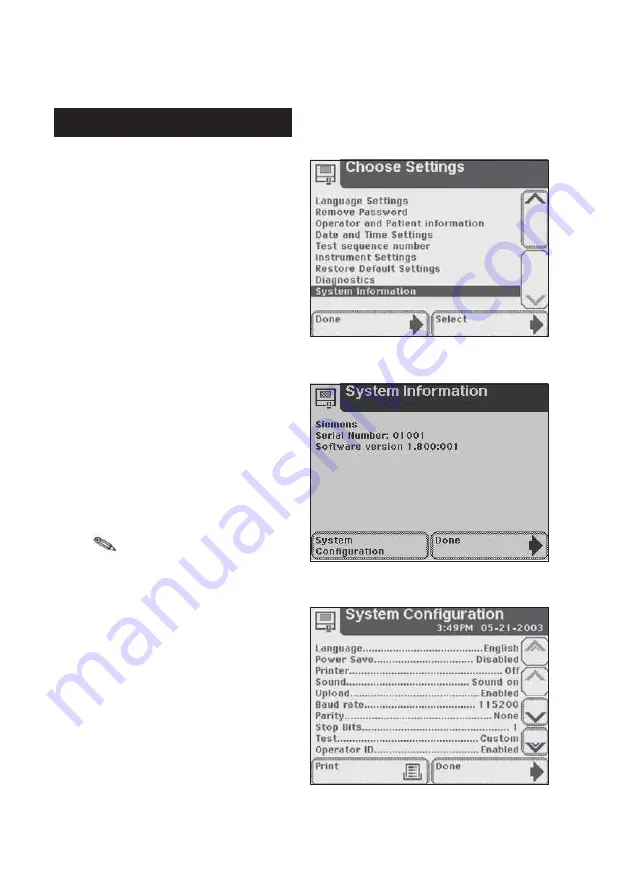
This screen has information about
your analyzer.

Touch 

System Configuration

 to

view details of the current system
configuration. This screen will show
the current settings for all the items
which can be changed within the

Input Settings

 and 

Instrument

Settings

 screens. Scroll through

the list using the up and down
arrows to view the details and print
the information if required.

Select 

Done

 once to return to

System Information

 screen and a

second time to return to 

Choose

Settings

 screen.

System Information 


Содержание CLINITEK Status

Страница 1: ...Operator s Manual REF 10379682 ...

Страница 2: ......

Страница 3: ...134798 Rev A 2009 07 Operator s Manual ...

Страница 4: ... US Pats 5 408 535 5 477 326 5 877 863 6 239 445 D456 082 D489 816 Origin UK The information in this manual was correct at the time of printing However Siemens Healthcare Diagnostics continues to improve products and reserves the right to change specifications equipment and maintenance procedures at any time without notice If this instrument is used in a manner differently than specified in this m...

Страница 5: ...t Strip Table 1 3 Loading Test Table Insert 1 3 Interfacing to the Clinitek Status Connector 1 4 Analyzer Software Upgrades 1 4 Loading the Printer Paper or Label Roll 1 5 Warranty Registration 1 6 Powering Up 1 7 Powering Down 1 8 2 Interacting with the Touch Screen 2 1 Screens 2 1 Keyboards 2 4 3 Start Up Wizard 3 1 4 Testing 4 1 Quick Tests 4 1 Urinalysis Strip Test 4 1 Cassette Test 4 8 Full T...

Страница 6: ...s and Advisory Messages 7 4 Problem Checklist 7 8 8 Quality Control Testing 8 1 9 Cleaning and Maintenance 9 1 Cleaning 9 1 Changing Batteries 9 7 10 Appendices 10 1 Appendix A Local Technical Support Providers and Distributors 10 1 Appendix B Tables of Results 10 2 Appendix C Specifications 10 8 Appendix D Instrument Default Settings English 10 10 Appendix E System Overview Principles 10 12 Appen...

Страница 7: ...een Do I have to calibrate You do not have to do anything to calibrate The instrument performs a system test each time it is turned on Then each time a test is run the instrument automatically calibrates The white calibration bar on the test table provides NIST traceable calibration How does it work Testing starts in the Quick Test mode when either the Strip Test or Cassette Test is selected on th...

Страница 8: ... testing site to another The batteries fit into an opening on the bottom of the instrument What about this Operator s Manual The Operator s Manual contains the directions you need to unpack the analyzer use it for your daily Siemens urinalysis and Clinitest immunoassay testing and keep it in good working condition As you read through the Operator s Manual you will find these symbols In the Operato...

Страница 9: ...ies that the instrument is class 111 type equipment which is equipment for connection to SELV Separated Extra Low Voltage i e a power supply Double insulated product or transformer may also identify class 2 equipment power supply only Identifies that the instrument is listed by Underwriters Laboratories as meeting U S and Canadian requirements for safety The CE mark identifies that the product com...

Страница 10: ...e recycled immediately after its environmental protection use period has expired Temperature limitation 18 30 C Contents sufficient for n tests 100 Use by YYYY MM Catalog number Serial number Batch code Biohazard Indicates that this equipment is classified as Waste Electrical and Electronic Equipment under the European WEEE Directive It must be recycled or disposed of in accordance with applicable...

Страница 11: ...icient PTC A thermistor device used to protect the transformer from short circuits or overload This is an auto reset device Thermal cut out TCO This safety device disconnects the supply voltage to the transformer at a specific temperature The operation temperature is stated below Ingress protection rating protected against the entry of solid objects 1 mm but no protection from liquids This symbol ...

Страница 12: ... Displayed when a cassette test is being carried out and when results are shown after a cassette test Results recall Used to show that results are being recalled from the instrument s memory Printer This icon is displayed when results are being printed Data transfer to Personal Computer Shows that data including results is being transferred to a PC Alert Used when an error is being displayed There...

Страница 13: ...y also be a Warranty Registration Card Unpacking Setup Guide and or Quick Reference Guide included 2 5 If you are using a reagent strip that has 4 or fewer test pads e g Uristix 4 you must use a short test table insert This has to be ordered separately for a list of suppliers see Appendix A Local Technical Support Providers and Distributors Do not touch the white calibration bar If the power cord ...

Страница 14: ...to an AC electrical wall outlet Only use the power supply adapter included with the unit Installing Batteries Optional Place the analyzer on its side and remove the battery cover by pressing down on the tab and pulling out Place the 6 new alkaline AA size batteries into the analyzer Replace the battery cover and turn the instrument back onto its base The best temperature for using the instrument i...

Страница 15: ...trip or Clinitest immunoassay cassette One side is used for a strip test and the other side is used for a cassette test 6 7 8 Set Up Interfacing to a Computer The instrument can send results to a computer via the serial port located on the back of the analyzer This requires a 9 pin null modem serial cable that can be purchased separately at an electronics store or from your Siemens Representative ...

Страница 16: ...f Care POC Clinitek Status analyzers Refer to the Clinitek Status Connect System Operator s Guide Analyzer Software Upgrades From time to time Siemens will add new features and make improvements to the Clinitek Status instrument software These software updates will be available on an electronic memory card which is inserted into the software update socket This socket is located under the printer c...

Страница 17: ...ng wall and through the printer Once you have approximately 4 inches or 10 cm of paper through the printer then feed the edge of the paper through the printer cover 6 Push the paper holding arm down in to the closed position 7 Close the printer and paper roll covers by clicking them into position The analyzer is set up to automatically print the results to turn off the automatic print function see...

Страница 18: ... be visible 2 Write the serial number and installation date on the Warranty Registration Card After the instrument has been successfully installed complete the information on the Warranty Registration Card and return the card to your local Siemens office for a contact list see Appendix A Local Technical Support Providers and Distributors 12 Set Up ...

Страница 19: ... The analyzer will run an automatic system diagnostic test each time it is turned on If this is the first time you have turned on the analyzer you will be led through a Start Up Wizard a quick set up procedure If you require further instruction regarding the Start Up Wizard see Section 3 page 3 1 Powering Up Powering Up ...

Страница 20: ...is no strip or cassette on the test table the door will close and the analyzer will switch off If a strip or cassette is still on the test table the test table will be pushed out and the analyzer will turn off The test table will remain out In order to retract the test table into the analyzer turn the analyzer on and then off without a strip or cassette on the test table Do not push the test table...

Страница 21: ...elect screen It displays the time and date and indicates the 5 possible actions Instrument Set Up Recall Results QC Test Cassette Test Strip Test Each screen that follows the Select screen has an icon title bar and touch sensitive active areas In some cases the screen will also display instructions messages or error messages The icon indicates the main section in which you are working 1 of the 5 s...

Страница 22: ...h a filled circle is the current selection To change your selection touch an unfilled circle The newly selected circle button will now be highlighted You then touch the Next button to move to the next screen If a touched area does not respond as expected slide your finger across the appropriate selection area Use of anything hard or pointed on the touch screen may cause damage In order to proceed ...

Страница 23: ...rrows on the right side of the screen to scroll through the list of information on the left side of the screen Once the information on the left side of the screen is highlighted touch the Select button to confirm your selection and move to the next screen If there are double arrows on the screen these arrows when touched will take you to the top or bottom of the page When an option can be selected...

Страница 24: ... 123 button to get to the numeric keyboard Touch the ABC button to get to the alphabetic keyboard To type in a name number birth date etc touch the appropriate button Your selections will appear in the data entry box If you switch between keyboards all values will be retained in the data entry box on both keyboard screens Keyboards Data Entry Box Back Space Erase key Confirm data entries Creates b...

Страница 25: ...Screen The maximum number of characters allowed is 32 An audible tone will sound when you have exceeded the maximum number of characters Once you have finished entering the information touch Enter from either keyboard screen Keyboards ...

Страница 26: ...2 6 ...

Страница 27: ...e analyzer with your choice of settings The Start Up Wizard will allow you to select the following settings Language Date and time Preferred test sequence e g Quick Test or Full Test Type of urinalysis strip Results format Once you have selected your choices the analyzer will display a Confirmation screen which allows you to check that your preferences are correct If you require further instructio...

Страница 28: ...3 2 ...

Страница 29: ...ard Also have the test strip urine sample and paper towel ready Touch the START button If you require more information regarding use and storage of test strips please refer to the strip package insert If you would like the steps for urinalysis testing to be shown on the screen then touch Help Quick Tests BIOHAZARD Wear personal protective equipment Use universal precautions Refer to Appendix H for...

Страница 30: ...remaining to complete the steps You have 8 seconds to complete the following four steps 1 Dip the reagent strip into the urine sample wetting all pads Immediately remove the strip from the urine NOTE Do not dip the automatic identification band or color band in the urine sample 2 Drag the edge of the strip against the side of the sample container as you remove it Quick Tests ...

Страница 31: ...ll automatically be pulled into the analyzer Do not lay the pads on the paper towel or cover the pads by the paper towel The Clinitek Status analyzer will perform an automatic calibration each time a test is run Be sure not to move or bump the table while the instrument is calibrating Quick Tests NOTE A warning message displays if you are not using a Siemens reagent strip Press OK to continue The ...

Страница 32: ...otherwise the Results screen will appear The date time and test sequence number will be printed along with the test results Not Entered will be printed next to Color and Clarity If the results are positive an asterisk will appear next to the results if mark positive results was selected in Instrument Set Up Quick Tests The Analyzing screen will be displayed when the calibration has been completed ...

Страница 33: ... test results touch More on the screen If you are using reagent strips with a color strip or auto identification band you can view Sample Interference notes about this test From the Results screen touch Notes If Sample Interference notes are generated for this test the Interference notes screen displays Touch the up and down arrows to scroll through the notes Touch Done to return to the main Resul...

Страница 34: ...me of the actual test If you enable the sample interface notes then recall the test results the analyzer generates Sample Interference Notes for this patient test If the analyzer has not been set up to automatically print the test results touch Print to have the results printed The results will automatically be sent to the connected PC if this option is set up in the analyzer If you require furthe...

Страница 35: ... laboratory supervisor or physician Touch Done to complete the test and return to main Select screen The results will be displayed on the screen for 2 minutes After this time elapses the display will return to main Select menu Touch Done to return the Strip Test Prepare screen You are ready to start the next test If testing is complete touch Back key to return to the Select menu Quick Tests ...

Страница 36: ...teps for cassette testing to be shown on the screen then touch Help Bring the test cassette and patient sample to room temperature 20 C to 30 C 68 F to 86 F prior to testing Please refer to the Clinitest hCG cassette test package insert for more information regarding use and storage of test cassettes Quick Tests BIOHAZARD Wear personal protective equipment Use universal precautions Refer to Append...

Страница 37: ...uch START button The next screen that appears is another Prepare Test This screen prompts you through the steps to prepare the cassette test A timer displays how much time you have remaining to complete the steps Once you touch the START button you have 8 seconds to draw the urine sample into the pipette and add the urine sample into the well on the cassette Quick Tests ...

Страница 38: ... to the line marked on the pipette approximately 0 2 mL 2 Add entire contents of the pipette into the sample well of the test cassette At the end of the 8 second countdown the test table and cassette will automatically be pulled into the instrument Do not push or pull the test table Quick Tests ...

Страница 39: ...s begun The Clinitest hCG test results are either negative positive or borderline The analyzer takes approximately 5 minutes to confirm a negative result If the result is a clear positive the analyzer will report it sooner If the result is borderline then you should retest with a new sample in 48 to 72 hours Please refer to the Clinitest hCG cassette test package insert for complete instructions f...

Страница 40: ...the analyzer s printer The results will automatically be sent to the connected PC if this option is set up in the analyzer Remove the used cassette and dispose of it according to your standard laboratory procedures Report the results to a laboratory supervisor or physician Touch Done to complete the test and return to main Select screen If the result is positive an asterisk will appear next to the...

Страница 41: ...cess is identical to a Quick Strip Test Testing is started from the main Select screen Touch Strip Test to conduct a Siemens urinalysis strip test If you require further instruction regarding the procedures required for running a Siemens Healthcare Diagnostics urinalysis strip test see Section 4 Quick Tests Full Tests BIOHAZARD Wear personal protective equipment Use universal precautions Refer to ...

Страница 42: ...this operator then touch the Last Operator button to proceed Option 2 Enter New Operator Name In order to enter the information for a new operator touch Enter New Operator Name button The next screen that is displayed is Enter Operator Name Use the keyboards to enter Operator Name using a maximum of 13 characters Touch Enter when you have finished entering the Name and to move to the next screen F...

Страница 43: ...esults will appear on the screen Use the up and down arrow buttons to scroll through the list of patients The most recently performed test will be shown at the top Once the patient is highlighted touch Select button The next screen will be Prepare Test A total of 950 patient tests can be stored in the analyzer The tests are listed in chronological order When the limit of 950 has been reached the o...

Страница 44: ...ext screen displayed is Enter Patient Name Use the keyboards to enter Patient Name using a maximum of 20 characters Touch Enter when you have finished entering the patient s name and to proceed to the next screen If you require further instruction regarding keyboard usage see Section 2 Interacting with the Touch Screen Full Tests ...

Страница 45: ...ction 2 Interacting with the Touch Screen The next screen displayed is Patient Identification Use the keyboards to enter Patient Identification using a maximum of 13 characters Touch Enter when you have finished entering the patient s ID and to proceed to the next screen Full Tests ...

Страница 46: ... yellow and clear touch the Yellow and Clear button If the urine sample is not yellow and clear touch the Other button for more choices If you touched the Other button select the appropriate color by touching the circle button that corresponds to the correct description NOTE You can select only one color for a urine sample If you require further instruction regarding the procedures for running a S...

Страница 47: ...There is a time indicator on the Select Appearance screen that is counting down the time remaining in the analysis of the strip After color and clarity have been entered the next screen displayed will either be Analyzing if the strip is still being analyzed Results if analyzing the strip has been completed Full Tests ...

Страница 48: ...t strip number and begin the test touch Use Last Lot To enter new strip data touch Enter new lot and expiration The Strip Lot screen displays 3 Enter the strip lot number Use the alpha keyboard to enter text To enter numeric text touch 123 4 Select Enter The Strip Expiration screen displays 5 Use the arrow keys to indicate the strip expiration date 6 Touch Enter The Prepare Test screen displays 7 ...

Страница 49: ... mark positive results was selected in Instrument Set Up The test results displayed on the screen and the printout will include the following information Patient Name ID or both Type of strip used Test date Time Operator Test Number Color Clarity Results Sample Interference Notes Full Tests ...

Страница 50: ... further instruction regarding the procedures for running a Siemens Clinitest immunoassay test see Section 4 Quick Tests Testing is started from the main Select screen Touch Cassette Test to conduct an hCG pregnancy test The next screen that appears is Operator Name There are two options under Operator Name Last Operator or Enter New Operator Name Full Tests BIOHAZARD Wear personal protective equi...

Страница 51: ...rator Name Use the keyboards to enter Operator Name using a maximum of 13 characters Touch Enter when you have finished entering the name and to move to the next screen Full Tests If you require further instruction regarding keyboard usage see Section 2 Interacting with the Touch Screen Option 1 Last Operator If this option is enabled the last operator that entered his her Name will be displayed o...

Страница 52: ...o scroll through the list of patients The most recently performed test will be shown at the top Once the patient is highlighted touch the Select button The next screen will be Test Type A total of 950 patient tests can be stored in the analyzer The tests are listed in chronological order When the limit of 950 has been reached the oldest test will be deleted from the analyzer Deleted information ca...

Страница 53: ...he next screen displayed is Enter Patient Name Use the keyboards to enter Patient Name using a maximum of 20 characters Touch Enter when you have finished entering the patient s name and to move to the next screen Full Tests If you require further instruction regarding keyboard usage see Section 2 Interacting with the Touch Screen ...

Страница 54: ...nter Patient Identification using a maximum of 13 characters Touch Enter when you have finished entering the patient s ID and are ready to proceed to the next screen Full Tests If you require further instruction regarding keyboard usage see Section 2 Interacting with the Touch Screen ...

Страница 55: ...nt Name ID or both Type of Clinitest cassette test Test date Time Operator Test Number Result If the result is positive an asterisk will appear next to the result if mark positive results was selected in Instrument Set Up Full Tests If you require further instruction regarding the procedures for running a Clinitest hCG cassette test see Section 4 Quick Tests ...

Страница 56: ...4 28 ...

Страница 57: ...e characters you enter will be displayed as asterisks Touch Enter to proceed to a list of settings Settings Use the up and down arrows to scroll through the Choose Settings screen Touch Select when you have highlighted the setting you want to change Touch Done to return to the main Select screen If no customizing is desired the analyzer will automatically be programmed with default settings to vie...

Страница 58: ...questing you to confirm your decision Touch No to continue with same language and retain current settings The display will return to Choose Settings Touch Yes to change the language Language Settings Changing the language will delete all results from the memory change the instrument settings to the defaults for the new language default settings are listed in Appendix D Instrument Default Settings ...

Страница 59: ...ssword and return to Choose Settings Touch Done to return to main Select screen Remove Password Once a password has been entered the option will change from Set Password to Remove Password Highlight the Remove Password option and touch Select The option displayed will change to Set Password and a password will no longer be needed to access Instrument Set Up Touch Done to return to the Select Menu ...

Страница 60: ...rmation required The test will be identified by a sequential test number when the results are displayed or printed Full Test The operator will be prompted to enter the following data during testing Operator Name Patient s Name Patient Identification Sample Appearance Color and Clarity of urine sample when testing with a urinalysis strip Custom Set Up This allows you to customize the data to be ent...

Страница 61: ...Settings screen touch a round button in the box of the preferred test sequence Then touch Next for test sequence confirmation Touch Done on the Input Settings screen to return to the Choose Settings screen Operator and Patient Information ...

Страница 62: ...g and highlighting a round button for each category Proceed through all 5 screens by touching Next at the bottom of each screen Screen 1 of 5 Operator Name allows you to choose whether Operator Name will be required for running a test Enabled on or Disabled off Keypad priority allows you to select either the Numeric or Alphabetic keyboard to be presented as the first keyboard during data entry Ope...

Страница 63: ...n the list of results Last Operator s Name displayed allows you to choose whether a Select Last Operator option is available to the user when you are prompted to enter an Operator Name during Strip or Cassette Testing Enabled on or Disabled off Operator and Patient Information A total of 950 patient records can be stored in the analyzer When the limit of 950 has been reached the oldest test will b...

Страница 64: ...en 5 of 5 Custom Field allows you to name the custom field in order to customize data entry To name the custom field touch the Enter Custom Field box The next screen displayed is Enter Custom Field Use the keyboards to enter a custom field e g Physician Name Touch Enter to return to the Custom Settings screen Operator and Patient Information If you require further instruction regarding keyboard us...

Страница 65: ...next to Disabled off to deactivate the custom setting Touch Previous to scroll back through custom setting screens to review Touch Next to proceed to the Input Settings screen which will provide a list of the selections made in Custom Set Up Touch Done to confirm and return to the Choose Settings screen Operator and Patient Information ...

Страница 66: ...m mode Setting and Customizing Urine Colors You can choose from one of 10 instrument provided colors and add up to 4 customized colors to patient test results To include instrument provided colors perform the following steps 1 At the Select screen touch Instrument Set Up The Choose Settings screen displays 2 Use the arrow keys to select Operator and Patient information 3 Touch Select The Input Set...

Страница 67: ...Sample Appearance Select colors screen 3 of 3 displays 12 Touch Next 3 times The Input Settings Confirmation screen displays 13 Touch Done twice to return to the Select screen Adding Customized Colors To enter up to 4 custom colors perform the following steps 1 At the Sample Appearance Select colors screen 3 of 3 touch Enter custom color 1 2 3 or 4 corresponding to each custom color 2 Enter the cu...

Страница 68: ...ce Select Colors screen 3 of 3 4 Touch Next 3 times The Input Settings Confirmation screen displays 5 Touch Done twice to return to the Select screen Managing Strip Lot Number and Expiration Date You can enter the strip lot number and expiration date and associate this information with each patient record Once entered the information is retained for the next test or you can enter a new lot number ...

Страница 69: ...ument Settings 3 Touch Enter The Instrument Settings screen displays 4 Use the arrow keys to select Urinalysis Test Settings 5 Touch Select The Urinalysis Test Settings screen displays 6 Touch Next The Urinalysis Test screen displays 7 To prompt for strip information before each test touch Enabled To bypass a prompt to enter strip information before each test touch Disabled 8 Touch Done 3 times to...

Страница 70: ...e date and time to the correct values Touch AM or PM if you are in the 12 hour time format Touch Set to confirm your choices and move to the next screen If the format is not correct for your workplace for example you prefer DD MM YY to MM DD YY or 24 hour clock to 12 hour clock touch Choose Format The next screen displayed is Choose Format Touch the round button that corresponds to your choice of ...

Страница 71: ... display will show the date and time in the formats selected Select Set to confirm your choices and return to the Choose Settings screen The AM and PM selections will not be available if the time is in the 24 hour format Date and Time Settings ...

Страница 72: ...st number Touch the Reset to 0001 round button if you would like to reset the numbers to start at 0001 for the next test Touch Done to confirm the reset or to leave the screen if you have not selected the option to reset the number You will return to the Choose Settings screen Test Sequence Number Test Sequence Number ...

Страница 73: ...rrows to highlight a setting item and touch Select Results Format This allows you to select the format in which you would like the results to be displayed and printed Choose Format Screen 1 of 2 Units Selection allows you to select the format in which you would like results by touching the round button next to the appropriate type of format NOTE Nordic units are only available in English and Swedi...

Страница 74: ...normal system and the Plus System Screen 2 of 2 Mark Positive Results allows you to choose whether positive results should be marked with an asterisk see Appendix B for results to be shown as positive Touch the round button next to Yes to mark and record positive results These will be marked on the display on a printout and when the data is transferred to a host computer Touch No and positive resu...

Страница 75: ...cally They can be printed by touching the Print selection area on the Results screen Off Test results will not be printed Power Save allows you to enable and disable this feature If the instrument is powered from an electrical outlet and is not used for 5 minutes you may choose to have the test table retract and the instrument power down When it is powered by batteries Power Save is always enabled...

Страница 76: ...l be made by the instrument Key clicks only Audible clicks will be heard when the user touches an active button or key Display Contrast This allows the contrast of the display to be increased or decreased to suit the work area in which it is being operated Use the up and down arrows to sample the contrast settings and touch Select to set and return to the Instrument Settings screen Instrument Sett...

Страница 77: ...PC If enabled the system automatically sends both new and recalled patient tests to a host or LIS To automatically send new and recalled patient results to the LIS or a PC directly connected to the system touch Enabled To prevent sending new and recalled patient results to the LIS or PC touch Disabled NOTE If there is no connector Siemens recommends setting the connector to Disabled setting Settin...

Страница 78: ...esults sent to the computer Touch Edit Connectivity Settings and a series of 3 screens for Connectivity Settings will allow you to edit the settings Connectivity Settings Screen 1 of 3 Baud rate Touch a round button to select the correct Baud rate and Next to move to the next screen If you have enabled the upload capability you will need to ensure that the connectivity settings are correct for the...

Страница 79: ...y rate and Next to move to the next screen Screen 3 of 3 Stop Bits Touch a round button to select the number of Stop Bits Select Urinalysis Test This displays a list of some of the Siemens Healthcare Diagnostics urinalysis strips which can be used with the Clinitek Status analyzer Instrument Settings ...

Страница 80: ...turn to the main Select screen Do not use any reagent strip product other than what is shown on the display Using the wrong Reagent Strip will give you incorrect results Some strips do not appear on the list e g Clinitek Microalbumin 2 The analyzer will automatically identify them through the color ID band on the strip You do not need to select a type of Clinitest immunoassay cassette within Instr...

Страница 81: ...e Instrument Settings screen displays 4 Use the arrow keys to select Urinalysis Test Settings 5 Touch Select The Urinalysis Test screen displays 6 Touch Edit reported chemistries The Reported Chemistries screen 1 of 2 displays 7 To remove a selected test from reported results touch the button for that test To include a test in reported results touch that test s button again 8 Touch Next to advance...

Страница 82: ...printed or displayed with patient results If you wish to associate the Operator s Name with patient results enable Operator Name in Custom Settings Operator screen 1 of 5 CAUTION Once the Operator ID and Operator Name settings are made do not change the Operator ID setting If you change the Operator ID setting all patient results are erased Setting Operator IDs To set up operator IDs perform the f...

Страница 83: ... instrument uses the operator list sent by the LIS do not power down the system If the connector loses power the operator names are erased NOTE The operator list sent by the LIS overwrites an operator list entered via the analyzer Adding Operator IDs To add operator IDs perform the following steps 1 At the Authorized operator screen touch Add operator 2 Enter the new Operator ID Use the alpha keyb...

Страница 84: ...llow this operator to recall results touch elect Enabled To prevent recall results touch Disabled 10 To allow this operator to set up the instrument touch Enabled To prevent instrument setup touch Disabled 11 Touch Done twice The Authorized Operator Operators list screen displays 12 Touch Exit 13 Touch Done 3 times to return to the Select Ready screen Instrument Settings Viewing Editing Printing a...

Страница 85: ...ors list screen displays 4 Use the arrow keys to select the operator you want to delete or edit 5 To delete that operator touch Delete entry To edit or delete that operator touch Select The Authorized operator screen displays Refer to Adding Operator IDs above Step 6 6 To print all operators touch Print NOTE The system prints the first 100 operators listed alphabetically 7 To return to the Authori...

Страница 86: ...text To customize the printout perform the following steps 1 At the Select Ready screen touch Instrument Set Up The Choose Settings screen displays 2 Use the arrow keys to select Instrument Settings 3 Touch Select The Instrument Settings screen displays 4 Use the arrow keys to select Printer Settings 5 Touch Select The Printer Settings Included in print out screen 1 of 4 displays Instrument Settin...

Страница 87: ... Up Custom Header screen 3 of 4 displays 10 To include a custom header in the printout touch Enabled To exclude a custom header touch Disabled 11 To edit or create line 1 of a custom header touch Enter Line 1 The Custom Header screen displays 12 Enter custom header text Use the alphabetic keyboard to enter text To enter numeric text touch 123 13 Touch Enter The Printer Settings Set Up Custom Heade...

Страница 88: ...rference notes touch Enabled To disable printing sample interference notes touch Disabled NOTE If you select External printer sample interference notes are automatically sent to the printer 18 Touch Done 3 times to return to the Select Ready screen NOTE To use an external printer you must connect and enable the Clinitek Status connector Quality Control For QC instructions refer to the Clinitek Sta...

Страница 89: ...rn the analyzer to the settings listed Touch Yes to confirm your decision or No to maintain the current settings of your analyzer You will then return to the Restore screen Select Exit to return to Choose Settings Restore Default Settings When the original settings are restored all results and patient data will be deleted from the memory Restore Default Settings ...

Страница 90: ...our local representative The representative will lead you through the test procedures see Appendix A for Local Technical Support Providers and Distributors Diagnostics This option lists 7 diagnostic tests which can be conducted Display Touch Screen Printer Test Table Light Source Electronics Check Cassette ...

Страница 91: ...ch Instrument Set Up The Choose Settings screen displays 2 Use the arrow keys to select Sample Notes 3 Touch Select The Notes Settings screen displays 4 To enable Sample Interference Notes touch Enabled To disable Sample Interference Notes touch Disabled 5 Touch Done twice to return to the Select screen Sample Interference Notes ...

Страница 92: ...ormation about your analyzer Touch System Configuration to view details of the current system configuration This screen will show the current settings for all the items which can be changed within the Input Settings and Instrument Settings screens Scroll through the list using the up and down arrows to view the details and print the information if required Select Done once to return to System Info...

Страница 93: ...5 37 5 Instrument Set Up This completes the settings and choices within Instrument Set Up Touch Done to return to the main Select screen System Information ...

Страница 94: ...5 38 ...

Страница 95: ...most recent test result is displayed at the top of the screen and is highlighted Use the up and down arrow keys to scroll through the list of patient tests and highlight the patient you would like to recall To view details of a patient result touch the Select button The results will automatically be sent to the connected computer if this option is set up in the analyzer Patient Results Patient Res...

Страница 96: ...ton will be present on the screen If you would like to print the results touch the Print button Any information that was entered in regard to the patient will be included on the printout When you are finished viewing the patient s results touch Done You will return to the Select Test Results screen Press Exit to return to the main Select screen Patient Results ...

Страница 97: ...r has been connected to the analyzer all results can be sent to the computer by touching the Send all data button Sending Data to a PC Sending Data to a PC If you are using a Clinitek Status connector refer to the Clinitek Status Connect System Operator s Guide ...

Страница 98: ...6 4 ...

Страница 99: ...rrected to enable testing of samples but do not prevent other instrument functions from being used You will need to carry out the corrective action to enable testing Advisory Messages Errors of less importance will be presented via a message on the main Select screen when this screen is next displayed When you have taken corrective action the message will be removed from the display If more than o...

Страница 100: ...l Roll Dashes in Displays Dashes are displayed in the Results screens and on printouts when no text has been entered for a field enabled in Instrument Set Up Dashes may appear next to Color and Clarity on test result printouts This occurs when the instrument is powered by batteries Color and Clarity are selected in the Instrument Set Up but no selections have been recorded on the Select Appearance...

Страница 101: ...r number b Completed Problem Checklist found at the end of this section For customer support please contact your local technical support provider or distributor for contact information please see Appendix A Local Technical Support Providers and Distributors Warranty Your Clinitek Status analyzer has a one year warranty period This warranty is designed to protect you from the cost associated with r...

Страница 102: ...he test table in place contact your local representative contact information is given in Appendix A Failure of test table E10 or E48 E02 Contact your local representative contact information is given in Appendix A Failure of calibration data E23 Replace the batteries a To view instructions on the display touch the Error Report selection area or b To use the instructions in this manual see page 1 2...

Страница 103: ...mens cassette Invalid barcode E53 Repeat the test using the Cassette Test routine see page 4 6 or 4 19 Strip Test selected but cassette detected E54 Repeat the test using the Strip Test routine see page 4 1 or 4 11 Cassette Test selected but strip detected E56 Repeat the test using the correct test table see page 4 1 Incorrect size test table E57 Repeat the test ensuring that the strip or cassette...

Страница 104: ...mple E69 Strip quality problem When performing the quality check the strip quality failed This means that the strip was not shipped or stored in the proper humidity temperature or light conditions 1 Remove the defective strip and discard 2 Repeat the test ensuring the strip meets quality requirements 3 Repeat the test using a new test strip E58 Repeat the test ensuring that the strip is correctly ...

Страница 105: ...Error Code Description Action E03 E04 E05 E06 E07 E08 E21 E22 E90 E91 E92 or E93 Contact your local representative contact information is given in Appendix A Failure of computer software Lists of Errors and Advisory Messages ...

Страница 106: ...___________________________________ 3 Does the test table move out to the load position when the analyzer is first turned on 4 If Question 3 is NO Is the power cord plugged into a live electrical outlet into the transformer and then into the analyzer If using batteries are they fully charged and correctly placed in the analyzer 5 Does the display show the Select screen or the Results screen as exp...

Страница 107: ..._ _ _ _ _ _ _ _ _ _ _ _ _ _ _ _ _ _ _ _ _ _ _ _ _ _ _ _ _ _ _ _ _ _ _ _ _ _ _ _ _ _ _ _ _ _ _ _ _ _ _ _ _ _ _ _ _ _ _ _ _ _ _ _ _ _ _ _ _ _ _ _ _ _ _ _ _ _ _ _ _ _ _ _ _ _ _ _ _ _ _ _ _ _ _ _ _ _ _ _ _ _ _ _ _ _ _ _ _ _ _ _ _ _ _ _ _ _ _ _ _ _ _ _ _ _ _ _ _ _ _ _ _ _ _ _ _ _ _ _ _ _ _ _ _ _ _ _ _ _ _ _ _ _ _ _ _ _ _ _ _ _ _ _ _ _ _ _ _ _ _ _ _ _ _ _ _ _ _ _ _ _ _ _ _ _ _ _ _ _ _ _ _ _ _ _ _ _ _ _ ...

Страница 108: ...7 10 ...

Страница 109: ...presentative for additional information on performing QC testing Quality Control for Cassette Testing It is recommended that quality control specimens be used with each new reagent box opened Water should NOT be used as a negative control Contact your Siemens representative for additional information on performing QC testing Refer to the quality control product insert for expected values for each ...

Страница 110: ...8 2 ...

Страница 111: ...g of Test Table when Required 1 Remove the test table by pulling it slowly out of the analyzer Lift the test table insert from the test table drain the drip tray if necessary 2 Wet a cotton tipped stick with water and carefully clean test table except for white calibration bar Do not autoclave the test table or test table insert Cleaning Cleaning BIOHAZARD Wear personal protective equipment Use un...

Страница 112: ...ration bar with the white calibration bar facing upwards Push the test table firmly but slowly just over halfway into the analyzer 5 Replace the test table insert Cleaning Care should be taken not to scratch the white calibration bar Instructions for cleaning the white calibration bar are given later in this section Do not push the test table fully into the analyzer as the test table may become ja...

Страница 113: ...t and or test table into the solution making sure the white calibration bar on the test table remains above the liquid level 3 Soak the table and insert for a minimum of 2 minutes and maximum of 10 minutes Do not soak longer than 10 minutes 4 Rinse the test table and insert thoroughly with water 5 Dry with a soft cloth and replace test table and table insert in the analyzer as described on the pre...

Страница 114: ...orm as intended and provide reliable test results it is recommended that you regularly check the white calibration bar on the test table and always check it after a strip jam In normal use the white calibration bar should not become dirty or discolored Cleaning the White Calibration Bar 1 Remove the insert from the test table 2 Remove the test table by pulling it slowly out of the analyzer 3 Check...

Страница 115: ... opposite the white calibration bar with the white calibration bar facing upwards Push the test table firmly but slowly just over half way into the analyzer 5 Replace the test table insert 6 If the white calibration bar is dirty or discolored gently wipe and clean it with a new cotton tipped stick or lint free cloth wetted with distilled water 7 Allow the calibration bar to air dry and then inspec...

Страница 116: ... cleaner directly onto the screen Do not use laboratory wipes such as Kimwipes since they may scratch the screen Care should be taken to avoid liquid from entering the printer compartment The display may be disinfected using the same solutions as for the test table see earlier in this section Wipe the solution on and allow to remain for 10 minutes Wipe clean using a clean cloth dampened with water...

Страница 117: ... be shown in the top right corner of the title bar when the analyzer is being powered by batteries The number of segments displayed represents the amount of power remaining in the batteries When power is reduced but testing can continue an advisory message will be displayed on the main Select screen NOTE The printout may be lighter if the analyzer is using battery power If you do not change the ba...

Страница 118: ...r Next place the analyzer on its side and remove the battery cover by pressing down on the tab and pulling out Remove current batteries Place 6 new AA size batteries into the analyzer Replace the battery cover and turn the instrument back onto its base Changing Batteries ...

Страница 119: ...ervice contact your local technical support provider Siemens Healthcare Diagnostics Authorized Representative Siemens Healthcare Diagnostics Ltd Sir William Siemens Sq Frimley Camberley GU16 8QD UK Siemens Healthcare Diagnostics Ltd Sir William Siemens Sq Frimley Camberley GU16 8QD UK Siemens Healthcare Diagnostics Inc Tarrytown NY 10591 5097 USA Siemens Healthcare Diagnostics Inc 511 Benedict Ave...

Страница 120: ... Difference Negative Small Negative 1 Trace lysed Moderate Trace lysed 2 Occult Blood BLO Trace intact Large Trace intact 3 5 0 6 5 8 0 5 5 7 0 8 5 pH pH 6 0 7 5 9 0 No Difference Negative 100 Negative 2 PRO mg dL 15 300 Low 3 Protein Multistix PRO CT Malb 9 30 1 Negative 100 Negative 2 PRO mg dL Trace 300 Trace 3 Protein All other urinalysis strips 30 1 0 2 4 0 1 0 8 0 Urobilinogen URO E U dL 2 0...

Страница 121: ...mal System Plus System 30 300 Abnormal 300 High Albumin Creatinine CT Malb 9 A C mg g Normal Dilute 30 Normal Abnormal No Difference Normal Dilute 300 Abnormal Normal 500 Abnormal Protein Creatinine Multistix PRO P C mg g 150 Abnormal No Difference Normal Dilute Normal Protein Creatinine CT Malb 9 P C mg g 300 Abnormal 1500 Abnormal 3000 Abnormal 5000 Abnormal No Difference Reported Results Test A...

Страница 122: ...od BLD Ery µL Trace intact Ca 200 Trace intact 3 5 0 6 5 8 0 5 5 7 0 8 5 pH pH 6 0 7 5 9 0 No Difference Negative 1 0 Negative 2 0 15 3 0 Low 3 Protein Multistix PRO CT Malb 9 PRO g L 0 3 1 Negative 1 0 Negative 2 Trace 3 0 Trace 3 Protein All other reagent strips PRO g L 0 3 1 3 2 66 16 131 Urobilinogen UBG µmol L 33 No Difference Nitrite NIT Negative Positive No Difference Negative Ca 125 Negati...

Страница 123: ...Results Reported Results Test Abbreviation Normal System Plus System hCG Negative hCG Positive Human Chorionic Gonadotropin hCG Borderline hCG level Test fresh sample in 48 72 hours No Difference Reported Results Test Abbreviation Units Normal System Plus System Normal Dilute 33 9 Abnormal Normal 56 6 Abnormal Protein Creatinine Multistix PRO P C mg mmol 17 0 Abnormal No Difference Normal Dilute N...

Страница 124: ...1 No Difference Negative 2 Negative 2 3 Trace 3 Protein All other reagent strips PRO 1 1 3 2 66 16 131 Urobilinogen URO µmol L 33 No Difference Nitrite NIT Negative Positive No Difference Negative 3 Negative 2 1 4 Trace 3 Leukocytes LEU 2 1 10 80 Albumin ALB mg L 30 150 No Difference 0 9 17 7 4 4 26 5 Creatinine CRE mmol L 8 8 No Difference 3 4 Normal 33 9 High Abnormal Albumin Creatinine Clinitek...

Страница 125: ...ey will be marked by asterisks when displayed when printed and when the data is transferred to a host computer Clinitek Microalbumin 9 Appendix B Tables of Results Reported Results Test Abbreviation Units Normal System Plus System hCG Negative hCG Positive Human Chorionic Gonadotropin hCG Borderline hCG level Test fresh sample in 48 72 hours No Difference ...

Страница 126: ...midity non condensing Appendix C Specifications Optimum Operating Temperature Range 22 C to 26 C 72 F to 79 F Optimum Operating Humidity Range 35 to 55 Relative Humidity non condensing Optimum ranges insure that the reagent results are optimized for performance At temperatures under 22 C 72 F urobilinogen and leukocyte results may be decreased and at temperatures above 26 C 79 F increased Altitude...

Страница 127: ...s and can radiate radio frequency energy and if not installed and used in accordance with the instruction manual may cause harmful interference to radio communications Operation of this equipment in a residential area is likely to cause harmful interference in which case the user will be required to correct the interference at his own expense The instrument is listed by the Underwriters Laboratori...

Страница 128: ...d Sample Appearance Disabled Custom Data Entry Disabled Date Format MM DD YYYY Appendix D Instrument Default Settings English Time Format 12 hour Results Format Units Selection Conventional Plus System Disabled Mark Positive Results Disabled System Settings Printer Automatic Power Save Disabled Sound On Contrast Setting 0 zero Connectivity Allow Results to be Sent to PC Enabled Instrument Serial N...

Страница 129: ...10 11 10 Appendices Baud Rate 115200 Parity None Stop Bits 1 one Urinalysis Test Selected Multistix 10 SG Appendix D Instrument Default Settings English Sample Notes Enabled Authorized Operator Disabled ...

Страница 130: ...the pad and is directly related to the concentration of the particular constituent in the urine The analyzer s optical system images the entire strip i e all reagent pads at once When using a Clinitest immunoassay cassette the detector will scan the read area for the test reference and control lines that form after urine has been applied The reference and control lines will always form whereas the...

Страница 131: ...n pulls completely into the instrument closing the shutter and the cassette read area is scanned at two wavelengths The test and references readings are then used to determine presence or absence of hCG the urine sample Differences between the Human Eye and Instrumental Optics There are inherent differences between the colors that are perceived by the human eye and that are detected by any instrum...

Страница 132: ...10 14 10 Appendices Appendix E System Overview Principles ...

Страница 133: ...10 15 10 Appendices Appendix E System Overview Principles ...

Страница 134: ...10 16 10 Appendices Appendix E System Overview Principles ...

Страница 135: ...10 17 10 Appendices Appendix E System Overview Principles ...

Страница 136: ... control strips are available for use in your training program for routine urine strip testing for supply information see Appendix A Local Technical Support Providers and Distributors Follow the package insert for instruction on preparation and testing Appendix F Training Educational Materials ...

Страница 137: ... by components detected in the urine sample Depending upon the strip and sample Sample Interference Notes include the following High SG may cause falsely lowered GLU results Elevated GLU may cause falsely lowered LEU results Visibly bloody urine may cause falsely elevated PRO results High SG may cause falsely lowered LEU results High pH may cause falsely elevated PRO results ...

Страница 138: ...other body fluids The following are the major sources of contamination when handling potentially infectious agents needlesticks hand to mouth contact hand to eye contact direct contact with superficial cuts open wounds and other skin conditions that may permit absorption into subcutaneous skin layers splashes or aerosol contact with skin and eyes To prevent accidental contamination in a clinical l...

Страница 139: ...insing coffee cups or washing hands Do not recap purposely bend cut break remove from disposable syringes or otherwise manipulate needles by hand Needlestick injuries may result References 1 Centers for Disease Control Update Universal precautions for prevention of transmission of human immunodeficiency virus hepatitis B virus and other bloodborne pathogens in healthcare settings 1988 MMWR 37 377 ...

Страница 140: ... Bilirubin Blood Occult Creatinine Glucose Ketone Leukocytes Nitrite pH Protein Protein to Creatinine Ratio Albumin to Creatinine Ratio Specific Gravity Urobilinogen and human Chorionic Gonadotropin hCG These measurements are used to assist diagnosis in the following areas Kidney Function Urinary tract infections Metabolic disorders e g diabetes mellitus Liver Function Pregnancy Tests performed us...

Страница 141: ...ror messages 7 4 Cleaning disinfect the test table and insert 9 3 exterior cleaning 9 6 periodic cleaning 9 1 routine cleaning 9 1 Clock error message 7 6 Connectivity 5 21 5 22 Custom field entry 5 6 information 5 6 set up 5 6 D Date and time settings 5 14 5 15 Default restore default settings 5 33 settings 10 10 Diagnostic tests 5 34 display contrast 5 20 E Error s calling for assistance with an...

Страница 142: ...ntification 5 6 Optical system 10 12 P Parity setting 5 23 Password remove password 5 3 set password 5 3 Patient enter new patient identification 4 16 4 17 4 25 information 4 15 4 25 patient identification set up 5 7 recall identification 4 15 4 24 Positive results marked 5 18 Power inlet socket 1 2 on off button 1 8 plugging analyzer in 1 2 save 5 19 supply 1 1 Powering down 1 8 Powering up 1 7 P...

Страница 143: ...g serial plate 1 6 recording serial number 1 6 storing serial number in patient records 5 22 Serial port 1 3 Sound settings 5 20 Specifications of instrument 10 8 Start up wizard 3 1 Stop bits setting 5 23 Strip blot strip 4 3 changing strip type 5 23 dip strip 4 2 holding channel 4 3 preparing a urine strip 4 2 quick strip test 4 1 select strip type 5 23 testing error messages 7 4 Strip Test v Su...

Страница 144: ...11Index 11 4 U Units conventional units 5 17 Unpacking 1 1 Urinalysis test 5 23 5 24 Urine sample clarity 4 19 color 4 18 settings 5 8 visual appearance 4 18 4 19 W Warranty 7 3 registration card 1 6 ...

Отзывы: