background image

46/73 

Building Technologies Division 

Basic Documentation LME39… 

CC1P7106en 


17 Info level 

08.12.2017 

17 Info 

level 

17.1 

Display of info level 


/reset


1…3 s 


Press 

/reset

 until 

InFo

 appears. 

When releasing 

/reset

, you are on the info level. 

 
The info level displays information about the basic unit and operation in general. 


Note! 

On the info level, you can press 

 or 

 to display the next or the previous 

parameter. 

In place of the 

 button, you can also press 

/reset

 for <1 second. 


Note! 

You can press 

ESC

 or 

/reset

 for >8 seconds to return to the normal display. 


Note! 
 

P

V

h min s

%

B

ild

 2

7

e/

08

07

Parameter

Parameter value


Figure 23: Info level


No change of value on the info level. 
 

If the display shows


._._


together with the 

parameter, the value may consist of more than 
5 digits. 

When pressing 

/reset

 for >1 second and  

<3 seconds, the value will be displayed. 

By pressing 

/reset

 for >3 seconds or 

ESC

 , 

you return to the selection of the parameter 
number (parameter number flashes). 


Содержание BPZ:LME39.100C1

Страница 1: ...n 08 12 2017 Building Technologies Division LME39 Gas burner controls Basic Documentation The LME39 and this Basic Documentation are intended for use by OEMs which integrate the burner controls in their products ...

Страница 2: ...ologies Division Basic Documentation LME39 CC1P7106en 08 12 20176 Supplementary documentation ASN Title Documentation no Type of document LME Burner control CC1Q7101 Range overview LME39 Burner control CC1N7106 Data Sheet ...

Страница 3: ...f functions 13 2 1 Use 13 2 2 Features 13 3 Basic unit 14 3 1 Time parameters 14 3 2 Indication and diagnostics 15 3 2 1 Communication parameterization 15 4 Type summary other types on request 16 5 Accessories to be ordered separately 18 5 1 Connection accessories for small burner controls 18 5 2 Service tools 18 5 3 Display and operating units 19 5 4 Flame detector 19 5 5 Actuators 20 5 6 Others ...

Страница 4: ... of LME39 100 32 10 1 Program sequence 32 10 2 Inputs and outputs internal connection diagram 33 10 3 Application examples 34 10 4 Application LME39 100 with LDU11 35 11 Inputs and outputs internal connection diagram program sequence of LME39 400 36 11 1 Program sequence 36 11 2 Inputs and outputs internal connection diagram 37 11 3 Application example 37 12 Legend 38 13 Dimensions 39 13 1 LME39 3...

Страница 5: ...6 End of info level 50 18 Service level 51 18 1 Display of the service level 51 18 2 Display of service values 52 18 2 1 Error history 52 18 2 2 Mains voltage 52 18 2 3 Intensity of flame 52 18 2 4 End of service level 52 19 Parameter level 53 19 1 Entering the password 54 19 2 Changing the heating engineer s password 56 19 3 Changing the OEM s password 58 20 Operating variants of the parameters 5...

Страница 6: ...6 73 Building Technologies Division Basic Documentation LME39 CC1P7106en Contents 08 12 20176 22 1 LME39 100 66 22 2 LME39 400 68 22 3 Table overview 73 ...

Страница 7: ...t be put into operation even if they do not exhibit any damage If this is not observed there is a risk of loss of safety functions and a risk of electric shock Each time work has been carried out mounting installation service work etc check to ensure that wiring and the parameterization are in an orderly state and make the safety checks as described in Commissioning notes If this is not observed t...

Страница 8: ...the burner control fuel valves etc the burner control must not be connected Check the connecting lines of the air pressure switch for short circuits air pressure switch between terminals 2 and 6 If this is not observed there is a risk of loss of safety functions To prevent mixup of different types of burner controls the LME39 must always be used in connection with grey plug in bases AGK11 6 Make a...

Страница 9: ...uired cable features will be available Do not lay the signal cable AGV50 from the LME39 to the AZL2 together with other cables especially high voltage ignition cable Service operation with a longer signal cable from LME39 to AZL2 or from LME39 to OCI410 If a longer signal cable is required for service work for example short time 24 hours note that above usage under the burner hood no longer applie...

Страница 10: ... OCI400 1 6 Electrical connection of flame detectors It is important to achieve practically disturbance and loss free signal transmission Never run detector cables together with other cables Line capacitance reduces the magnitude of the flame signal Use a separate cable Observe the permissible length of the detector cables refer to Technical data The ionization probe and the ignition electrode are...

Страница 11: ...on heating engineer responsible for the plant These data can be printed out with the help of the PC software ACS410 for example or must be written down The documentation must be checked by the expert and then kept in a safe place Warning On the OEM access level of the LME39 it is possible to make parameter settings that differ from application standards When setting the parameters it must be made ...

Страница 12: ...trol systems for burners and appliances burning gaseous or liquid fuels DIN EN 298 Safety and control devices for gas burners and gas burning appliances DIN EN 13611 Automatic electrical controls for household and similar use Part 2 5 Particular requirements for automatic electrical burner control systems DIN EN 60730 2 5 The relevant valid edition of the standards can be found in the declaration ...

Страница 13: ... is not the warranty time specified in the Terms of Delivery 1 10 Disposal notes The unit contains electrical and electronic components and must not be disposed of together with domestic waste Local and currently valid legislation must be observed 2 Makeup of system description of functions 2 1 Use LME39 are used for the startup and supervision of 1 or 2 stage gas or gas burners in intermittent op...

Страница 14: ... All safety related digital inputs and outputs of the system are monitored by means of a contact feedback network The display and operating unit AZL2 is designed for direct connection to the LME39 The LME39 is operated and parameterized via the AZL2 or with the help of the OCI410 ACS410 Burner capacity unlimited thermal output on startup 120 kW 3 repetitions in the event of loss of flame during op...

Страница 15: ...t of some manufacturers 3 2 1 Communication parameterization The display and operating unit AZL2 with LCD and menu driven operation facilitates enable a simple operation parameterization and targeted diagnostics via menu driven operation When making diagnostics the display shows operating states the type of error and the startup counter IBZ Passwords protect the different parameter levels of the b...

Страница 16: ...9 100C2 Requirement 2 5 3 0 3 30 3 2 5 10 0 180 30 30 Setting range Min 0 3 0 0 1 2 0 0 3 1 2 0 0 0 0 Max 37 5 1 5 0 3 1 5 75 37 5 37 5 0 3 75 1237 179 5 75 75 Increments s 0 147 0 147 0 294 0 147 0 147 0 294 4 851 4 851 0 294 0 294 Factory setting t3n tfz 0 294 32 34 3 234 2 205 0 3 9 996 0 179 487 32 34 32 34 BPZ LME39 400C1 LME39 400C1 Requirement 2 5 5 0 3 14 5 1 7 4 4 10 0 5 BPZ LME39 400C2 L...

Страница 17: ...l be set via the change of postignition time to 5 seconds Special case here Safety time is set directly via the change of postignition time and flame detection time using the following formula TSA t3n tfz P257 0 3 seconds P228 Calculation 5 seconds 7 4 65 seconds t3n 4 65 seconds 0 3 seconds P228 t3n 4 05 seconds with tfz 0 3 seconds Value to be parameterized parameter 257 Must be equal to or smal...

Страница 18: ... N7201 Cable strain relief elements AGK67 Article no BPZ AGK67 For plug in base AGK11 Refer to Data Sheet N7201 5 2 Service tools Optical Interface OCI400 Article no BPZ OCI400 Optical interface between burner control and PC Facilitates viewing and recording setting parameters on site using the ACS410 software Refer to Data Sheet N7614 BCI interface module OCI410 Article no BPZ OCI410 BCI interfac...

Страница 19: ...N7542 Display and operating unit AZL23 00A9 Article no BPZ AZL23 00A9 Detached unit choice of mounting methods 8 digit LCD 5 buttons BCI interface for LME39 degree of protection IP54 Refer to Data Sheet N7542 5 4 Flame detector UV flame detector QRA2 Only in conjunction with ancillary unit AGQ3 Refer to Data Sheet N7712 UV flame detector QRA10 Only in conjunction with ancillary unit AGQ3 Refer to ...

Страница 20: ...Division Basic Documentation LME39 CC1P7106en 5 Accessories to be ordered separately 08 12 2017 5 5 Actuators Actuator SQN3 Refer to Data Sheet N7808 Actuator SQN7 Refer to Data Sheet N7804 Actuator SQN9 Refer to Data Sheet N7806 ...

Страница 21: ... N7696 RC unit ARC 4 668 9066 0 Article no BPZ ARC466890660 For the supervision of ionization currents in networks with non earthed neutral conductor PTC resistor AGK25 Article no BPZ AGK25 AC 230 V To burden terminal 3 for burners without fan motor such as atmospheric gas burners Ancillary unit AGQ3 For UV supervision Can be fitted under the plug in base Article no Type Cable lenght mm BPZ AGQ3 1...

Страница 22: ... DIN EN 60664 LME39 total unit 4 kV Creepage distances and air gaps 2 5 kV due to voltage limitation measures Pollution degree 2 in accordance with DIN EN 60730 1 Software class Class C in accordance with DIN EN 60730 2 5 2011 2 channel structure Reaction time in the event of loss of flame Max 1 s Perm cable length terminal 1 Max 1 m at a line capacitance of 100 pF m unshielded max 3 m at 15 pF m ...

Страница 23: ...hanical conditions Class 2M2 Temperature range 20 70 C Humidity 95 r h Operation DIN EN 60 721 3 3 Climatic conditions Class 3K3 Mechanical conditions Class 3M3 Temperature range 20 60 C Humidity 95 r h Installation altitude Max 2 000 m above sea level Attention Condensation formation of ice and ingress of water are not permitted If this is not observed there is a risk of loss of safety functions ...

Страница 24: ...he conductivity and rectifying effect of the flame The DC current that flows in the presence of a flame ionization current is largely proportional to the flame quality This current is measured in the flame signal amplifier The amplifier is designed such that it only responds to the DC current component of the flame signal This ensures that a short circuit between the ionization probe and ground ca...

Страница 25: ...tector voltage Load by DC measuring instrument Ri 10 M Terminal 3 off refer to program sequence DC 380 V DC 380 V Terminal 3 on refer to program sequence DC 280 V DC 280 V DC current detector signals with flame detector QRA Min required Max possible Measurement at the flame detector QRA 200 µA 500 µA Table 4 Data QRA The correct functioning of aged UV cells can be checked with a UV test by applyin...

Страница 26: ...and there is no extraneous light 7 2 Undervoltage Safety shutdown from the operating position takes place should mains voltage drop below about AC 75 V at UN AC 120 V Restart is initiated when mains voltage exceeds about AC 95 V at UN AC 120 V Safety shutdown from the operating position takes place should mains voltage drop below about AC 165 V at UN AC 230 V Restart is initiated when mains voltag...

Страница 27: ...code 7 Air pressure switch welded in working position Prevention of startup lockout after approx 65 seconds at the latest blink code 5 Air pressure switch welded in no load position Failure during valve proving only in connection with LDU11 Lockout approx 180 seconds at the end of specified time blink code 3 Note Time may be extended by the actuator s running tim t11 depending on the application N...

Страница 28: ...rol thermostat pressurestat takes place Factory setting No repetition Note In the event of repetition due to loss of flame during operation a flame signal must be available at the end of the safety time if not the unit will go to lockout 8 PC software ACS410 8 1 Duty of PC software The PC software is a component of the LME39 system and serves primarily as an operator module for the following basic...

Страница 29: ... interface OCI400 and the PC software ACS410 or flue gas analyzers of different makes 3 On the display of the AZL2 or BC interface OCI410 and PC software ACS410 Visual diagnostics In normal operation the different operating states are indicated in the form of color codes according to the color code table given below 9 2 Operational status indication During startup operation indication takes place ...

Страница 30: ... interface diagnostics Interface diagnostics works only if the AGK20 lockout reset button extension is not fitted If by accident interface diagnostics has been activated in which case the slightly red light of the signal lamp flickers it can be deactivated by pressing again the lockout reset button for at least 3 seconds The moment of switching over is indicated by a yellow light pulse The followi...

Страница 31: ...r soiled fuel valves Faulty or soiled flame detector Poor adjustment of burner 8 x blinks ON Free 9 blinks ON Free 10 blinks OFF Wiring error Internal error Output contacts Other fault Manual lockout 14 blinks ON CPI contact not closed Table 7 Error code table During the time the cause of fault is diagnosed the control outputs are dead Burner remains shut down External fault indication remains dea...

Страница 32: ... sequence 7106d04e 0312 R W LR V2 Z FS No 12 Function inputs Operation unit parameter number LED permanent LED flashing tw t3n t8 Standby Startup Operation Shutdown Function outputs SB GP No 11 No 4 No 5 No 7 No 1 Phase number AZL2 21 24 30 74 10 M V1 t11 TSA t4 Terminal Terminals 225 234 42 AL No 10 40 230 257 240 oP P2 No 6 LP SA No 9 22 t10 t1 36 t12 38 t3 oP P1 226 259 224 260 228 No 3 Actuato...

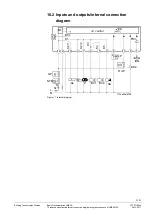
Страница 33: ... internal connection diagram program sequence of LME39 100 08 12 2017 10 2 Inputs and outputs internal connection diagram NT RESET EK FSV ION L N M BV1 BV2 Z AL P 12 GP STB SA 7106a05e 0708 pa LP EK2 K1 K2 1 K2 2 K3 K4 K5 BCI H Si T R W 2 3 10 7 4 5 9 6 11 8 1 C control Figure 11 Internal diagram ...

Страница 34: ...information about actuators SQN3 see Data Sheet N7808 SQN7 see Data Sheet N7804 SQN9 see Data Sheet N7806 5 SA L SB R W 12 12 2 10 8 3 6 11 9 5 7 4 1 AL EK2 LP V1 0 L 6 8 10 2 1 3 7 9 LK K2 K1 MS KL LKP t1 t4 N M N M 1 2 Si SQN3 151 or SQN3 251 SQN90 220 2 stage modulating control Note With 2 stage modulating burners with gas regulation damper fuel valve 2 and the dotted connection between termina...

Страница 35: ...terminal 3 after controller ON or after lockout If the LDU11 initiates lockout valve proving can take up to 160 seconds Therefore the maximum permissible response time of the air pressure switch is 180 seconds With the LDU11 faults during valve proving lead to lockout and with the LME39 100 to lockout due to air pressure switch timeout blink code 3 Note A faulty air pressure switch air pressure sw...

Страница 36: ...ence of LME39 400 11 1 Program sequence 7106d05e 0312 R W V2 Z FS No 12 Function inputs Operation unit parameter number LED permanent LED flashing tw t3n t8 Standby Startup Operation Shutdown Function outputs SB GP No 11 No 4 No 5 No 7 No 1 Phase number AZL2 21 30 74 10 M V1 TSA t4 Terminal Terminal 256 234 42 AL No 10 40 230 257 240 oP P2 t1 38 t3 oP P1 226 228 No 3 CPI No 6 ZV1 No 9 tfz t22 50 2...

Страница 37: ... Warning The connection diagram shown is merely an example which must be adapted in the individual case depending on the application Note In extremely EMC stressed environments burners without fan motor or burners equipped with fan control via auxiliary contactor should use an AGK25 to produce a burden on terminal 3 If not observed the burner is not reliably started up 12 2 3 11 6 GP SB R W L N M ...

Страница 38: ...CI Communication interface BV Fuel valve CPI Closed Position Indicator DBR2 Wire link DW Pressure switch valve proving E Safety shut off valve dead closed optional EK Lockout reset button internal EK2 Remote lockout reset button FS Flame signal FSV Flame signal amplifier GP Gas pressure switch H Main switch HS Auxiliary contactor relay ION Ionization probe K1 Internal relay KL Low fire LK Air damp...

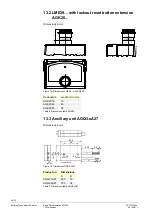
Страница 39: ...es Division Basic Documentation LME39 CC1P7106en 13 Dimensions 08 12 2017 13 Dimensions 13 1 LME39 Dimensions in mm 5 2 53 9 88 91 41 6 47 2 62 5 7106m01 0405 22 9 59 1 53 9 37 4 Figure 17 Dimensions LME39 Plug in base AGK11 6 ...

Страница 40: ...m03 1108 Figure 18 Dimensions LME39 with AGK20 Designation Length L in mm AGK20 19 19 AGK20 43 43 AGK20 55 55 Table 8 Dimensions table AGK20 13 3 Ancillary unit AGQ3 xA27 Dimensions in mm 90 5 60 220 69 6 A B 6 5 4 5 4 13 18 4 65 6 27 5 7106m02 0405 Figure 19 Dimensions AGQ3 xA27 Product no Dimensions A B AGQ3 1A27 500 19 AGQ3 2A27 300 34 Table 9 Dimensions table AGQ3 xA27 ...

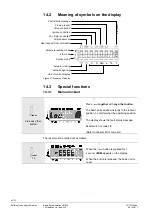
Страница 41: ...to parameter setting mode P press F and A simultaneously reset Info and Enter button For navigation in info and service mode For selection symbol flashing press button for 1 second For changing to a lower menu level press button for 1 3 seconds For changing to a higher menu level press button for 3 8 seconds For changing to the normal display press button for 8 seconds Enter in parameter setting m...

Страница 42: ...status message Unit of current display Bild 2e 0807 Figure 21 Meaning of display 14 3 Special functions 14 3 1 Manual lockout reset plus any other button Press reset together with any other button The basic unit switches instantly to the lockout position no matter what the operating position The display shows the fault status message Example Error code 10 Refer to chapter Error code list The reset...

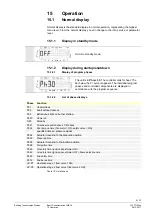
Страница 43: ...al program phases and controlled components are displayed in accordance with the program sequence 15 1 2 2 List of phase displays Phase Function Ph1 Undervoltage Ph2 Fault without lockout Ph4 Extraneous light on burner startup Ph10 Home run OFF Standby Ph21 Air pressure switch check CPI check Ph22 Fan ramp up time fan motor ON safety valve ON specified time air pressure signal Ph24 Actuator travel...

Страница 44: ...The bar under the fault status message appears The unit is in the lockout position The current error code is displayed refer to Blink code table Example Error code 7 15 1 4 2 Reset reset 1 s When pressing reset for 1 second rESEt appears on the display When the button is released the basic unit will be reset reset 3 s P V h min s Bild 21 0707 P V h min s Bild 22 0707 When pressing reset for 3 seco...

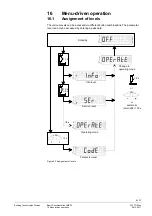
Страница 45: ...levels The various levels can be accessed via different button combinations The parameter level can only be accessed by entering a password P 7105z10e 0716 Standby VSD A F 1 s P Change to operating mode ESC P Info level P Service level P Parameter level P Operating mode 8 s or or automatic return after 120 s 1 s 3 s 8 s 8 s Figure 22 Assignment of levels ...

Страница 46: ...xt or the previous parameter In place of the button you can also press reset for 1 second Note You can press ESC or reset for 8 seconds to return to the normal display Note P V h min s Bild 27e 0807 Parameter Parameter value Figure 23 Info level No change of value on the info level If the display shows _ _ together with the parameter the value may consist of more than 5 digits When pressing reset ...

Страница 47: ...Example 102 _ _ reset 1 3 s P V h min s Bild 30 0707 Pressing the reset button 1 3 seconds and releasing it when _ _ flashes displays the identification date creation date of the program sequence DD MM YY Example Identification date 03 11 05 reset or ESC P V h min s Bild 29 0707 Press reset or ESC to return to the display of parameters To the next parameter 17 2 2 Identification number P V h min s...

Страница 48: ...Example 113 _ _ reset 1 3 s P V h min s Bild 162 1107 Pressing the reset button 1 3 seconds and releasing it when _ _ flashes displays the burner ID Default setting burnEr Id Note The burner ID can only be changed with the help of the PC software ACS410 and only on parameter level reset or ESC P V h min s Bild 32 0707 Press reset or ESC to return to the display of parameters To the next parameter ...

Страница 49: ...707 Pressing the reset button 1 3 seconds and releasing it when _ _ flashes displays the number of startups can be reset Example 000036 reset 3 8 s P V h min s Biod 73 0707 Press reset for 3 8 seconds to go to the range that can be changed Digit 0 flashes reset P V h min s Bild 163 1107 By pressing reset the number of startups is reset to 0 Display 000000 reset or ESC P V h min s Bild 34 0707 Pres...

Страница 50: ...Press reset or ESC to go back to the display of parameters To the next parameter Back to the previous parameter 17 2 6 End of info level P V h min s Bild 38 0707 When this display appears you have reached the end of the info level The display shows End flashing To the first parameter on the info level To the final parameter on the info level ESC or reset 8 s P V h min s Bild 22 0707 Press ESC or t...

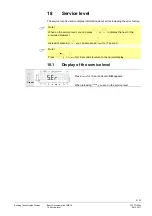
Страница 51: ... error history Note When on the service level you can press or to display the next or the previous parameter Instead of pressing you can also press reset for 1 second Note Press ESC or reset for 8 seconds to return to the normal display 18 1 Display of the service level reset P V h min s Bild 21 0707 Press reset for 3 seconds until SEr appears When releasing reset you are on the service level ...

Страница 52: ...arameter Back to the previous parameter 18 2 3 Intensity of flame P V h min s Bild 41 0707 The display shows parameter 954 flashing On the right the intensity of the flame is displayed as a microamperes µA Example 954 0 0 End of service level End Back to the previous parameter 18 2 4 End of service level P V h min s Bild 38 0707 When this display appears you have reached the end of the service lev...

Страница 53: ...operation will be warranted The OEM which made the settings is always responsible for the parameters their settings and compliance of the respective application with the relevant national and international standards and safety regulations such as EN 676 EN 267 EN 1643 EN 746 2 etc If this is not observed there is a risk of loss of safety functions Siemens AG its suppliers and other Group Companies...

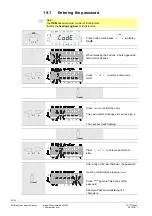
Страница 54: ...nation VSD A F to display CodE When releasing the buttons 6 bars appear the first of which flashes or Press or to select a numeral or letter reset or Press reset to confirm the entry The value entered changes to a minus sign The next bar starts flashing reset or Press or to select a numeral or letter reset After entry of the last character the password must be confirmed by pressing reset Press res...

Страница 55: ... Parameter level 08 12 2017 P V h min s Bild 48 0707 As a confirmation of correct entry PArA appears for a maximum of 2 seconds Note For the entry of passwords or burner IDs the following numerals and letters can be used 1 A L 2 b n 3 C o 4 d P 5 E r 6 F S 7 G t 8 H u 9 I Y 0 J ...

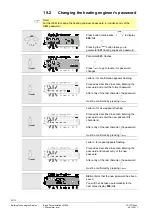
Страница 56: ... as described in section Entering the password and enter the former password After entry of the last character the password must be confirmed by pressing reset reset Letter n for new appears flashing Proceed as described in section Entering the password and enter the new password 4 characters After entry of the last character the password must be confirmed by pressing reset reset Letter r for repe...

Страница 57: ...sic Documentation LME39 CC1P7106en 19 Parameter level 08 12 2017 Pressing the reset button takes you to parameter 041 heating engineer s password Continue in the parameter level to the next parameter group 100 End of the parameter level End ...

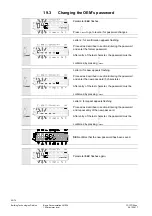
Страница 58: ...r the password must be confirmed by pressing reset reset Letter n for new appears flashing Proceed as described in section Entering the password and enter the new password 5 characters After entry of the last character the password must be confirmed by pressing reset reset Letter r for repeat appears flashing Proceed as described in section Entering the password and repeat entry of the new passwor...

Страница 59: ...e sensitivity 20 1 Parameters without index with direct display 20 1 1 Example of parameter 226 preignition time on the parameter level P V h min s Bild 186 1107 Press to select preignition time Display Parameter 226 flashes value 3 675 does not reset or P V h min s Bild 167 1107 Press or to go to editing mode Display 3 675 or P V h min s Bild 168 1107 Press or to shift the former preignition time...

Страница 60: ...e change ESC P V h min s Bild 186 1107 Alternative 2 Adopt the value reset P V h min s Bild 170 1107 Press reset to return to editing mode The value set will be adopted Note To detect display errors the value appears one place shifted to the right Display Value 3 822 ESC P V h min s Bild 171 1107 To the next parameter Back to the previous parameter ...

Страница 61: ...ied time for air pressure signal air pressure switch Display Parameter 224 flashes characters _ _ do not reset or P V h min s Bild 173 1107 Press or to go to editing mode Display 48 510 or P V h min s Bild 174 1107 Press or to shift the former specified time to change mode one place to the left Display Specified time 48 510 flashes Note To detect display errors the value appears one place shifted ...

Страница 62: ...dopt the change reset P V h min s Bild 176 1107 Press reset to return to editing mode The value set will be adopted Note To detect display errors the value is shown again but shifted one place to the right Display Value 53 361 ESC P V h min s Bild 172 1107 Press ESC to return to the parameter level Display Parameter 224 flashes characters _ _ do not To the next parameter Back to the previous param...

Страница 63: ...dex 01 and error code 4 do not P V h min s Bild 177 1107 On the left the current error 701 appears flashing index 01 does not flash On the right error code 4 is displayed Example Parameter 701 index 01 error code 4 reset1 3 s P V h min s Bild 178 1107 Press reset for 1 3 seconds to show index 01 for the error code flashing Display Parameter 701 does not flash index 01 flashes error code 4 does not...

Страница 64: ...index Back to the previous index P V h min s Bild 180 1107 When this display appears you have reached the end of the index level within parameter 701 Display End appears flashing ESC P V h min s Bild 177 1107 Press ESC to return to the parameter level Display Parameter 701 flashes index 01 and diagnostic code 4 do not To the next older error P V h min s Bild 182 1107 Parameters cover the period ba...

Страница 65: ...r pressure failure air pressure switch has welded in the operating position Air pressure switch time supervision Air pressure switch has welded in the operating position Loc 7 Loss of flame Loss of flame during operation too frequent limitation of repetitions Defective or soiled fuel valves Defective or soiled flame detector Poor adjustment of burner Loc 10 Errors that cannot be assigned applicati...

Страница 66: ...o 166 Total number of startups Read only 0 999999 1 0 Info 200 Burner control 224 Max time until air pressure on Edit 0 s 179 487 s 4 851 s 179 487 s SO OEM 225 Prepurge time Edit 0 s 74 97 s 0 294 s 32 34 s SO OEM 226 Preignition time Edit 1 176 s 37 485 s 0 147 s 3 234 s SO OEM 228 Flame detection time Edit 0 s 1 47 s 0 147 s 0 294 s SO OEM 230 Interval Ignition OFF until fuel valve 2 BV2 releas...

Страница 67: ...er reading Read only 2 0 15 999999 1 1 Service 703 Error history former 2 01 Error code 02 Startup counter reading Read only 2 0 15 999999 1 1 Service 704 Error history former 3 01 Error code 02 Startup counter reading Read only 2 0 15 999999 1 1 Service 705 Error history former 4 01 Error code 02 Startup counter reading Read only 2 0 15 999999 1 1 Service 706 Error history former 5 01 Error code ...

Страница 68: ...d Info OEM via ACS410 164 Number of startups Resettable 0 999999 1 0 Info Info 166 Total number of startups Read only 0 999999 1 0 Info 200 Burner control 226 Preignition time Edit 1 176 s 37 485 s 0 147 s 1 911 s SO OEM 228 Flame detection time Edit 0 s 1 47 s 0 147 s 0 294 s SO OEM 230 Interval Ignition OFF until fuel valve 2 BV2 release Edit 1 176 s 74 97 s 0 294 s 9 996 s SO OEM 231 2nd safety...

Страница 69: ...ead only 2 0 15 999999 1 1 Service 703 Error history former 2 01 Error code 02 Startup counter reading Read only 2 0 15 999999 1 1 Service 704 Error history former 3 01 Error code 02 Startup counter reading Read only 2 0 15 999999 1 1 Service 705 Error history former 4 01 Error code 02 Startup counter reading Read only 2 0 15 999999 1 1 Service 706 Error history former 5 01 Error code 02 Startup c...

Страница 70: ...52 Engineering notes 7 Entering the password 54 Environmental conditions 23 Error code list 65 Error history 52 F Fault status messages display of errors and info 44 Features 13 Flame supervision with AGQ3 xA27 and flame detector QRA 25 Flame supervision with ionization probe 24 Functions 26 G General unit data 22 I Identification date 47 Identification number 47 Identification of burner 48 Indica...

Страница 71: ...Parameters without index with direct display 59 Parameters without index with no direct display 61 PC software ACS410 15 28 Preconditions for burner startup 26 R Reset 44 Resetting the burner control 27 S Safety notes 7 Service level 51 Signal cable AGV50 display BCI 23 Special functions 42 Standards and certificates 12 Supplementary documentation 2 T Technical data 22 Time parameters 14 Total num...

Страница 72: ...nt made at the flame detector QRA 25 Figure 9 Diagnostics of cause of fault 30 Figure 10 Program sequence 32 Figure 11 Internal diagram 33 Figure 12 Application examples LME39 100 34 Figure 13 Application examples with LDU11 35 Figure 14 Program sequence 36 Figure 15 Internal diagram 37 Figure 16 Only for burners with fan control via auxiliary contactor with air pressure switch 37 Figure 17 Dimens...

Страница 73: ...le 5 Lockout 27 Table 6 Error code table 29 Table 7 Error code table 31 Table 8 Dimensions table AGK20 40 Table 9 Dimensions table AGQ3 xA27 40 Table 10 List of phase 43 Table 11 Error code list 65 Table 12 Parameter list 69 Siemens AG Building Technologies Division Berliner Ring 23 D 76437 Rastatt Tel 49 7222 598 279 Fax 49 7222 598 269 www siemens com 2017 Siemens AG Building Technologies Divisi...

Отзывы: