background image


15 


Ordercode: 33060 

Performer Profile 600 

Setting the angle  

01)


Loosen the adjustment screws (do not remove them). 

02)


Tilt the fixture to the desired position (Fig. 11). 

03)


Tighten the adjustment screws to secure the fixture in position. 


Fig. 11 


Содержание Performer Profile 600

Страница 1: ...Performer Profile 600 V1 Highlite International B V Vestastraat 2 6468 EX Kerkrade the Netherlands Ordercode 33060 MANUAL ENGLISH...

Страница 2: ...e barrel assembly 14 Installation with clamp 14 Setting the angle 15 Control Modes 16 One Performer Run Mode 16 Multiple Performers Master Slave control 16 Multiple Performers DMX Control 17 Fixture L...

Страница 3: ...rofile 600 Cleaning 25 Cleaning 19 26 36 and 50 glass lenses 25 Cleaning the reflector 25 Maintenance 26 Replacing the Fuse 26 Troubleshooting 26 No Light 26 No Response to DMX 27 Product Specificatio...

Страница 4: ...ludes Showtec Performer Profile 600 2 color frames 2 safety cables User manual LED Expected Lifespan LEDs gradually decline in brightness over time HEAT is the dominant factor that leads to the accele...

Страница 5: ...before handling Do not shake the device Avoid brute force when installing or operating the device Only use the device indoors avoid contact with water or other liquids Only operate the fixture after h...

Страница 6: ...y must not exceed 50 with an ambient temperature of 40 C If this device is operated in any other way than the one described in this manual the product may suffer damages and the warranty becomes void...

Страница 7: ...ight color cable is connected to the right place International EU Cable UK Cable US Cable Pin L BROWN RED YELLOW COPPER PHASE N BLUE BLACK SILVER NEUTRAL YELLOW GREEN GREEN GREEN PROTECTIVE GROUND Mak...

Страница 8: ...number 04 A brief description of the symptoms Claims The client has the obligation to check the delivered goods immediately upon delivery for any short comings and or visible defects or perform this...

Страница 9: ...smooth fades Strobe 0 20Hz Beam Angle 26 Connections 3 and 5 pin XLR signal connectors IN OUT Powercon power connectors IN OUT Refresh Rate 1200Hz Power Linking 4 units 120V 7 units 230V DMX channels...

Страница 10: ...rol 03 Barrel 04 Mounting bracket 05 LED lens 06 LED board 07 Thermal switch holder thermal switch 08 Driver board 09 Insulated handle 10 PCB 11 Fuse T3 15AL 250V 12 PS socket 13 PS socket 14 PCB adap...

Страница 11: ...se T3 15AL 250V 21 Powercon power connector 100 240V IN 22 Powercon power connector 100 240V OUT 23 5 pin DMX signal connector IN 24 5 pin DMX signal connector OUT 25 3 pin DMX signal connector IN 26...

Страница 12: ...ugging the unit in always make sure that the power supply matches the product specification voltage Do not attempt to operate a 120V specification product on 230V power or vice versa Connect the devic...

Страница 13: ...rt the color frame s 03 Lock the retaining clip by pushing sideways while gently pushing forward Fig 06 Color Notes The performance of saturated colors is not guaranteed with low temperature ranges Fo...

Страница 14: ...cured with 2 screws prevents light leakage Fig 08 01 Use a screwdriver to loosen the screws on the drop in iris slot cover Do not remove the screws 02 Slide the cover completely forward to expose the...

Страница 15: ...control to lock it into position Fig 09 Installation with clamp You can choose an appropriate clamp from your dealer to fix the fixture to a trussing system and allows you to adjust the position of t...

Страница 16: ...0 Performer Profile 600 Setting the angle 01 Loosen the adjustment screws do not remove them 02 Tilt the fixture to the desired position Fig 11 03 Tighten the adjustment screws to secure the fixture i...

Страница 17: ...iple Performers Master Slave control 01 Fasten the effect light onto firm trussing Leave at least 0 5 meter on all sides for air circulation 02 Use a 3 pin XLR cable to connect the Performer The pins...

Страница 18: ...Connect the first unit s DMX out socket with the second unit s in socket using a DMX signal cable Repeat this process to link the second third and fourth units 05 Supply electric power Plug electric...

Страница 19: ...ures on a Powercon link 7 units 230V Data Cabling To link fixtures together you must obtain data cables You can purchase DAP Audio certified DMX cables directly from a dealer distributor or construct...

Страница 20: ...ss of the third Performer should be 4 3 7 007 etc Please be sure that you do not have any overlapping channels in order to control each Performer correctly If two or more Performers are addressed simi...

Страница 21: ...20 Ordercode 33060 Performer Profile 600 Menu Overview...

Страница 22: ...e ENTER button to open the menu 03 If the display shows you need to insert a key combination which will unlock the menu 04 Insert the key combination by pressing the buttons in the following order UP...

Страница 23: ...ollowing order UP DOWN UP DOWN ENTER 03 The display will promptly show and the settings will have been reset 2 4 Save DMX Blackout 01 When the display shows press the ENTER button to open the menu 02...

Страница 24: ...r level 2 8 Dimming curve settings 01 When the display shows press the ENTER button to open the menu 02 Press the UP and DOWN buttons to choose the desired dimming curve out of the 4 available options...

Страница 25: ...tilize the DMX protocol to determine its performance 05 If the display shows the Performer will become a slave device and will react the same as the master device DMX Channels 1 Channel Channel 1 Dimm...

Страница 26: ...e before attempting to clean the reflector To quickly clean the reflector remove the lens tube and clean the dust from the reflector with a blast of oil free air You may also wipe the reflector with a...

Страница 27: ...damp cloth Make sure connections are thoroughly dry before linking equipment or supplying electric power Replacing the Fuse Power surges short circuit or inappropriate electrical power supply may cau...

Страница 28: ...the problem may be a bad data link connection poor quality or broken cables missing termination plug or a defective fixture disturbing the link Bad data link connection Inspect connections and cables...

Страница 29: ...anual Beam Angle 26 Dimmer 0 100 Dim Curve Dimm4 technology 4 presets Strobe 0 20Hz Peak Intensity 71900cd Max Flux 3800 Lumen Color Rendering 83Ra Color Temperature 3100K Refresh Rate 1200Hz Housing...

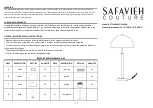
Страница 30: ...29 Ordercode 33060 Performer Profile 600 Dimensions...

Страница 31: ...30 Ordercode 33060 Performer Profile 600 Notes...

Страница 32: ...2015 Showtec...

Отзывы: