background image

3

Engl

ish

Españ

ol

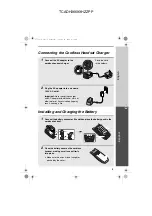
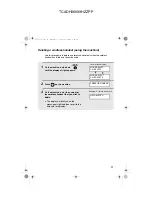
Connecting the Cordless Handset Charger

1

Connect the AC adapter to the 

cordless handset charger.

2

Plug the AC adapter into a standard 

120 V AC outlet.

Place the cord 
in the holders.

Installing and Charging the Battery

1

Connect the battery connector 

, and then place the battery pack in the 

cordless handset.

2

Place the battery cover on the cordless 

handset, making sure it snaps firmly 
into place.

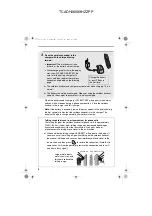
Make sure the wires are not caught or 
pinched by the cover.

Black

Red

Black

Red

Important:

 Never cover the charger 

and AC adapter with a blanket, cloth, or 
other material. Excessive heating may 
result, causing a fire.

all.book  Page 3  Wednesday, January 21, 2004  4:24 PM

TCADH3669XHZZPP

Содержание UX-K02

Страница 1: ...less Handset Charger Installing and Charging the Battery Registering the Cordless Handset Enterring a Name for the Cordless Handset Maintenance Charge the battery for about 10 hours before initial use Cargue la batería durante 10 horas aproximadamente antes del primer uso TCADH3669XHZZPP ...

Страница 2: ...d meets the FCC RF exposure guidelines for use with accessories that contains no metal and that positions the handset a minimum of 1 5 cm from the body Use of other accessories may not ensure compliance with FCC RF exposure guidelines The maximum SAR levels tested for this phone Cordless Handset has been shown to be 1 220 W kg at head and 0 446 W Kg at body This equipment complies with Part 68 of ...

Страница 3: ...attery Battery 3 6 V Ni MH battery capacity 850 mAh Power consumption Initial charging Battery life Battery life in standby mode Approx 1 3 W in standby mode Approx 10 hours for initial charge Approx 4 hours 240 minutes at room temp Approx 3 days with one full charge at room temperature Battery life both normal and in standby mode may vary depending on usage range from base machine and environment...

Страница 4: ... electric shock If an object falls into the product that you cannot remove unplug the product and consult a qualified service representative Do not place this product on an unstable cart stand or table The product could be seriously damaged if it falls Battery Use only the battery specified in this manual Use only the provided charger to charge the battery Do not open or mutilate the battery pack ...

Страница 5: ...t the battery connector and then place the battery pack in the cordless handset 2 Place the battery cover on the cordless handset making sure it snaps firmly into place Make sure the wires are not caught or pinched by the cover Black Red Black Red Important Never cover the charger and AC adapter with a blanket cloth or other material Excessive heating may result causing a fire all book Page 3 Wedn...

Страница 6: ...the display during the first several minutes that the cordless handset is in the charger The battery will begin to charge normally after several minutes Reinforced concrete Metal Aluminum sash Talking range distance from fax machine for phone calls The talking range of the cordless handset for phone calls is approximately 1200 ft 400 m line of sight talking range may decrease depending on transmis...

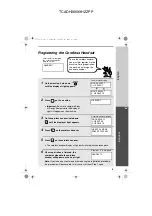
Страница 7: ... at right appears 4 Press on the cordless handset 5 Press on the cordless handset The cordless handset display will go dark while registration takes place 6 When registration is finished the number assigned to the cordless handset will appear as shown at right Note If you take no action for one minute during the registration procedure the procedure will be canceled In this case start from Step 1 a...

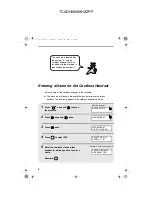
Страница 8: ... to your cordless handset The name will appear in the cordless handset s display 1 Press once and twice on the machine 2 Press once and once 3 Press once 4 Press to select SET 5 Enter the number of the cordless handset for which you wish to enter a name Example FUNCTION Example Cordless handset 2 SELECT HS NO ENTER 1 8 Machine display ENTRY MODE HS NAME SET HS NAME SET 1 SET 2 CLEAR ENTER HS NAME ...

Страница 9: ...S T U V W X Y Z SPACE Machine display HANDSET2 BILL The handset number and name appear in the standby display Note If other cordless handsets for the UX CD600 are in use when the above procedure is performed the name of the new cordless handset will not be transmitted to those cordless handsets the name will not appear by the cordless handset number when is pressed on those cordless handsets to us...

Страница 10: ...ter the battery is charged replace it with the following battery Replacement battery Use only a Sharp UX BA01 battery 3 6 V Ni MH battery capacity 850 mAh Caution There is a danger of explosion if the battery is incorrectly replaced Replace only with the same or equivalent type recommended by the manufacturer Dispose of used batteries according to the manufacturer s instructions Battery disposal T...

Страница 11: ...Press once and twice on the machine 2 Press once and once 3 Press once 4 Press to select CLEAR 5 Enter the number of the cordless handset for which you wish to clear the name 6 Press to clear the name and then press to exit FUNCTION START MEMORY STOP SELECT HS NO ENTER 1 8 Machine display ENTRY MODE HS NAME SET HS NAME SET 1 SET 2 CLEAR all book Page 9 Wednesday January 21 2004 4 24 PM TCADH3669XH...

Страница 12: ...handset has failed and cannot be used 1 On the cordless handset that you wish to delete hold down until the display at right appears 2 Press on the cordless handset 3 Press on the cordless handset The cordless handset display will go dark while the cordless handset is deleted 4 When deletion of the cordless handset is finished the display at right will appear INTER COM ABC 2 START MODE SELECT 1 HS...

Страница 13: ...right appears 2 Press on the machine 3 On the machine enter the number of the cordless handset that you wish to delete The display will briefly show the message at right and then revert to the date and time display INTERCOM CONFERENCE Example Cordless handset 2 Fax machine display MODE SELECT 1 HS ENTRY MODE SELECT 2 HS DELETE PRESS HS NUMBER HS2 DELETED all book Page 11 Wednesday January 21 2004 ...

Страница 14: ...all book Page 12 Wednesday January 21 2004 4 24 PM TCADH3669XHZZPP ...

Страница 15: ...attery Battery 3 6 V Ni MH battery capacity 850 mAh Power consumption Initial charging Battery life Battery life in standby mode Approx 1 3 W in standby mode Approx 10 hours for initial charge Approx 4 hours 240 minutes at room temp Approx 3 days with one full charge at room temperature Battery life both normal and in standby mode may vary depending on usage range from base machine and environment...

Страница 16: ... electric shock If an object falls into the product that you cannot remove unplug the product and consult a qualified service representative Do not place this product on an unstable cart stand or table The product could be seriously damaged if it falls Battery Use only the battery specified in this manual Use only the provided charger to charge the battery Do not open or mutilate the battery pack ...

Страница 17: ...t the battery connector and then place the battery pack in the cordless handset 2 Place the battery cover on the cordless handset making sure it snaps firmly into place Make sure the wires are not caught or pinched by the cover Black Red Black Red Important Never cover the charger and AC adapter with a blanket cloth or other material Excessive heating may result causing a fire all book Page 3 Wedn...

Страница 18: ...the display during the first several minutes that the cordless handset is in the charger The battery will begin to charge normally after several minutes Reinforced concrete Metal Aluminum sash Talking range distance from fax machine for phone calls The talking range of the cordless handset for phone calls is approximately 1200 ft 400 m line of sight talking range may decrease depending on transmis...

Страница 19: ... at right appears 4 Press on the cordless handset 5 Press on the cordless handset The cordless handset display will go dark while registration takes place 6 When registration is finished the number assigned to the cordless handset will appear as shown at right Note If you take no action for one minute during the registration procedure the procedure will be canceled In this case start from Step 1 a...

Страница 20: ... to your cordless handset The name will appear in the cordless handset s display 1 Press once and twice on the machine 2 Press once and once 3 Press once 4 Press to select SET 5 Enter the number of the cordless handset for which you wish to enter a name Example FUNCTION Example Cordless handset 2 SELECT HS NO ENTER 1 8 Machine display ENTRY MODE HS NAME SET HS NAME SET 1 SET 2 CLEAR ENTER HS NAME ...

Страница 21: ...S T U V W X Y Z SPACE Machine display HANDSET2 BILL The handset number and name appear in the standby display Note If other cordless handsets for the UX CD600 are in use when the above procedure is performed the name of the new cordless handset will not be transmitted to those cordless handsets the name will not appear by the cordless handset number when is pressed on those cordless handsets to us...

Страница 22: ...ter the battery is charged replace it with the following battery Replacement battery Use only a Sharp UX BA01 battery 3 6 V Ni MH battery capacity 850 mAh Caution There is a danger of explosion if the battery is incorrectly replaced Replace only with the same or equivalent type recommended by the manufacturer Dispose of used batteries according to the manufacturer s instructions Battery disposal T...

Страница 23: ...Press once and twice on the machine 2 Press once and once 3 Press once 4 Press to select CLEAR 5 Enter the number of the cordless handset for which you wish to clear the name 6 Press to clear the name and then press to exit FUNCTION START MEMORY STOP SELECT HS NO ENTER 1 8 Machine display ENTRY MODE HS NAME SET HS NAME SET 1 SET 2 CLEAR all book Page 9 Wednesday January 21 2004 4 24 PM TCADH3669XH...

Страница 24: ...handset has failed and cannot be used 1 On the cordless handset that you wish to delete hold down until the display at right appears 2 Press on the cordless handset 3 Press on the cordless handset The cordless handset display will go dark while the cordless handset is deleted 4 When deletion of the cordless handset is finished the display at right will appear INTER COM ABC 2 START MODE SELECT 1 HS...

Страница 25: ...pears 2 Press on the machine 3 On the machine enter the number of the cordless handset that you wish to delete The display will briefly show the message at right and then revert to the date and time display INTERCOM CONFERENCE Example Cordless handset 2 Fax machine display MODE SELECT 1 HS ENTRY MODE SELECT 2 HS DELETE PRESS HS NUMBER HS2 DELETED all book Page 11 Wednesday January 21 2004 4 24 PM ...

Страница 26: ...all book Page 12 Wednesday January 21 2004 4 24 PM TCADH3669XHZZPP ...

Страница 27: ...beyond the time period described above on behalf of Sharp The warranties described herein shall be the sole and exclusive warranties granted by Sharp and shall be the sole and exclusive remedy available to the purchaser Correction of defects in the manner and for the period of time described herein shall constitute complete fulfillment of all liabilities and responsibilities of Sharp to the purcha...

Страница 28: ...manufactured Upon your receipt of the exchange unit packaging and shipping instructions will be enclosed for you to return the defective unit Upon Sharp s receipt of the defective unit your credit card hold will be released How Warranty Repair Service is Obtained If you prefer that we repair your unit instead of replacing it our Customer Relations Specialists at 1 877 794 8675 will explain how to ...

Страница 29: ...all book Page 3 Wednesday January 21 2004 4 24 PM TCADH3669XHZZPP ...

Страница 30: ...all book Page 4 Wednesday January 21 2004 4 24 PM TCADH3669XHZZPP ...

Страница 31: ...UR RECORDS Please record the model number and serial number below for easy reference in case of loss or theft These numbers are located on the rear side of the unit Space is also provided for other relevant information Model Number UX K02 Serial Number Date of Purchase Place of Purchase all book Page 139 Wednesday January 21 2004 4 24 PM TCADH3669XHZZPP ...

Отзывы: