


SD-CX1W
– 14 –
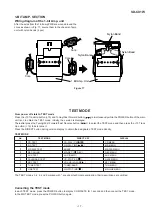
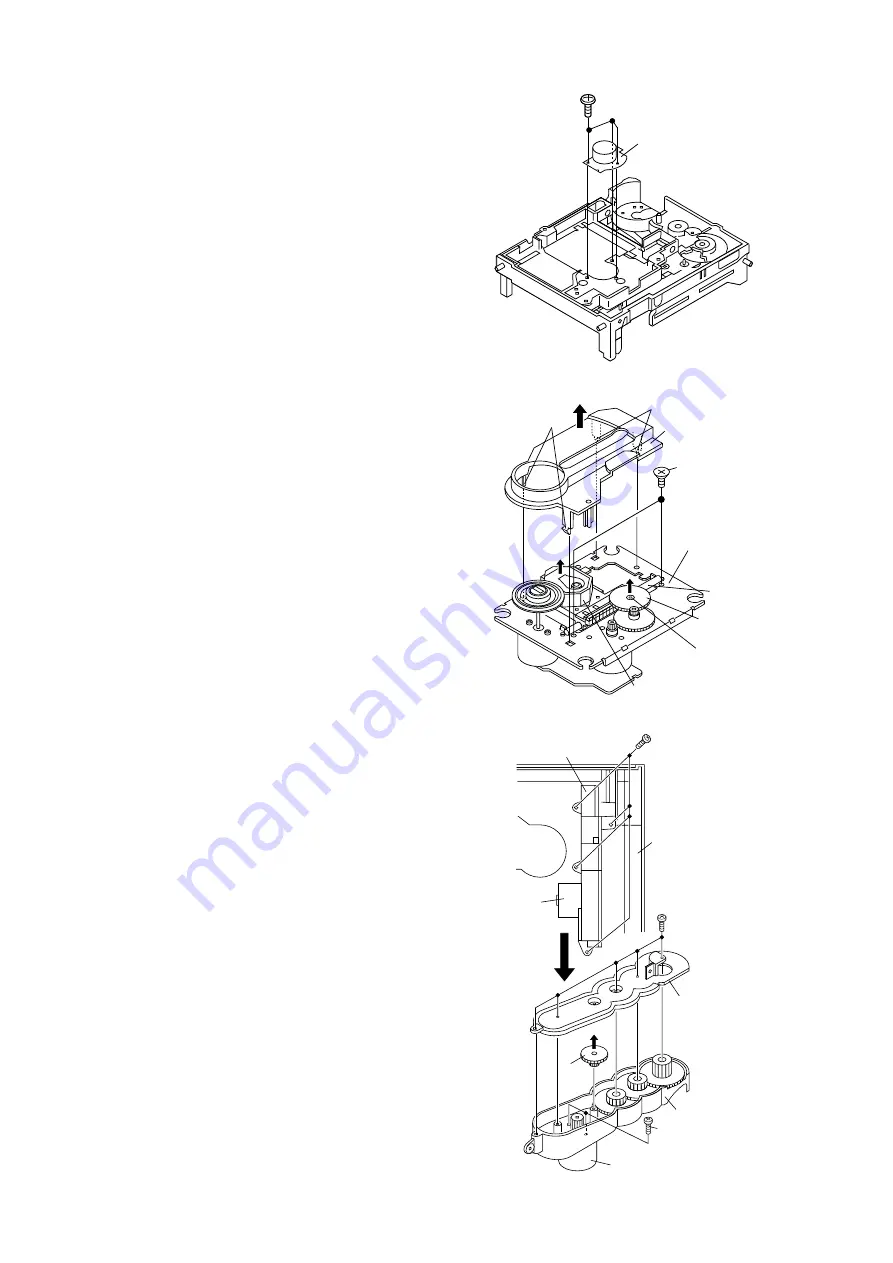
Figure 14-1
How to remove the MD spindle motor
(See Fig. 14-1)
1. Remove the screws (D1) x 3 pcs., and remove the MD
spindle motor.
Caution:
Be careful so that the gear is not damaged.
(The damaged gear emits noise during searching.)
CD MECHANISM SECTION
Perform steps 1 to 11 of the disassembly method to remove
the CD mechanism. (See pages 10-11.)
Note:
After removing the connector for the optical pickup from the
connector, wrap the conductive aluminium foil around the
front end of connector remove to protect the optical pickup
from electrostatic damage.
Figure 14-2
Figure 14-3
How to Remove the CD lid motor
(See Fig. 14-3.)
1. Remove the front panel.
(Refer to the disassembly method on page 10.)
2. Remove the screws (B1) x 4 pcs.
3. Remove the CD lid gear unit from the front panel.
4. Remove the screws (B2) x 5 pcs. to remove the gear box
B.
5. Remove the gear (B3) x 1 pc.
6. Remove the screws (B4) x 2 pcs. to remove the CD lid
motor.
How to remove the pickup (See Fig. 14-2)
1. Remove the CD mechanism cover, paying attention to
the pawls (A1) x 4 pcs.
2. Remove the screws (A2) x 2 pcs., to remove the shaft
(A3) x 1 pc.
3. Remove the stop washer (A4) x 1 pc., to remove the
gear (A5) x 1 pc.
4. Remove the pickup.
Caution:
Be careful not to damage the gear.
(If the gear is damaged, noise is heard when searching.)
Gear Box A
CD Lid Motor
(B4)x2
ø2x5mm
Gear
(B3)x1
Gear Box B
(B2)x5
ø2x10mm
(B1)x4
ø3x10mm
CD Lid Gear Unit
CD Lid
Motor
Front Panel
(D1)x3
ø1.4x3mm
MD Spindle Motor
(A2)x2
ø2.6 x6mm
(A1)x2
Shaft
(A3)x1
Gear
(A5)x1
Stop Washer
(A4)x1
CD Mechanism
Cover
CD Mechanism
Pickup
(A1)x2
Содержание SD-CX1W(BL)
Страница 56: ...SD CX1W 56 Figure 56 WIRING SIDE OF P W BOARD 3 13 A B C D E F G H 1 2 3 4 5 6 TUNER PWB A2 TOP VIEW ...
Страница 114: ...SD CX1W 15 M E M O ...
Страница 115: ...SD CX1W 16 M E M O ...


