


SD-CX1W
– 32 –
S P G
1 1
H
S P G — i n
6 0
H
S P G — m i d
4 B
H
S P G — o u t
3 B
H
S P G M
9 6
H
S P 1
1 0
H
S P 2
9 3
H
S P 2 2
9 3
H
S P 3
E D
H
S P 4
E E
H
S P 5
2 0
H
S P 5 2
2 0
H
S P D L I M
6 2
H
S P K L E V m
1 6
H
F G
9 B
H
F G 2
B 1
H
F F 0
1 0
H
F F 1
7 0
H
F F 2
E 0
H
F Z H L E V
E D
H
F O K L E V h
0 7
H
F O K L E V L
0 9
H
F O S T n
2 C
H
D S C J G
0 D
H
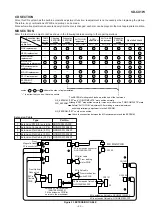
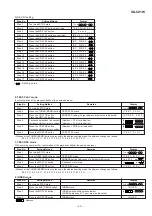
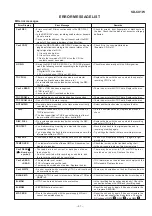
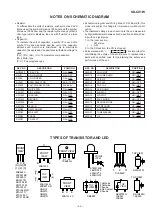
The details description of mechanism error
Error Display
Error Message
E r - M D 1
Ejection is not completed.
E r - M D 2
Head-up is not completed.
E r - M D 3
Head-down is not completed.
HINF
(93 Pin of IC1401)
= E
EJECT complete position
< 1.0 V
= M
LOAD/EJECT halfway position
> 3 V
= L
LOAD complete position
1.31 ~ 2.35 V
= D
HEAD DOWN position
1.01 ~ 1.3 V
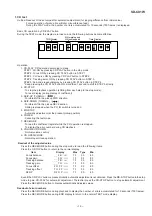
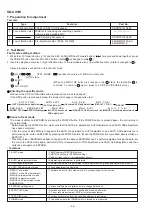
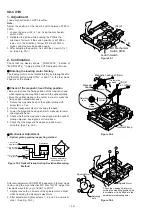
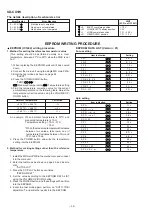
EEPROM WRITING PROCEDURE
EEPROM (IC1402) writing procedure
1. Method for setting the reference temperature value
(This setting should be performed quickly at a room
temperature, between 21
°
C to 29
°
C when the PWB is not
hot.)
1. When replacing the EEPROM, wait until it has cooled
down.
2. Connect the main unit using the single MD main PWB.
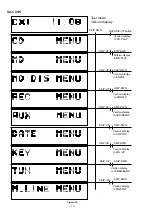
3. Enter the test mode as shown on page 24.
"EJECT"
4. Press the TUNER (BAND) button.
"TEMP
"
: Measured temperature,
: Temperature setting
5. Find the temperature correction value for the current
ambient temperature on the following table. Adjust the
temperature correction value using the VOLUME UP/
DOWN button.
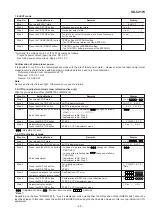
Ambient Temperature
Correction
+ 21.0
°
C ~ + 23.2
°
C
-1
H
+ 23.3
°
C ~ + 26.8
°
C
±
0
H
+ 26.9
°
C ~ + 29.0
°
C
+1
H
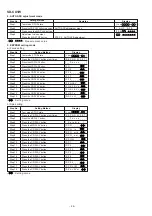
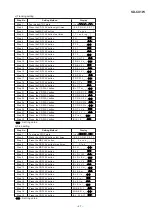
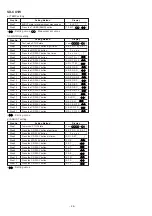
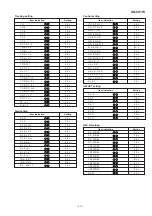
EEPROM DATA LIST (Version : 01)
Focus setting
Item indication
Setting
Spin setting
Item indication
Setting
An example: When ambient temperature is 22
°
C and
measured temperature is 7A H
Temperature setting = 7A H - 01 H
= 79 H
* When the measured temperature fluctuates
between two values, take lower one (if
temperature fluctuates between 7A H and
79 H, take 79 H).
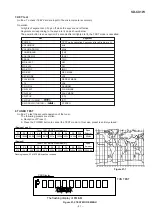
6. Press the POWER button and write the temperature
setting into the EEPROM.
2. Method for making settings other than the reference
temperature
1. Install the MD main PWB in the mechanism, and connect
it to the main unit.
2. Enter the test mode as shown on page 24, and insert a
disc.
"AUTO AJST"
3. Press the CD PLAY button seven times.
"EEPROM SET"
4. Set the value according to the EEPROM DATA LIST
using the VOLUME UP/DOWN button.
5. Press the POWER button, and the settings will be written
into the EEPROM.
6. Enter the test mode again, perform an "AUTO YOBI
adjustment", and write the results into the EEPROM.
Содержание SD-CX1W(BL)
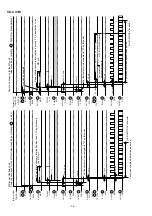
Страница 56: ...SD CX1W 56 Figure 56 WIRING SIDE OF P W BOARD 3 13 A B C D E F G H 1 2 3 4 5 6 TUNER PWB A2 TOP VIEW ...
Страница 114: ...SD CX1W 15 M E M O ...
Страница 115: ...SD CX1W 16 M E M O ...


