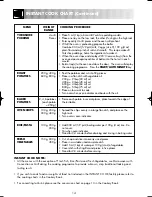
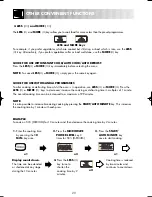
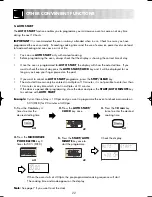
background image

10

CONVECTION COOKING

The oven cavity, door, turntable, turntable support, racks and dishes will become very hot.  Use thick oven gloves
when removing the food or turntable from the oven to prevent burns.

NOTES:

• Once the oven has started you can find out the temperature you have programmed by pressing the

CONVECTION TEMPERATURE 

key. The temperature will appear on the display. This will not affect the

programme or cooking time.

• If you wish to preheat and cook at a different temperature, press the 

CONVECTION TEMPERATURE 

key until the

desired temperature is displayed after step 5 in the above example.

• After cooking is complete, the cooling fan will continue working for a short time to lower the temperature of

the electrical and mechanical components.  The display will show “NOW COOLING”

WARNING:

Your oven can be used as a
conventional oven using the
convection facility.

The temperatures available in degrees Centigrade are:

250°C, 230°C, 220°C, 200°C, 180°C, 
160°C, 130°C, 100°C,  70°C, 40°C.

NOTES:

• CONVECTION cooking is ideal for cooking Victoria sandwich cakes, buns, biscuits, scones and for proving

bread at 40˚C.

• When using the CONVECTION facility, all metal cookware can be used. See SUITABLE COOKWARE

page 24-25. To achieve the best results when cooking by CONVECTION, always use the low metal
rack for one layer cooking, and the high rack and low rack for two layer cooking.

• When first using the convection, smoke and odour will be given off.  To avoid this happening when

food is being cooked, heat the oven convection 250˚C without food for approximately 20 minutes.

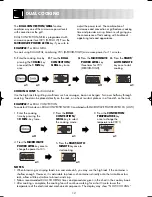
EXAMPLE:

To bake at 200°C for 20 minutes.

1.

Input the desired
cooking time, of 20
minutes.

3.

Press the 

START/AUTO MINUTE

key and the oven will cook 20
minutes at 200˚C. 

x2

x1

2.

Input 200˚C by pressing
the 

CONVECTION

key

four times. 

x4

R-952M O/M FINAL  1/7/99  2:03 pm  Page 10

Содержание R-952M

Страница 1: ...Lamb 2 Roast Pork 3 Roast Poultry 4 Chicken Portions 5 Pork Lamb Chops 6 Crispy Crumb Foods 7 Baked Potatoes 8 Oven Chips 9 Cake Kg Lb LESS MORE g oz GRILL MICROWAVE POWER LEVEL STOP CLEAR TIMER Kg Lb AUTO START CLOCK AUTO MINUTE START CONVECTION CONVECTION DUAL GRILL 10min 1min 10sec CHICKEN PORTIONS FRESH FISH SAUSAGE BURGER YORKSHIRE PUDDING ROAST POTATOES BAKED POTATOES OVEN CHIPS RICE PASTA F...

Страница 2: ......

Страница 3: ...n 6 Energy Save Guide 6 Setting the Clock 7 Maff Heating Category 7 Microwave Power Levels 8 Microwaving Introduction 8 How to Operate the Oven 9 Microwave Defrosting 9 Convection Cooking 10 Preheating the oven 11 Grilling 11 Dual Cooking 12 Instant Cook 13 Instant Cook Chart 13 14 Auto Cook Auto Defrost 15 Auto Cook Chart 16 18 Auto Defrost Chart 18 Other Convenient Functions 19 23 Cooking Advice...

Страница 4: ...ACCESSORIES Check to make sure the following accessories are supplied 1 Turntable 2 Turntable support 3 Low Rack 4 High Rack Place the turntable support into the coupling in the centre of the oven floor ensuring you place it TOP side up TOP is engraved on one side It should be able to freely rotate around the coupling Place the turntable on to the turntable support NOTE When you order accessories ...

Страница 5: ...ator 5 MICROWAVE indicator 6 COOK indicator 7 LBS WEIGHT indicator 8 OZ WEIGHT indicator 9 DEFROST indicator 10 AUTO indicator 11 PERCENTAGE indicator 12 LESS MORE indicator 13 INFO indicator 14 TEMPERATURE indicator CONTROL PANEL 15 TIME keys Use to select cooking times 16 INSTANT COOK keys 17 AUTO COOK key 18 AUTO DEFROST key 19 INFO key for interactive display 20 WEIGHT key 21 LESS MORE keys Pr...

Страница 6: ...e oven and cause an electric shock If water or food drops inside the air vent openings switch off the oven immediately unplug it and call a Service Technician appointed by SHARP Never attempt to move the oven while it is operating Childcare Pacemaker If you have a heart pacemaker consult your doctor or the pacemaker manufacturer prior to oven use 1 Remove all packing materials including the featur...

Страница 7: ...fit an appropriate type observing To replace the mains plug on this page If you wish to remove or replace the plug supplied ensure the plug is removed properly and not cut off When replacing the plug please ensure that you use a BSI or ASTA approved plug to BS1363 this should be fitted with a brown coloured 13 amp fuse approved by BSI or ASTA to BS1362 If you have any doubt about electrical connec...

Страница 8: ... START AUTO MINUTE key once 1 Press the AUTO START CLOCK key once The energy save mode will be set and the display will show nothing 2 Press the AUTO START CLOCK key again The display will show The display will show x1 x1 Your oven has an Energy Save mode 1 Plug in the oven Nothing will appear in the display at this time 2 Open the door The display will flash the message shown opposite 3 Close the...

Страница 9: ...n the less heating time is required as shown opposite Your oven is fitted with a 12 hour clock To set the time of day follow the guidelines given in the example below EXAMPLE To set the time of day 12 35 5 Press the AUTO START CLOCK key again to set the clock 1 Press the AUTO START CLOCK key once Check the display 3 Press the AUTO START CLOCK key again 4 Enter the minutes by pressing the 10 MIN ke...

Страница 10: ... See SUITABLE COOKWARE page 24 25 100 HIGH 70 MEDIUM HIGH 50 MEDIUM 30 MEDIUM LOW 10 LOW x1 x2 x3 x4 x5 MICROWAVE POWER LEVELS To operate the microwave function Enter the required cooking defrosting time Select the power level by pressing the MICROWAVE POWER LEVEL key There are 5 microwave power levels see below Press START AUTO MINUTE key IMPORTANT The microwave power level will default to 100 HI...

Страница 11: ... times to select 10 3 Press the START AUTO MINUTE key once to start cooking Display will count down through heating time x5 x2 x1 WARNING NOTES Your oven can be programmed up to 99 minutes 90 seconds 99 90 When the door is opened during cooking the cooking time on the display stops The cooking time starts to count down again when the door is closed and the START AUTO MINUTE key is pressed When ove...

Страница 12: ...G Your oven can be used as a conventional oven using the convection facility The temperatures available in degrees Centigrade are 250 C 230 C 220 C 200 C 180 C 160 C 130 C 100 C 70 C 40 C NOTES CONVECTION cooking is ideal for cooking Victoria sandwich cakes buns biscuits scones and for proving bread at 40 C When using the CONVECTION facility all metal cookware can be used See SUITABLE COOKWARE pag...

Страница 13: ...rox 20 minutes 1 Enter the grilling time by pressing the 1MIN key 8 times 2 Press the GRILL key to select the grill mode 3 Press the START AUTO MINUTE key once to start grilling The display counts down through the grilling time EXAMPLE To grill for 8 minutes x1 x8 x1 EXAMPLE To preheat the oven to 130 C NOTES When the oven reaches the desired temperature the beep signal will sound and display the ...

Страница 14: ...acon or burgers Turn over halfway through cooking Food can be placed directly on the rack on a heat resistant plate or in a flan dish on the rack EXAMPLE For DUAL CONVECTION To cook for 20 minutes on DUAL CONVECTION 230 C combined with MICROWAVE POWER LEVEL 10 LOW 5 Press the START AUTO MINUTE key once to start cooking NOTES When browning or crisping foods in a casserole dish you may use the high ...

Страница 15: ...ed for cooking the foods shown opposite Always refer to the Instant Cook Chart before operating this function Press the selected key re press to select the correct weight and the programme will automatically start to cook after 2 3 seconds If food requires manipulation i e turn over or stir then open the door when the oven indicates follow the instruction close the door and press the START AUTO MI...

Страница 16: ... BAKED 2 4 6 potatoes Pierce each potato in several places place towards the edge of POTATOES each potato the turntable 250 g OVEN CHIPS 100 g 200 g Spread the chips evenly in a large flan dish and place on the 300 g 400 g high rack Turn over as oven indicates RICE PASTA 100 g 200 g Add 300 ml 1 2 pint boiling water per 100 g 4 oz rice Do 300 g not cover Stir when oven indicates Stand for 3 4 minu...

Страница 17: ...TION FUNCTION active see page 21 the weight range flashes on the display If you enter a weight below or above the range ERROR will flash on the display screen when you press the START key COOKING HINT Each setting of AUTO COOK AUTO DEFROST has a cooking hint If you wish to check press the INFO key whenever info is lit in the display x1 x1 You can enter weight in Lb oz or Kg g To convert to either ...

Страница 18: ... pork chops Place the chops on the high rack Turn over when the oven indicates After cooking stand wrapped in foil for 2 3 minutes Place in a single layer in a large flan dish on the high rack Turn over when oven indicates After cooking stand for 2 3 minutes before serving NOTE Use the MORE key for frozen crispy crumb foods Place either directly on the high rack After cooking stand for 2 3 minutes...

Страница 19: ...y through cooking Place in the center of the turntable Stir the food as the oven instructs for non stirrable foods such as lasagne the oven will not stop during cooking as it is not necessary to stir For food in bags turn over and manipulate contents when oven indicates STIR After cooking stand for 2 3 minutes before serving NOTE Use the MORE key for all non stirrable food eg lasagne It is not pos...

Страница 20: ...ghts of food not included in the AUTO COOK function please refer to the cooking charts in the Cookery Book 3 When using AUTO COOK for cakes use only the utensils recommended in the Cookery Book Do not use metal cooking utensils Please refer to the Cookery Book for the suitable recipes IMPORTANT NOTE FOR CHILLED READY MEALS FROZEN READY MEALS 1 These menus are suitable for savory microwave ready me...

Страница 21: ... HIGH for 2 minutes 1 Press the START AUTO MINUTE key twice 3 Press the START AUTO MINUTE key once to start cooking 2 Press the MICROWAVE POWER LEVEL key twice for 70 MEDIUM HIGH x2 x2 x1 The time can be extended or shortened at any stage during the 5 minutes EXAMPLE To cook on 70 MEDIUM HIGH for 5 minutes and then extend the cooking time by 1 minute during cooking 1 Enter the cooking time by pres...

Страница 22: ...er vegetables which are cooked but still crisp or beef which is rare use the LESS key Alternatively if you prefer vegetables softer or beef well done use the MORE key GUIDE FOR USE WITH INSTANT COOK AUTO COOK AUTO DEFROST Press the LESS or MORE key immediately before selecting the menu NOTE To cancel LESS or MORE simply press the same key again GUIDE FOR USE WITH MANUAL PROGRAMMES To alter cooking...

Страница 23: ...OK key twice to select Roast Pork x1 The message will be repeated twice and then the display will show the time of day if set If you want to cancel the guide press the STOP CLEAR key There are two options when you use the INFO key 1 Guide of Keys allows you to press a key to display information about it The information will be displayed twice The display will flash a series of messages 2 Guide on ...

Страница 24: ...to cancel an AUTO START programme press the STOP CLEAR key The auto start time can only be entered in multiples of 10 minutes it is not possible to enter less than 10 minutes or any time which is not in multiples of 10 minutes If the door is opened after programming close the door and press the START AUTO MINUTE key to continue with AUTO START Example Current time of day is 1 00pm and you want to ...

Страница 25: ...et the timer for 3 minutes to boil an egg on a conventional hob 1 When the water comes to the boil add the egg and press the TIMER key once 2 Press the 1 MIN key 3 times 3 Press the START AUTO key 3 times The timer will count down When the display reaches zero the beep signal will sound x3 x1 x3 6 TIMER 7 WEIGHT CONVERSION Use the Weight Conversion key to change the weight unit from kg to Lbs or v...

Страница 26: ...rst Only use utensils that are suitable for use in microwave ovens SUITABLE FOR MICROWAVING GRILL CONVEC DUAL TION COOKING YES YES YES Microwave cling film and bags must be vented for steam to escape pierce in 4 5 places Do not use plastic or metal ties as they may melt or catch fire due to arcing YES Except for dishes with metallic decoration YES Always attend the oven closely Look at the oven fr...

Страница 27: ...t heat stress Follow manufacturer s instructions Be careful as these become very hot Popcorn Only use microwave popcorn within recommended packaging follow popcorn manufacturer s instructions Never use oil unless the manufacturer recommends and never cook for longer than instructed NO YES NO Use small pieces of aluminium foil to shield food from overheating Keep foil at least 2cm from the oven wal...

Страница 28: ...food on the outside of the dish e g place meaty ends of chicken drumsticks on the outside of the dish Fish vegetables and certain other foods benefit from being covered during microwave cookery follow recommendations where given and use vented microwave cling film or a suitable lid Food size and shape affects the amount of cooking time needed When cooking more than one portion of the same food ens...

Страница 29: ...OTE Do not defrost poultry with giblets Place in a flan dish separate during defrosting and turn over at least 2 3 times Shield if necessary Place in a bowl stir or turn over at least 3 4 times during defrosting remove defrosted parts each time For frozen blocks of meat see Minced Beef in the charts in the cook book Place in a flan dish separate during defrosting and turn over at least twice Shiel...

Страница 30: ...ons on the can Plated meals Casseroles Poultry portions Sliced meat Pies Vegetables Remove any poultry or meat portions reheat these separately see below Place smaller items of food to the centre of the plate larger and thicker foods to the edge Cover with vented microwave cling film and reheat on 50 MEDIUM stir rearrange halfway through reheating Ensure food is thoroughly reheated before serving ...

Страница 31: ...e door Programme the oven on convection 180 C for 3 minutes and press the START AUTO MINUTE key Does the oven light come on YES NO Does the turntable rotate YES NO After 3 minutes is the oven cavity hot YES NO If you answer NO to any question first check that the oven is plugged in properly and the fuse has not blown If there is no fault with either contact the dealer from whom the oven was purcha...

Страница 32: ...usiness trade or profession Only use the microwave oven for cooking defrosting or reheating of food SHARP declines any liability for damages caused by improper use 3 This Guarantee does not cover any faults or defects caused by accident misuse fair wear and tear neglect tampering with the equipment or any attempt at adjustment or repair other than by a Service Technician Appointed by Sharp Please ...

Страница 33: ...tained in this publication to our best knowledge were correct at the time of going to print The right to change specifications at any time without notice is reserved as part of our policy of continuous development and improvement AC Line Voltage Single phase 230 240 V 50 Hz AC Power requried Microwave 1 55kW Convection 1 35kW Grill 2 5kW Convection Microwave 2 85kW Grill Microwave 2 75kW Output Po...

Страница 34: ...NOTES 32 ...

Страница 35: ......

Страница 36: ...SHARP ELECTRONICS U K LTD Manchester U K LoCall 0345 125387 PRINTED IN THE UK TINS A159URR0 ...

Отзывы: