background image

-88

Displaying Dual Pictures (

Pict in Pict

)

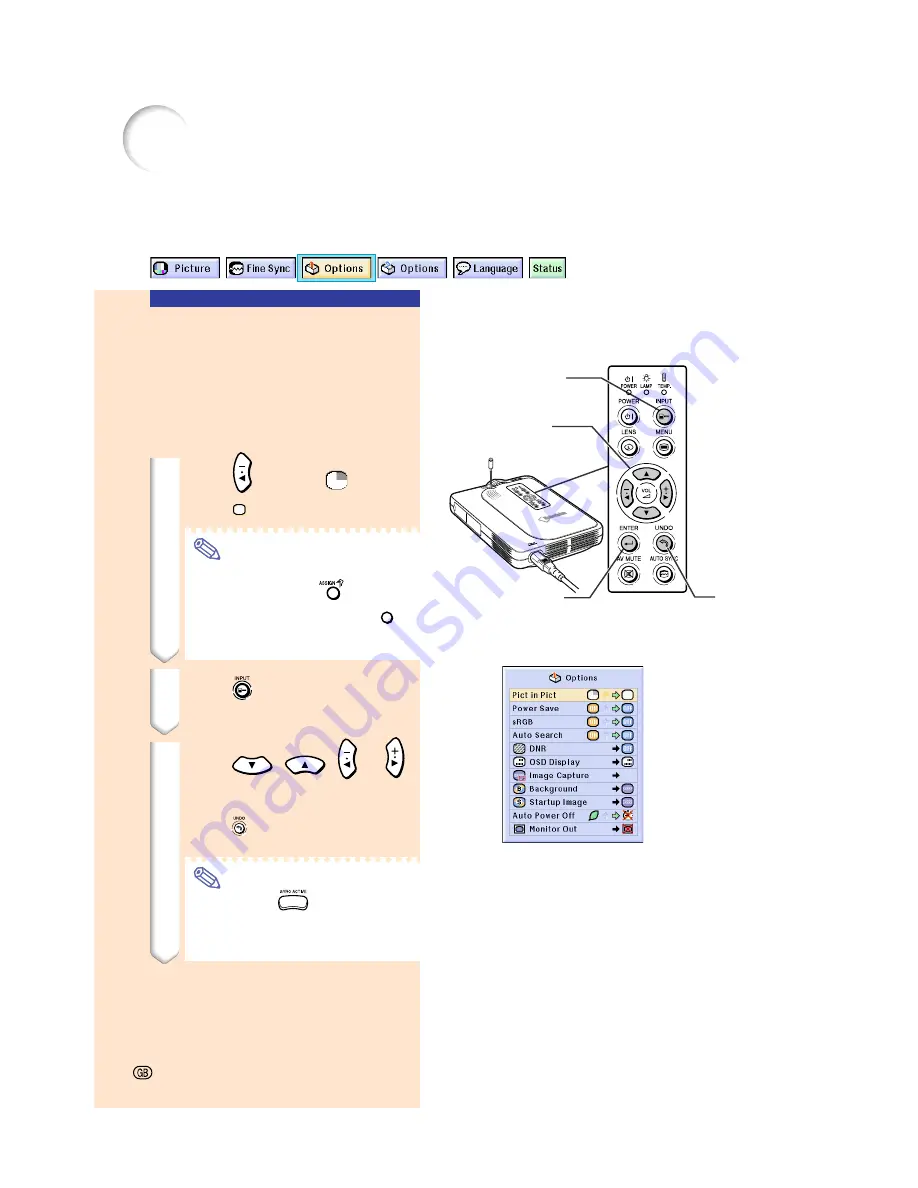
Picture in Picture function allows you to display two pictures on the same screen. You can
display the image input from INPUT 2 or 3 as an inset picture overlapping the main picture
from INPUT 1. (This function can only be set in the RGB menu.)

-88

Adjustment
buttons (

'"\ |

)

INPUT
button

Enter button

Displaying the Inset Picture

Select “Pict in Pict” in the “Options (1)”
menu on the menu screen. Make sure
to operate after signals have been en-
tered in INPUT 1, INPUT 2 and INPUT 3.

For operating the menu screen, see

pages 50 to 55

.

1

Press

 to select 

.

Select

 to clear the Pict in Pict mode

Note

When operating with the

GyroRemote, press 

 to display

“Button Assign 3/5” and press 

4

.

Pict in Pict does not function with
INPUT 4.

2

Press

 to change the image

in the inset picture.

3

Press

,

,

 or 

to set the position of the inset
picture.

Press

 to stop the frame from mov-

ing or to make the frame disappear.

Note

Hold down 

 and move the

GyroRemote in all directions, when
moving the position of the inset pic-
ture using the GyroRemote.

UNDO
button

Содержание Notevision PG-M25X

Страница 1: ...DIGITAL MULTIMEDIA PROJECTOR OPERATION MANUAL MODEL PG M25X Introduction Setup and Connections Basic Operation Easy to Use Functions Appendix ...

Страница 2: ...336 EEC og 73 23 EEC i endringen 93 68 EEC Tämä laite täyttää direktiivien 89 336 EEC ja 73 23 EEC vaatimukset joita on muutettu direktiivillä 93 68 EEC IMPORTANT For your assistance in reporting the loss or theft of your Projector please record the Serial Number located on the bottom of the projector and retain this information Before recycling the packaging please be sure that you have checked t...

Страница 3: ...tuguês Chinês e Coreano Leia cuidadosamente todas as instruções de operação antes de operar o projetor SPECIAL NOTE FOR USERS IN THE U K The mains lead of this product is fitted with a non rewireable moulded plug incorporating a 13A fuse Should the fuse need to be replaced a BSI or ASTA approved BS 1362 fuse marked or and of the same rating as above which is also indicated on the pin face of the p...

Страница 4: ...SPECIAL NOTE FOR USERS IN EUROPE ...

Страница 5: ...ended to alert the user to the presence of uninsulated dangerous voltage within the product s enclosure that may be of sufficient magnitude to constitute a risk or electric shock to persons The exclamation point within a triangle is intended to alert the user to the presence of important operating and maintenance servicing instructions in the literature accompanying the product Introduction ENGLIS...

Страница 6: ... ETEINDRE LA LAMPE AVANT DE PROCEDER A L ENTRETIEN LAMPE A MOYENNE PRESSION RISQUE D EXPLOSION DANGER POTENTIEL DE PARTICULES DE VERRE EN CAS D ECLATEMENT DE LA LAMPE A MANIPULER AVEC PRECAUTION SE REPORTER AU MODE D EMPLOI BEFORE REMOVING THE SCREW DISCONNECT POWER CORD HOT SURFACE INSIDE ALLOW 1 HOUR TO COOL BEFORE REPLACING THE LAMP REPLACE WITH SAME SHARP LAMP UNIT TYPE BQC PGM20X 1 ONLY UV RA...

Страница 7: ...hronous signals Using Advanced Compression Technology computer screens of UXGA 1 600 1 200 resolution can be displayed with minimal distortion 4 Advanced Computer Video lntegrated Composer Technology Realizes vivid images using the latest high image quality circuitry New I P conversion algorithm enhances the performance of the motion detect I P conversion Extensive improvements on the jagged edges...

Страница 8: ...ers via a wireless connection Effective presentations can now be achieved without having to reconnect data cables PC less presentations using a memory card Just by inserting an IC media a memory card such as CompactFlash in the projecter using a PCMCIA card Type II adapter you can make presentations or auto demonstrations without a computer Note For wireless presentations using the wireless LAN PC...

Страница 9: ...he Trapezoidal Distortion 38 Using the GyroRemote 40 Before Using the GyroRemote 40 Operating by Turning your Wrist Selecting OSD Menus Operating Presentation Tools 40 Function Assign 41 GyroRemote RF Channel Setting or Confirming 42 Registering the GyroRemote in the Projector 42 Registering Multiple GyroRemotes in One Projector 43 Using the Presentation Tools 44 Using the Pointer 44 Using the Sta...

Страница 10: ...88 Displaying the Inset Picture 88 Activating the sRGB Color Management Function 89 Setting the Color Management Function sRGB 89 Auto Search Function 90 Using Auto Search 90 Video Digital Noise Reduction DNR System 91 Reducing Image Noise 91 Setting On screen Display 92 Turning Off the On screen Display 92 Setting the Video Signal 93 Saving Projected Images 94 Capturing the Image 94 Deleting the ...

Страница 11: ...tion Concerning the Lamp 111 Replacing the Lamp 111 Removing and Installing the Lamp Unit 112 Resetting the Lamp Timer 113 Connecting Pin Assignments 114 Computer Compatibility Chart 115 Troubleshooting 116 For SHARP Assistance 118 Specifications 119 Wireless LAN PC Card Specifications 120 Usable Cards and Their Capacity 121 Dimensions 122 Glossary 123 Index 125 ...

Страница 12: ...cated on the marking label If you are not sure of the type of power supply to your home consult your product dealer or local power company For products intended to operate from battery power or other sources refer to the operating instructions 12 Grounding or Polarization This product is provided with one of the following types of plugs If the plug should fail to fit into the power outlet please c...

Страница 13: ... has been dropped or damaged in any way f When the product exhibits a distinct change in performance this indicates a need for service 19 Replacement Parts When replacement parts are required be sure the service technician has used replacement parts specified by the manufacturer or have the same characteristics as the original part Unauthorized substitutions may result in fire electric shock or ot...

Страница 14: ...ense To obtain such source code send email to embedix support lineo com OS Embedix Embedded Linux EmbedixTM is a registered trademark of U S A LINEO Inc DLP Digital Light Processing and DMD Digital Micromirror Device are trademarks of Texas Instru ments Inc Microsoft and Windows are registered trademarks of Microsoft Corporation in the United States and or other countries PC AT is a registered tra...

Страница 15: ...tor to hard impact and or vibration Take care with the lens so as not to hit or damage the surface of the lens Rest your eyes occasionally Continuously watching the screen for long hours will make your eyes tired Be sure to rest your eyes sometimes Avoid locations with high or low tem perature The operating temperature for the projector is from 41 F to 95 F 5 C to 35 C The storage temperature for ...

Страница 16: ...function If the projector starts to overheat due to setup prob lems or blockage of the air vents and will blink in the lower left corner of the picture If the temperature continues to rise the lamp will turn off the TEMPERATURE WARNING indicator on the projector will blink and after a 90 second cooling off period the power will shut off Refer to Maintenance Indicators on page 110 for details Info ...

Страница 17: ...ns on the screen For other operating systems Please download Acrobat Reader from the Internet http www adobe com For other languages If you prefer using Acrobat Reader for languages other than those included in the CD ROM please download the appropriate version from the Internet Accessing the PDF Manuals For Windows 1 Insert the CD ROM in the CD ROM drive 2 Double click the My Computer icon 3 Doub...

Страница 18: ...button For setting items selected or adjusted on the menu Adjustment buttons For selecting menu items LENS button For adjusting Keystone or Digital Shift setting POWER button Turns the power on or off POWER indicator Illuminates in red when the projector is in standby When the power is turned on this indicator will illuminate in green LAMP replacement indicator Illuminates in green normally Replac...

Страница 19: ... cap strap on the lens cap pass the other end of the strap through the hole under the projector next to the lens as shown in the illustration Bottom View INPUT 2 terminal Terminal for connecting video equipment with an S VIDEO terminal INPUT 1 terminal DVI Port for DVI digital analog RGB and COMPO NENT signals INPUT 3 terminal For connecting video equipment INPUT AUDIO terminal Shared audio termin...

Страница 20: ... 3 and Function 4 LED indicator Lights up when the GyroRemote is in motion POINTER button Holding this button down displays a pointer on the screen R CLICK UNDO button For undoing an operation or to perform a right click when using the wireless mouse MENU button For displaying adjustment and setting screens VOLUME buttons For adjusting the speaker sound level ASSIGN button Switches the button assi...

Страница 21: ... the batteries with new batteries as soon as possible when the LED indicator starts to blink Be sure to use alkaline batteries Note If GyroRemote is idle for five minutes it will go into sleep mode to conserve battery life Press ing any button will make GyroRemote up LED indicator The GyroRemote Incorrect use of the batteries may cause them to leak or explode Please follow the precautions below Ca...

Страница 22: ...e the projector is placed Caution Do not use the GyroRemote in restricted places such as hospitals Signals from the GyroRemote may affect electronic equipment or medical electronic equipment thereby causing accidents When using the GyroRemote in medical institutions make sure to follow the directives of each institution Multi Projector Control This projector has a GyroRemote identification functio...

Страница 23: ... GyroRemote to its normal condition Calibrating the GyroRemote If there are any extreme temperature changes when the GyroRemote is being used or after batteries have been replaced the mouse cursor or pointer may continue to move by itself even if no action has been performed In this case calibrate the GyroRemote using the following procedure 1 Press on the rear of the GyroRemote twice 2 Make sure ...

Страница 24: ...ccessories Supplied accessories DVI cable 9 10 3 0 m AN C3DV 3 RCA to 15 pin D sub cable 9 10 3 0 m AN C3CP Computer RGB cable 32 10 10 0 m AN C10BM for IBM PC PC9821 and PC98NX systems AN C10PC for PC98 systems Except PC9821 and PC98NX systems 5 BNC to 15 pin D sub cable 9 10 3 0 m AN C3BN RGB monitor loop out adaptor 7 9 20 cm AN A1MY DVI to 15 pin D sub adaptor 7 9 20 cm AN A1DV If your compute...

Страница 25: ...Setup and Connections Setup and Connections ...

Страница 26: ...eight and remove your hands from the foot releases 3 Rotate the adjustment feet to make minor changes Note When returning the projector to its origi nal position hold the projector firmly press the foot releases and then lower it The projector is adjustable up to approxi mately 5 5 degrees from the standard po sition Info Do not press the foot releases when the feet are extended without firmly hol...

Страница 27: ... making viewing difficult Close the curtains and dim the lights when setting up the screen in a sunny or bright room A polarizing screen cannot be used with this projector Standard Setup Front Projection Place the projector at the required distance from the screen according to the desired picture size See page 24 Side View Top View The distance from the screen to the projec tor may vary depending ...

Страница 28: ...TRETCH Mode 16 9 Picture Screen size Projection distance L Diag X Width Height Maximum L1 Minimum L2 250 635 cm 218 554 cm 123 312 cm 35 9 10 9 m 20 27 64 51 9 cm 225 572 cm 196 498 cm 110 279 cm 38 11 11 9 m 32 2 9 8 m 18 25 64 46 7 cm 200 508 cm 174 442 cm 98 249 cm 34 7 10 5 m 28 7 8 7 m 16 22 64 41 5 cm 150 381 cm 131 333 cm 74 188 cm 25 11 7 9 m 21 5 6 5 m 12 16 64 31 1 cm 133 338 cm 116 295 ...

Страница 29: ... Before mounting the projector contact your nearest Sharp Authorized Projector Dealer or Service Center to obtain the recommended ceiling mount bracket sold separately AN PGCM90 ceiling mount bracket its AN EP101B extension tube and AN JT200 universal bracket adaptor for non level ceiling installation for U S A BB M20T ceiling adaptor its BB NVHOLDER280 BB NVHOLDER550 BB NVHOLDER900 ceiling mount ...

Страница 30: ...e connected to A computer using A DVI to 15 pin D sub cable See page 27 A DVI cable type AN C3DV sold separately See page 28 A wireless LAN PC card See page 68 Component video or audio visual equipment A DVD player or DTV decoder See page 29 A VCR Laser disc player or other audio visual equipment See page 30 DTV is the umbrella term used to describe the new digital television system in the United ...

Страница 31: ...listed may cause some of the functions not to work When connecting the projector to a com puter in this way select RGB for Signal Type in the Picture menu See page 59 A Macintosh adaptor may be required for use with some Macintosh computers Con tact your nearest Sharp Authorized Projector Dealer or Service Center See page 118 Connecting the thumbscrew cables Connect the thumbscrew cable making sur...

Страница 32: ...om copy guard system compatible DVI version 2 0 equipment no signal will be received Plug and Play function when connecting to a 15 pin terminal This projector is compatible with VESA standard DDC 1 DDC 2B The projector and a VESA DDC compatible computer will communicate their setting requirements allowing for quick and easy setup Before using the Plug and Play function be sure to turn on the proj...

Страница 33: ... cables to con nect the projector and the video equipment 3 Connect the projector and the video equipment using a ø3 5 mm to RCA audio cable commercially available Note When connecting the projector to the video equipment in this way select Com ponent for Signal Type in the Picture menu See page 59 A ø3 5 mm stereo minijack to RCA audio cable commercially available is required for audio input Opti...

Страница 34: ...lable Note The S VIDEO INPUT terminal uses a video signal system in which the picture is separated into color and luminance sig nals to produce a higher quality image To achieve a higher quality image use a commercially available S VIDEO cable to connect the S VIDEO terminal on the pro jector and the S VIDEO output terminal on the video equipment A ø3 5 mm minijack to RCA audio cable commercially ...

Страница 35: ...s a wireless LAN card or memory card as shown on the right Info We recommend that you recess the Eject button before inserting the PC card This will prevent accidental ejection during operation The input mode will change automatically to INPUT 4 when the PC card has been inserted into INPUT 4 PC card slot Removing the PC Card 1 In the Card menu select Eject PC Card For details see page 68 2 Remove...

Страница 36: ... loop out adaptor sold separately and an RGB cable commercially available 2 In the Options 1 menu se lect Monitor Out and then Yes Y cable If Disable is selected the projected image will be dimmer This does not indicate a malfunction For details see page 96 Note When using an RGB monitor loop out adaptor sold separately make sure that the cable is connected to the monitor Analog RGB signals as wel...

Страница 37: ...Basic Operation Basic Operation ...

Страница 38: ...he projector or on the GyroRemote The POWER indicator illuminates in green After the LAMP REPLACEMENT indicator illuminates the projector is ready to start operation Note The LAMP REPLACEMENT indica tor illuminates indicating the status of the lamp Green The lamp is ready Green blinking The lamp is warming up Red blinking The lamp should be replaced soon Red The lamp should be replaced immediately...

Страница 39: ...pment that sends RGB signals or Component signals connected to the DVI DIGITAL ANALOG input port Used for projecting images from equipment connected to the S VIDEO input terminal Used for projecting images from equipment connected to the VIDEO input terminal When projecting from a wire less LAN PC card or a memory card INPUT 1 RGB Component INPUT 2 S Video INPUT 3 Video INPUT 4 PC Card INPUT 1 Mod...

Страница 40: ...he projector or on the GyroRemote When the confirmation screen is displayed press or once again Note If you accidentally pressed or and do not want to turn off the power wait until the confirma tion message disappears Info Do not unplug the power cord dur ing projection or cooling fan opera tion This can cause damage due to the rise in internal temperature as the cooling fan also stops When connec...

Страница 41: ...ations from the projector as example 1 Press The menu will be displayed 2 Press or to select Language 3 Press or to select the desired language and then press 4 Press The desired language will be set as the on screen display Adjusting the Lens The image is focused and adjusted to the desired size using the focus ring or zoom knob on the projector 1 The focus is adjusted by rotat ing the focus ring...

Страница 42: ...ressing again while the BORDER STRETCH or SMART STRETCH screen is displayed will start the Digital Shift function See page 39 You can also use on the GyroRemote 2 Press or to adjust the Keystone correction If you want to make more detailed cor rections press to display the test pattern and then press or to make the adjustments Adjustments can also be done using the or button on the GyroRemote Note...

Страница 43: ...ift function works with BORDER STRETCH or SMART STRETCH screen For details see page 83 Digital Shift Setting Note For easier viewing this function shifts the entire image projected on the screen up or down when projecting 16 9 images from DVD players and DTV decoders DTV is the umbrella term used to describe the new digital television system in the United States UNDO button Press to move the proje...

Страница 44: ... while holding it and performs the following operations 1 1 1 1 1Bright and easy to see screen pointer See page 44 2 2 2 2 2Operate the menu with a simple wave of the hand See pages 54 55 3 3 3 3 3Select the function assigned using the function buttons 1 4 by selecting the Button Assign Function from the 5 Button Assign Function groups Each press of toggles the 5 But ton Assign Function groups 4 4...

Страница 45: ...n the GyroRemote Each time you press the Button Assign selection changes as shown below 1 5 2 5 3 5 4 5 5 5 2 Press The Button Assign selection display disappears Function 1 button Function 2 button Function 3 button Function 4 button Function 1 button Function 2 button Function 3 button Function 4 button ASSIGN button UNDO button All Button Assign selections The list can also be displayed using A...

Страница 46: ...hannel by the number of times the LED indicator flashes Ex RF Channel 3 if the LED indicator flashes 3 times 2 Hold for more than 1 sec Each time you press for over 1 sec the RF channel changes as shown below The switched channel is displayed at the bottom right of the screen For U S Canada etc 1 2 3 4 5 6 7 8 For Europe Australia Oceania and Asia 1 2 3 4 Registering the GyroRemote in the Projecto...

Страница 47: ...s can be registered 1 Set the same channel for the RF channel of the GyroRemote you want to register For details on the setting see page 42 2 Using step 3 in Registering the GyroRemote in the Projec tor press on the GyroRemotes to be registered When registering other GyroRemotes continuously after each GyroRemote is registered and the Registration mode message is displayed proceed with the next Gy...

Страница 48: ... the Pointer 1 Hold the GyroRemote and move it while pressing The pointer moves in accordance with the GyroRemote s movements The pointer disappears when is released Note When operating the GyroRemote with multiple projectors the position of the pointer may be slightly off in each projector This does not indicate a malfunction Info Hold the GyroRemote and move it around freely in the air The point...

Страница 49: ...r The stamp color will change every time is pressed as shown on the right 4 Move the GyroRemote while holding down The stamp will move on the screen 5 Release at the location on the screen that you want to stamp and press The stamp will be fixed at that location Note If you want to display another stamp re peat steps 2 to 5 Press to delete a stamp just inserted Press to clear all stamps Even if th...

Страница 50: ...ve the cursor to the starting position while holding down on the GyroRemote Note If you want to display another stamp repeat steps 2 to 4 5 Release on the Gyro Re mote and press 6 Move the cursor to the ending position while holding down on the GyroRemote and press Note If you want to draw another shape or line repeat steps 2 to 6 Press to clear any shapes or horizontal or vertical lines you have ...

Страница 51: ...crosoft Windows OS and Mac OS However this function does not work with the following operating systems that do not support USB Versions earlier than Windows 95 Versions earlier than Windows NT 4 0 Versions earlier than Mac OS 8 5 2 Move the GyroRemote while holding down The LED indicator is lit 3 Press or It functions the same as the buttons of a mouse connected to the com puter In the case of one...

Страница 52: ...emote control cable To use it again press to reactivate When purchasing a ø2 5 to ø3 5 mm wired remote cable please contact Sharp Au thorized Projector Dealer or Service Cen ter Using the Wireless Mouse Function of the GyroRemote Cont 48 ø2 5 to ø3 5 remote control cable available as Sharp service part QCNW 5943CEZZ ø3 5 minijack cable commercially available or available as Sharp service part QCNW...

Страница 53: ...cated in side the lower cover on the GyroRemote at the same time for more than 2 seconds The LED Indicator will flash 3 times and the GyroRemote will turn off Any buttons pressed after excluding will not emit signals 2 Press on the GyroRemote to turn on the GyroRemote Note GyroRemote Sleep Function To avoid battery consumption the GyroRemote automatically enters the Sleep mode if not action takes ...

Страница 54: ... menu for INPUT 2 or INPUT 3 Mode Menu Bar Main Menu MENU button Menu Screen Menu Selections on the Projector Adjustments 1 Press The menu screen is displayed Note The Picture menu screen is displayed in inputs 1 2 and 3 and the Card menu screen is displayed in INPUT 4 mode The on screen display shown on the right is displayed when the INPUT 1 mode is selected On screen menu for INPUT 4 RGB mode E...

Страница 55: ...or to select the item you want to adjust Note To display a single adjustment item press after selecting the item Only the menu bar and the selected adjustment item will be displayed Then if you press or the following item Phase is after Clock will be displayed Press to return to the previous screen 4 Press or to adjust set the item selected The adjustment is stored 5 Press The on screen display is...

Страница 56: ...ed in INPUT 4 mode The on screen display shown on the right is displayed when the INPUT 1 mode is selected 2 Press or to select the menu you want to adjust Note For details on the menus see the tree charts on pages 56 and 58 When using the GyroRemote to move through a menu see page 55 3 Press or to select theitem you want to set Note Press to return to the previous screen In some menus select the ...

Страница 57: ... the setting of the item displayed in the sub menu 6 Press The item selected is set and the ad justment is stored Note Some adjustment items will display a confirmation message When setting an item press or to select Yes or OK and then press 7 Press The menu will disappear Sub menu ...

Страница 58: ...roRemote left and right to select the menu Note The GyroRemote will not function if is not held down If is pressed twice the GYRO ACTIVE function will remain active without having to hold down The LED indicator will remain lit If is pressed again the GYRO ACTIVE function will be released and the LED indicator will turn off You can select the menu by press ing while the menu bar is displayed 2 2 2 ...

Страница 59: ... GYRO ACTIVE function will remain active without having to hold down The LED indicator will remain lit If is pressed again the GYRO ACTIVE function will be released and the LED indicator will turn off You can select the menu by press ing while the menu bar is displayed 2 2 2 2 2 While holding down move the GyroRemote up or down to select an item 3 3 3 3 3 While holding down move the GyroRemote to ...

Страница 60: ...en All Reset in Options 2 has been selected For details see page 105 Picture Page 59 Contrast Bright Color Tint Sharp Red Blue CLR Temp Reset Signal Type Progressive Mode Fine Sync Clock Phase H Pos V Pos Reset Save Setting Select Setting Special Modes Signal Info Auto Sync Auto Sync Disp ON OFF RGB Component 2D Progressive 3D Progressive Film Mode Resolution Vert Freq Resolution Vert Freq Resolut...

Страница 61: ...tup Image Auto Power Off ON OFF 2D Progressive 3D Progressive Film Mode OFF Level 1 Level 3 Normal Level A Level B Auto PAL 50 60Hz SECAM NTSC4 43 NTSC3 58 PAL M PAL N Sharp Custom Blue None Sharp Custom None Options 2 Lamp Timer Break Timer PRJ Mode Keylock Level Password Anti Theft All Reset Front Ceiling Front Rear Ceiling Rear Normal Level A Level B Old Password New Password Reconfirm Old Code...

Страница 62: ...ec 300 sec Network Page 69 Projector TCP IP Wireless LAN DHCP Server Reset Name IP Address Gateway Subnet Mask Channel SSID Server Start Address Max Lease Options 1 Page 87 Power Save sRGB Auto Search OSD Display Image Capture Background Startup Image Auto Power off Normal Level A Level B Save Image Delete Sharp Custom Blue None Sharp Custom None Page 96 Break Timer PRJ Mode Register R C Keylock L...

Страница 63: ... Skin tones become greenish For more sharpness For stronger red For stronger blue Increases color temperature for cooler bluish fluorescent like images Adjusting Image Preferences Adjust the Picture menu on the menu screen For operating the menu screen see pages 50 to 55 Note Color Tint and Sharp are not dis played when selecting INPUT 1 and the Signal Type is RGB The picture adjustments can be st...

Страница 64: ...sformed with three two pull down NTSC and PAL60Hz or two two pull down PAL50Hz and SECAM enhancement to progressive mode images The film source is a digital video recording with the original encoded as is at 24 frames second The projector can convert this film source to progressive video at 60 frames second with NTSC and PAL60Hz or at 50 frames second with PAL50Hz and SECAM to play back a high def...

Страница 65: ...c menu on the menu screen For operating the menu screen see pages 50 to 55 Note Computer image adjustments can be made easily by pressing See page 63 for de tails Saving Adjustment Settings This projector allows you to store up to seven adjustment settings for use with various com puters Select Save Setting in the Fine Sync menu on the menu screen For operating the menu screen see pages 50 to 55 S...

Страница 66: ...ted and the correct resolution mode is automati cally selected However for some signals the optimal resolution mode in Special Modes on the Fine Sync menu screen may need to be selected to match the computer display mode Set the resolution by selecting Special Modes in the Fine Sync menu on the menu screen For operating the menu screen see pages 50 to 55 Note Avoid displaying computer patterns whi...

Страница 67: ...he projector is turned on or when the inputs are switched when connected to a com puter Normal executes Auto Sync more accurately compared to High Speed Therefore Auto Sync may take slightly longer time Manual adjustments should be per formed When the optimum image cannot be achieved with Auto Sync adjustment See page 61 Auto Sync adjustment may take some time to complete depending on the im age o...

Страница 68: ...ed during Auto Sync Select Auto Sync Disp in the Fine Sync menu on the menu screen For operating the menu screen see pages 50 to 55 The image set as a background image is projected The computer image being adjusted is dis played 64 Adjusting Computer Images cont ...

Страница 69: ...Easy to Use Functions Easy to Use Functions ...

Страница 70: ...ified and thus a wireless connection cannot be possible 192 168 150 150 192 168 150 153 192 168 150 154 192 168 150 151 192 168 150 152 Assigning IP addresses When creating a local network where the projector and a computer are connected in a wireless environment 192 168 0 1 to 192 168 255 254 can be assigned as the IP addresses for a local network for the devices connected to that network The IP ...

Страница 71: ...ximum number to be assigned For settings see page 73 Note DHCP stands for Dynamic Host Configuration Protocol Wireless Channels What is a wireless channel A wireless channel is a frequency used by wireless LAN PC cards when communicating For IEEE802 11b standard 14 channels can be used If other wireless LAN networks are being used near the location where the projector is make sure that different c...

Страница 72: ...ry card in the projector Installation should be done after Standby is displayed in the lower right corner of the screen Ejecting the Card Make sure to perform the following pro cedures before removing the card Se lect Eject PC Card in the Card menu on the menu screen For operating the menu screen see pages 50 to 55 1 Select EjectPCCard andpress Afterafewseconds themessage Youmay safely eject the P...

Страница 73: ...ng is MY_PROJECTOR The projector name is displayed when the projector has been found via the computer and you can set the name as you like When selecting Projector in the net work menu on the menu screen For operating the menu screen see pages 50 to 55 1 Press or to select Projector and then press Note If a password has been set the password input box will be displayed when selecting the Projector...

Страница 74: ...r the remaining characters you want Note A maximum of 16 characters can be entered 6 Press The settings are stored and active Setting the TCP IP Set the IP Address Gateway Subnet Mask of the projector Set TCP IP in the network menu on the menu screen For operating the menu screen see pages 50 to 55 1 Press or to select TCP IP and then press Note If a password has been set the password input box wi...

Страница 75: ...less channel Select Wireless LAN in the network menu on the menu screen For operating the menu screen see pages 50 to 55 1 Press or to select WirelessLAN andthepress Note If a password has been set the password input box will be displayed when selecting Wireless LAN 2 Press or to select Channel and then press 3 Press or to select the wireless channel number you want to set Note Depending on the co...

Страница 76: ...ers can be entered following Letters A to Z numerical 0 to 9 symbols _ Pressing or switches between procedures as shown below If you want to delete one character to the left select BS and press 4 Press You can also move the cursor using on the GyroRemote Note If you want to correct a letter or symbol press or to move the cursor to the character you want to correct and then use or to correct the ch...

Страница 77: ...0 Assigning a maximum number of IP addresses This function is for setting the maximum number of IP addresses from the start address that can be automatically assigned Make sure to set an approximate amount of the computers that are to be connected to the wireless LAN You can set anywhere between 1 to 253 computers Note IP addresses will not be assigned if the last three digits of their number are ...

Страница 78: ...P Server on the projector is ON Check the values of the IP address subnet mask and DHCP start address of the projector If part of the IP address or DHCP start address is not identical to the ones specified in the subnet mask IP address assigning cannot be properly done 4 When sending the screen to the projector make sure to turn on the projector first When Standby is displayed on the screen turn o...

Страница 79: ...play format of the Index mode see pages 76 and 77 For details on how to install the wireless LAN PC card in the projector see page 68 The following are the files that this projec tor can handle Non compressed Bitmap BMP JPEG files JPEG JPG Non compressed TIFF files TIFF TIF VQ files VQ Script files SSF The file names will be displayed in 8 characters with their extensions 3 characters Ejecting the...

Страница 80: ...ther files except images will be displayed only as file names Other file names except for folders image files and script files will be displayed in gray The folders are displayed in The file names will be displayed in 8 char acters with their extensions 3 characters If the file name or folder name is com posed of other than letters or numbers will be displayed Note JPEG thumnail images are display...

Страница 81: ...ode Setting Lists You can display files in lists For list settings see page 79 Moving folders Press or to select the folder and press Moving the folder up one level Select and press Changing the page displayed Select or and press Projecting a file Press or to select the image file and press The selected image is displayed If you press while the image is displayed the submenu is displayed Next Proc...

Страница 82: ...mages files and folders are displayed The types of images files that can be displayed are as follows JPEG VQ TIFF BMP Script File SSF Only slide show script files and folders are displayed Setting the Display Order of Files You can set the display order of files displayed in the Index mode Select Sort in the Memory Card menu on the menu screen For operating the menu screen see pages 50 to 55 Name ...

Страница 83: ...unction Script File When the script files which are created by Slide Manager of the Wireless Reality included with your projector are stored in the memory card the Autorun will au tomatically load the script files and then projects the image files in order accord ing to the script files The display interval between images is regulated in the script file Only one file can have Autorun setting per m...

Страница 84: ...revious Moves back one page Index Mode Quits automatic display of images The screen returns to Index mode Info If the following operations are executed during Autorun Autorun will stop AV MUTE Break Timer INPUT LENS Pressing to select the Index mode Note During Slide Show playback the OSD message Please wait will appear be tween slides This message can be elimi nated by selecting Level A or Level ...

Страница 85: ... to explain the image to the audience Function 2 button On screen Display ASSIGN button Pausing an image 1 Press to display Button Assign 2 5 The Assign function is displayed at the bottom right of the screen 2 Press The image currently being projected becomes a still image 3 Press again to return to the moving image from the cur rently connected device Info The Still Image function does not work ...

Страница 86: ...on Switching the Picture Display Using Different Input Signals 1 Press to display Button Assign 4 5 The Assign function is displayed at the bottom right of the screen 2 Press Info In the DOT BY DOT mode images are diplayed with the original resolution therefore they are not enlarged When XGA 1024 768 signals have been entered or when using INPUT 4 Mode they will be fixed as NORMAL STRETCH is fixed...

Страница 87: ...e 4 3 aspect ratio Input Signal Output screen image XGA Resolution higher than XGA 480I 480P NTSC PAL SECAM 4 3 aspect ratio Input Signal Output screen image 720P 1080I Letter box Squeeze 16 9 aspect ratio COMPUTER VIDEO When XGA 1024 x 768 signals have been entered or when using INPUT 4 Mode they will be fixed as NORMAL STRETCH is fixed when 720P or 1080I signals are entered The Digital Shift fun...

Страница 88: ...creen moving indicator Displaying an Enlarged Portion of an Image 1 Press to display Button Assign 3 5 The Assign function is displayed at the bottom right of the screen 2 Press to enlarge the im age To reduce the size of the enlarged image press Note 1 4 9 16 36 64 2 3 To enlarge To reduce When an SXGA or UXGA see page 115 image is displayed 2 and 3 cannot be selected Selecting the Picture Displa...

Страница 89: ...to Normal If Level A or Level B is set the Screen moving indicator will not be displayed and the Screen Pan cannot be performed Note You can also move the position of the enlarged image using or or on the projector 4 Press to cancel the opera tion then the magnification returns to 1 Note In the following cases the enlarged image will return to its original size 1 When switching the input When undo...

Страница 90: ...aying images in a bright room this feature makes the dark scenes easier to see and gives the impression of greater depth in the image ASSIGN button UNDO button STANDARD GAME PRESENTATION CINEMA Function 1 button INPUT mode INPUT signal GAMMA mode INPUT1 RGB PRESENTATION Component CINEMA INPUT2 S Video STANDARD INPUT3 Video STANDARD INPUT4 PRESENTATION Adjusting Gamma Correction 1 Press to display ...

Страница 91: ...FF When setting the power save mode to ON the projected images become dark Automatic Power Shutoff Function If this is set to On and no action is per formed for more than 15 minutes and in the following cases the power will turn automati cally off When selecting INPUT 1 to 3 If the input signal cannot be detected When selecting INPUT 4 If there is no card The Auto Power Off function will be disabl...

Страница 92: ...ke sure to operate after signals have been en tered in INPUT 1 INPUT 2 and INPUT 3 For operating the menu screen see pages 50 to 55 1 Press to select Select to clear the Pict in Pict mode Note When operating with the GyroRemote press to display Button Assign 3 5 and press 4 Pict in Pict does not function with INPUT 4 2 Press to change the image in the inset picture 3 Press or to set the position o...

Страница 93: ... is set to DOT BY DOT When no signals are sent to INPUT 1 or when the resolution or refresh rate vertical frequency is changed You can use on the GyroRemote or on the projector to change the inset picture Activating the sRGB Color Management Function Setting the Color Manage ment Function sRGB Select sRGB in the Options 1 menu on the menu screen For operating the menu screen see pages 50 to 55 Not...

Страница 94: ...or When the Auto Search function has been set to ON select any desired input using the Button Assignment of the GyroRemote OFF For switching input modes manually in order by pressing on the projector To stop searching for the input mode press on the projector or on the GyroRemote Auto Search Function This function automatically searches for and switches to the input mode in which signals are being...

Страница 95: ...t DNR to OFF in the fol lowing cases When the image is blurry When the contours and colors of moving images drag When TV broadcasts with weak signals are projected Info Make sure to set when signals have been input into INPUT 2 or INPUT 3 This function is available with INPUT 1 480I and 480P signals and INPUT 2 3 all signals Video Digital Noise Reduction DNR provides high quality images with minim...

Страница 96: ...f the On screen Display Select OSD Display in the Options 1 menu For operating the menu screen see pages 50 to 55 Note The following messages will be displayed regardless of OSD Display level Standby when a wireles LAN PC card is installed in the INPUT 4 PC card slot Please wait when a PC card is installed or when receiving and reading in files from a memory card This function allows you to turn o...

Страница 97: ...splayed in PAL even if PAL N or PAL M input signals are received When connected to PAL video equipment When connected to SECAM video equipment When reproducing NTSC signals in PAL video equipment When connected to NTSC video equipment PAL SECAM NTSC4 43 NTSC3 58 The video input system mode is preset to Auto however a clear picture from the con nected audio visual equipment may not be received depe...

Страница 98: ...operating the menu screen see pages 50 to 55 1 Press or to select Save Image and press The projected image is captured It may take some time for capturing 2 1 1 1 1 1 Press or to select Yes 2 2 2 2 2 Press Note The following images can be captured XGA 1024 768 non interlace signals in INPUT 1 XGA 1024 768 image files in memory card in INPUT 4 XGA 1024 768 images received using the wireless LAN PC ...

Страница 99: ...stom image is preset as a black screen Selected Item Sharp Custom 1 Blue None Description SHARP default image User customized image i e company logo Blue screen Black screen 2 95 Selecting a Startup Image This function allows you to specify the image to be displayed upon the projector s startup You can set a captured image as a startup image by selecting Custom Selected Item Sharp Custom None Desc...

Страница 100: ...the setting is not correct the image may be dark too bright or whitish This does not indicate malfunction Make sure to set to Yes Y Cable when using the RGB monitor loop out adaptor sold separately Using an RGB Monitor Loop out Adaptor Confirming the Lamp Usage Time This function allows you to check the lamp us age time Select Options 2 menu on the menu screen to see the lamp usage time For operat...

Страница 101: ...60 minutes in 1 minute units To Cancel the Break Time 1 Press on the projector or press on the GyroRemote Note Set the Break time using the GyroRemote see page 41 Auto Power Off will be temporarily dis abled during the Break Timer If no signal transmission occurs for more than 15 minutes after the BreakTimer has completed the projector will turn off The Break Timer will be displayed on the startup...

Страница 102: ...on Normal image Inverted image Reversed image Reversed and inverted image Front Ceiling Front Rear Ceiling Rear Setting the Projection Mode Select PRJ Mode in the Options 2 menu on the menu screen For operating the menu screen see pages 50 to 55 Note If a password has been set the password input box will be displayed when select ing the PRJ Mode This function is used for the reversed im age and ce...

Страница 103: ...eylock Level Canceling the Keylock Setting When the Keylock Level is set to Normal all buttons are functional Select Keylock Level in the Options 2 menu and set Normal on the menu screen For operating the menu screen using the GyroRemote see pages 54 and 55 Note When a password has been set and Keylock Level is selected the password input box will be displayed If both a password and the Keylock Le...

Страница 104: ...ering the Password Select Password in the Options 2 menu on the menu screen For operating the menu screen see pages 50 to 55 1 Press or to select the desired number and then press 2 Enter the 3 remaining digits and press 3 Enter the password again in Reconfirm and press Note When a password is set you need to enter the password to change PRJ Mode Keylock Level Anti Theft Register R C and All Re se...

Страница 105: ... Old Password and press 2 Press and to set the new password and press 3 Enter the new 4 digit password again in Reconfirm and press Note If you do not want to set a password leave the fields in procedures 2 and 3 blank and press To cancel the password settings press If You Forget Your Password If you forget the password delete it and set a new password using the following procedure 1 Press ...

Страница 106: ...as key codes Both on the projector and GyroRemote POWER button ENTER button UNDO button MENU button GyroRemote GYRO ACTIVE button POINTER button L CLICK ENTER button R CLICK UNDO button MENU button TEACH button RF CH button The anti theft function prevents unauthorized use of the projector You can choose to use this function or not If you do not want to use this function just do not enter the keyc...

Страница 107: ... keycode We sug gest you record the keycode in a safe place where only authorized users will have access If you lose or forget your keycode you will need to contact your nearest Sharp Authorized Projector Dealer or Service Center see page 118 You may need to bring your projector to them to restore the projector to original factory condition password and keycode reset If the Anti theft function is ...

Страница 108: ...ft in the Options 2 menu on the menu screen For operating the menu screen see pages 50 to 55 1 Enter the preset 4 digit keycode in Old Code using the buttons on the GyroRemote or on the projector 2 Press any button you like on the GyroRemote or the projector to enter the new keycode 3 Enter the same 4 digit keycode in Reconfirm Note If you do not want to set a keycode leave the keycode field blank...

Страница 109: ...ttings Select All Reset in the Options 2 menu on the menu screen For operating the menu screen see pages 50 to 55 Note If a password has been set the pass word input box will be displayed when selecting All Reset The following items cannot be initialized Fine Sync Special Modes Signal Info Options 2 Lamp Timer Anti Theft Language Image stored using Image Capture ...

Страница 110: ...ll the adjusted settings as a list on the screen Displaying the Adjustment Settings Overview of All Menu Settings Select the Status menu and press on the menu screen For operating the menu screen see pages 50 to 55 106 Display example of INPUT 1 ...

Страница 111: ...Appendix Appendix ...

Страница 112: ...placing it in the case Make sure that the GyroRemote antenna is fully retracted Make sure that the Eject button is fully inserted Make sure to turn the off the GyroRemote Info This carrying case is only for storing and carrying the projector Shipping the projector in the carrying case as a par cel may cause damage to the projector If you ship the projector be sure to place it in a sturdy case and ...

Страница 113: ...eration panel is made of plastic Avoid using benzene or thinner as these can damage the finish on the cabinet Do not use volatile agents such as insecticides on the projector Do not attach rubber or plastic items on the pro jector for long time The effects of some of the agents in the plastic may cause damage to the quality or finish of the projector Wipe off dirt gently with a soft flannel cloth ...

Страница 114: ... problem occurs either the TEMPERATURE WARNING indicator or the LAMP REPLACEMENT indicator will illuminate red and the power will turn off After the power has been turned off follow the procedures given below About the LAMP REPLACEMENT indicator When the lamp exceeds 1 900 cumulative hours of use will be displayed on the screen in yellow When the cumulative hours of use reach 2 000 will change to ...

Страница 115: ...illuminated or flash it is recommended that the lamp be replaced with a new one immediately even if the lamp appears to be operating normally Should the lamp break the glass particles may spread inside the lamp cage or gas contained in the lamp may be vented into the room from the exhaust vent Because the gas in this lamp includes mercury ventilate the room well if the lamp breaks and avoid all ex...

Страница 116: ...manual included with the lamp unit 1 Press on the projector to turn off the power Wait until the cooling fan stops Warning Do not remove the lamp unit from the projector right after use The lamp will be very hot and may cause burn or injury 2 Disconnect the power cord Unplug the power cord from the AC socket Retract the antenna Leave the lamp until it has fully cooled down about 1 hour 3 Remove th...

Страница 117: ...ew Info If the lamp unit and lamp unit cover are not correctly installed the power will not turn on even if the power cord is connected to the projector Resetting the Lamp Timer Reset the lamp timer after replacing the lamp 1 Connect the power cord Plug the power cord into the AC socket of the projector 2 Reset the lamp timer While pressing simultaneously and on the projec tor press on the project...

Страница 118: ...connected 20 Not connected 6 DDC clock 21 Not connected 7 DDC data 22 Not connected 8 Vertical sync 23 Not connected 9 Not connected 24 Not connected 10 Not connected C1 Analog input Red 11 Not connected C2 Analog input Green 12 Not connected C3 Analog input Blue 13 Not connected C4 Horizontal sync 14 5V power C5 Ground 15 Ground DVI Analog Component Input Pin No Signal Pin No Signal 1 Not connect...

Страница 119: ...80 800 600 1 024 768 31 5 37 9 27 0 31 5 27 0 31 5 37 9 27 0 31 5 37 9 26 2 31 5 34 7 37 9 37 5 43 3 47 9 53 0 61 8 78 5 80 9 100 4 31 4 35 1 37 9 44 5 48 1 46 9 53 7 56 8 64 0 77 2 98 3 102 1 125 6 70 85 60 70 60 70 85 60 70 85 60 70 72 75 85 90 100 120 160 200 50 56 60 70 72 75 85 90 100 120 150 160 200 PC XGA SVGA VGA 50 150 35 5 40 3 48 4 56 5 58 1 60 0 68 7 73 5 77 2 80 6 98 8 113 2 43 50 60 ...

Страница 120: ...n the computer The DNR Digital Noise Reduction setting is not correct Cables incorrectly connected to side panel of projector Volume is set to minimum If the picture is normal the sound is due to cabinet shrinkage caused by a room temperature changes This will not affect operation or performance See Maintenance Indicators The signal in INPUT 1 is not an analog RGB Digital RGB XGA 1024 768 signal I...

Страница 121: ...d Make sure that the Link indicator on the wireless LAN PC card is lit Is the card installed in the projector compatible with the projector Is the wireless LAN PC card installed in the projector different from the wireless LAN PC card AN WC11B included with the projector or sold separately The LAMP REPLACEMENT indicator is blinking in red Replace the lamp Monitor Out is set to Disable when the RGB...

Страница 122: ...rp fr Spain Sharp Electronica Espana S A 93 5819700 sharplcd sees sharp eu com http www sharp es Switzerland Sharp Electronics Schweiz AG 0041 1 846 63 11 cattaneo sez sharp eu com http www sharp ch Sweden Sharp Electronics Nordic AB 46 8 6343600 vision support sen sharp eu com http www sharp se Austria Sharp Electronics Austria Ges m b H 0043 1 727 19 123 pogats sea sharp eu com http www sharp at...

Страница 123: ...cage module BQC PGM20X 1 GyroRemote for U S Canada etc RRMCG1631CESA GyroRemote for Europe Australia Oceania and Asia RRMCG1653CESA Four R 03 batteries AAA size UM SUM 4 HP 16 or similar Power cord for U S Canada etc QACCDA007WJPZ Power cord for Europe except U K QACCV4002CEZZ Power cord for U K and Hong Kong QACCB5024CENA Power cord for Australia New Zealand and Oceania QACCL3022CEZZ DVI to 15 pi...

Страница 124: ...00 mA Spreading DS SS Direct Sequence Spread Spectrum Data rate 11 Mbps 5 5 Mbps 2 Mbps 1 Mbps Auto Switch Transmit Power 10 dBm Normal Temp Range 13 dBm Max Modulation 11 Mbps and 5 5 Mbps CCK 2 Mbps DQPSK 1 Mbps DBPSK Security WEP 64 bit 128 bit not compatible with the projector Standards IEEE802 11b Media Access Protocol CSMA CA with ACK Environmental Conditions Temperature Range 32 to 131 F 0 ...

Страница 125: ...64MB can be used Smart media under 128MB can be used Each memory card requires a suitable PC Card Adapter Caution 1 Operation cannot be guaranteed for other memory cards except for those mentioned above 2 PC Card Adapters may have special regulations according to the memory cards For details see the PC Card Adapter s operation manual 3 In some cases part of images edited on your computer may not b...

Страница 126: ... 1 2 38 7 27 1 16 68 7 1 3 8 34 2 3 1 4 82 9 5 15 16 151 6 When the antenna is pulled out 3 76 10 5 16 261 5 4 1 8 104 3 1 8 80 5 16 7 5 12 1 16 306 5 8 5 8 219 5 1 16 128 4 9 16 115 5 8 3 4 223 7 11 16 195 2 3 8 60 1 1 2 37 5 2 3 16 55 5 3 1 4 82 5 54 54 Units inches mm Dimensions ...

Страница 127: ...log interfaces Freeze Temporarily freezes a moving image GAMMA Image quality enhancement function that offers a richer image by brightening the darker portions of the image without altering the brightness of the brighter portions You can select four different modes STANDARD PRESENTATION CINEMA and GAME Gateway Device which reays transmissions between dif ferent networks IEEE802 11b One of the inte...

Страница 128: ...tifying Groups of devices connected to a wireless LAN Wireless data transmissions can be done only with devices that carry the same SS ID group name You can set any desirable SS ID using a combination of alphanumeric characters or symbols max 32 characters Startup Image The image displayed when the projector is turned on Status function Displays the settings of each adjustment item Stretch Mode th...

Страница 129: ...79 INPUT AUDIO terminal 15 INPUT 1 terminal 15 INPUT 1 4 modes 35 INPUT 2 terminal 15 INPUT 3 terminal 15 INPUT 4 PC card slot 15 INPUT button 14 Interval 80 IP Address 66 Kensington Security Standard connector 15 Keylock level 99 Keystone correction adjustment 38 Lamp 111 LAMP REPLACEMENT indicator 110 Lamp Timer 113 Language selection 37 L CLICK ENTER button 16 LED indicator 42 Lens adjustment 3...

Страница 130: ...ask 70 Supplied accessories 20 TEACH OK button 16 TEMPERATURE WARNING indicator 110 Terminal cover 32 TCP IP 70 Thumbnails display 79 UNDO button 14 USB cable 47 USB port 15 View 79 Video System 93 VOLUME buttons 14 Wireless channel 67 Wireless LAN 71 Wireless LAN PC card 68 Wireless Mouse 47 Wired remote terminal 16 Zoom knob 14 Index cont ...

Страница 131: ...SHARP CORPORATION ...

Отзывы: